Testors 1/32 Salt Flats Racer " Turbo-Go"
| KIT #: | 863004 |
| PRICE: | $4.25 MSRP |
| DECALS: | None |
| REVIEWER: | Scott Van Aken |
| NOTES: | This little jewel is from 1961! |
| BACKGROUND |
Please visit the preview for more information on the kit and a look in the box.
| CONSTRUCTION |
I can tell you that this one isn't going to be getting complaints about too many parts or fiddly bits. This is about as basic a kit as one can find. Not only that, but is seems to be a bit more 'flexy' than the standard styrene plastic. I'm thinking that it could be made of ABS. However, I had no trouble gluing it with Ambroid Pro-Weld and filler seemed to stick to it OK.
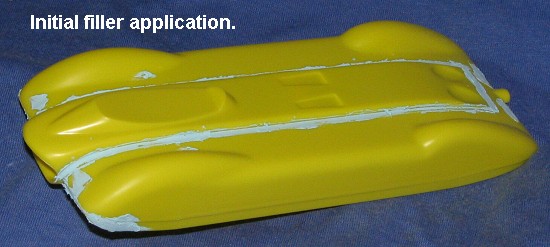 The first thing I did was to glue on
as many bits as I could prior to putting on some paint. This meant the
front lower axle support, the forward lower fascia and the upper center
section. As you can imagine, there were some rather substantial gaps in the
upper center section. There were also some rather large sink areas to fill.
It took two applications of filler to get things smoothed out. Since this i
The first thing I did was to glue on
as many bits as I could prior to putting on some paint. This meant the
front lower axle support, the forward lower fascia and the upper center
section. As you can imagine, there were some rather substantial gaps in the
upper center section. There were also some rather large sink areas to fill.
It took two applications of filler to get things smoothed out. Since this i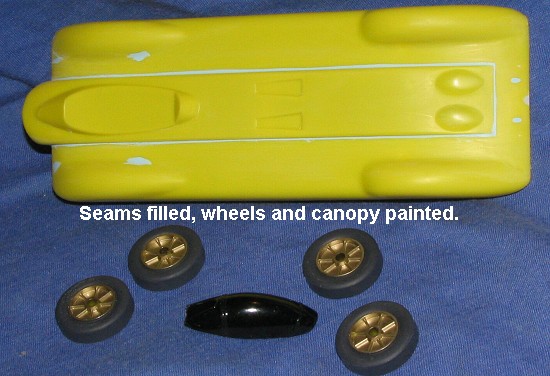 sn't
to be powered, I also filled in the bottom of the 'wind up' opening at the
back with some epoxy filler. That was all smoothed down.
sn't
to be powered, I also filled in the bottom of the 'wind up' opening at the
back with some epoxy filler. That was all smoothed down.
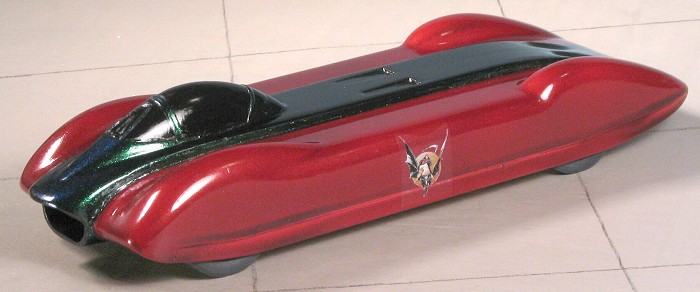
During the drying process, I painted the wheels with Alclad II Light Burnt Metal, which is a sort of gold shade and is quite nice. The tires were brush painted with Floquil's Weathered Black. I also took this opportunity to paint the inside of the canopy with black as there won't be anything to see in there anyway. Once it had dried, it was glued onto the body and then masked. I then headed for the paint shop.
| COLORS & MARKINGS |
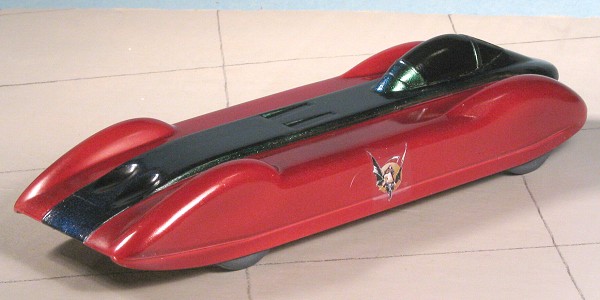 While I wasn't really sure what
color(s) to paint this, I did know that it would have a base coat of flat
white, so I put on several coats of Floquil's Reefer White. I then picked
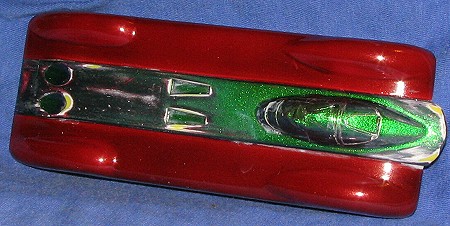
out the colors I wanted. The outer section was to be in a Burgundy
Metalflake from the Testors enamel line up. I sprayed that on in several
rather wet coats. I fear I may have overdone it a bit as there was some
pooling on the sides. Next, that was masked and the center section painted
gloss black and then sprayed with Alclad II 'Scarebus' a greenish
metalflake. I then sprayed clear Future over that when it had dried. At
least, when I thought it had dried.
While I wasn't really sure what
color(s) to paint this, I did know that it would have a base coat of flat
white, so I put on several coats of Floquil's Reefer White. I then picked
out the colors I wanted. The outer section was to be in a Burgundy
Metalflake from the Testors enamel line up. I sprayed that on in several
rather wet coats. I fear I may have overdone it a bit as there was some
pooling on the sides. Next, that was masked and the center section painted
gloss black and then sprayed with Alclad II 'Scarebus' a greenish
metalflake. I then sprayed clear Future over that when it had dried. At
least, when I thought it had dried.
Next day I was greeted by a center section that was cracked and in areas, looked like molten lava. Taking off the tape, I was even more dismayed to see that the beautiful shine was gone and the surface was very rough from the tape. RATS!!!
 Nothing
to do but repaint it. I rough sanded the Burgundy and repainted that area.
The shine returned. I then sanded the center section as much as I could to
remove the Alclad and the Alclad primer that had caused such heartache. I
was unable to get a really smooth surface as the primer had etched the
plastic under it, but it seemed I was doing damage control. Once all the
really nasty parts had been sanded down, I cut thin strips of newspaper and
soaked it for a while. Pulling it out of the water, I let most of it drain
and used it as my masking material. No tape, no problem, though the air
brush did want to move the paper out of the way. I resprayed the center
section allowing a full day between paints for drying.
Nothing
to do but repaint it. I rough sanded the Burgundy and repainted that area.
The shine returned. I then sanded the center section as much as I could to
remove the Alclad and the Alclad primer that had caused such heartache. I
was unable to get a really smooth surface as the primer had etched the
plastic under it, but it seemed I was doing damage control. Once all the
really nasty parts had been sanded down, I cut thin strips of newspaper and
soaked it for a while. Pulling it out of the water, I let most of it drain
and used it as my masking material. No tape, no problem, though the air
brush did want to move the paper out of the way. I resprayed the center
section allowing a full day between paints for drying.
Then a coat of Future was sprayed over it and the masking removed. I had some bleed-under, but a bit of gloss black paint took care of what I couldn't scrape off.
| FINAL CONSTRUCTION |
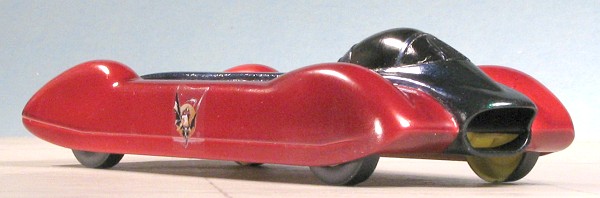
 In this case, it was nothing more
difficult than putting the wheels on the axles and gluing those assemblies
in place. The gold wheels are nearly invisible, but I know they are there.
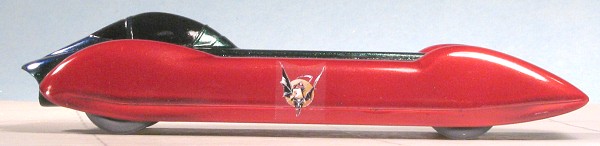
I also decided to try some of Starship Modeler's Cheesecake decals on the
side, just to spice things up a bit. These worked very well, though the
carrier is quite obvious. I used Microsol on them with no problems. Once it
had dried, the entire model was given another coat of Future to seal in the
decals and add a touch more shine. Unfortunately it didn't cause all the
carrier on the decal to disappear, but no biggie as this won't be making
the show ciruit!
In this case, it was nothing more
difficult than putting the wheels on the axles and gluing those assemblies
in place. The gold wheels are nearly invisible, but I know they are there.
I also decided to try some of Starship Modeler's Cheesecake decals on the
side, just to spice things up a bit. These worked very well, though the
carrier is quite obvious. I used Microsol on them with no problems. Once it
had dried, the entire model was given another coat of Future to seal in the
decals and add a touch more shine. Unfortunately it didn't cause all the
carrier on the decal to disappear, but no biggie as this won't be making
the show ciruit!
| CONCLUSIONS |
 Other than
the painting disaster, this could have been a very prompt build. As it was,
it took a lot longer than I'd have thought. Face it, this isn't exactly a
challenging kit. It was designed for kids and from what I've heard from a
few of you, it is doing that very nicely. It is a shame that the bits to
make it powered are not included, but I think we can thank the lack of
personal responsibility, a society of 'victims', and a justifiable fear on
the part of companies not to be on the receiving side of frivolous law
suits to be the cause of that.
Other than
the painting disaster, this could have been a very prompt build. As it was,
it took a lot longer than I'd have thought. Face it, this isn't exactly a
challenging kit. It was designed for kids and from what I've heard from a
few of you, it is doing that very nicely. It is a shame that the bits to
make it powered are not included, but I think we can thank the lack of
personal responsibility, a society of 'victims', and a justifiable fear on
the part of companies not to be on the receiving side of frivolous law
suits to be the cause of that.
Kit courtesy of me and my willingness to do a blast from the past.
January 2005
Kit # 1347 in a series
Copyright ModelingMadness.com. All rights reserved.
If you would like your product reviewed fairly and fairly quickly , please contact the editor or see other details in the Note to Contributors.