| KIT #: | PW Kit #1 |
| PRICE: | $49.95 MSRP |
| DECALS: | Five options |
| REVIEWER: | Scott Van Aken |
| NOTES: | Slot car white Kit |
| HISTORY |
The 1967 model year Mustang was the first model to feature a major redesign
with the installation of a big-block V8 engine. The overall size, interior and
cargo space were increased. Exterior trim changes included concave taillights,
side scoop (1967) and chrome (1968) side ornamentation, square rear-view
mirrors, and usual yearly wheel and gas cap changes. The high-performance 289
option was placed behind the newer 320 hp (239 kW) 390 cu in (6.4 L) FE engine
from the Ford Thunderbird, which was equipped with a four-barrel carburetor. A
390 GT engine, and a 4-speed manual transmission recorded quarter mile times of
 approximately 13 seconds and trap speeds of over 105 mph (169 km/h). A very low
number of 1967 Mustangs were ordered and came with the 428 CJ motor. During the
mid-1968 model year, a drag racer for the street could be ordered with the
optional 428 cu in (7 L) Cobra Jet engine which was officially rated at 335 hp
(250 kW) all of these Mustangs were issued R codes on their VIN#'s.
approximately 13 seconds and trap speeds of over 105 mph (169 km/h). A very low
number of 1967 Mustangs were ordered and came with the 428 CJ motor. During the
mid-1968 model year, a drag racer for the street could be ordered with the
optional 428 cu in (7 L) Cobra Jet engine which was officially rated at 335 hp
(250 kW) all of these Mustangs were issued R codes on their VIN#'s.
The 1967 and 1968 models discontinued the "Pony Interior" in favor of a new deluxe interior package, which included special color options, brushed stainless steel (1967) or woodgrain (1968) trim, seat buttons, a tilt steering wheel, and special interior paneling. The 1968 models that were produced during 1968 were also the first year to incorporate 3 point lap belts as opposed to the standard lapbelts The air-conditioning option was fully integrated into the dash, the speakers and stereo were upgraded, and unique center and overhead consoles were options. The fastback model offered the option of a rear fold-down seat, and the convertible was available with folding glass windows. Gone too was the Rally-Pac, since the new instrument cluster had provisions for an optional tachometer and clock. Its size and shape also precluded the installation of the accessory atop the steering column.
 The 1967 Ford Mustang was the championship winning car in the second year of
the Trans-Am Championship. Here is some additional information from Wikipedia:
The 1967 Ford Mustang was the championship winning car in the second year of
the Trans-Am Championship. Here is some additional information from Wikipedia:
At first, the Trans-Am vehicles were primarily modified versions of the road-going car. The competition was divided into two classes- an "Under 2 Liter" class (predominantly small European sedans) and the "Over 2 Liters" class (displacement limited to 5.0 liters, or 302 cu. in. ).
The first race was in 1966 at Sebring International Raceway. The overall win went to Jochen Rindt driving an Alfa Romeo GTA (an Under 2 Liter entry), with Bob Tullius (driving a Dodge Dart) taking second overall, but first in the Over 2 Liter class.
Allan Moffat in an Under 2 Liter Lotus Cortina won the third race at Bryar. Ford had full factory effort with the Alan Mann Cortinas but suffered from reliability issues. In 1966 the Over 2 Liter manufacturers' champion was Ford and the Under 2 Liter manufacturers' champion Alfa Romeo with the Kwech/Andrey GTA scoring 39 of the 57 manufacturers' points for Alfa. The Alfa Romeo of Horst Kwech and Gaston Andrey also scored the most points in the first unofficial drivers' championship, edging out Bob Johnson.
In 1967 Porsche lobbied the SCCA to have the 911 accepted as a sedan and then dominated the Under 2 Liter field winning the manufacturers championship over Alfa Romeo. In Over 2 Liter, Ford edged out Mercury to win the manufacturers' championship. Jerry Titus, driving a 1967 Mustang won the second unofficial drivers' championship.
| THE KIT |
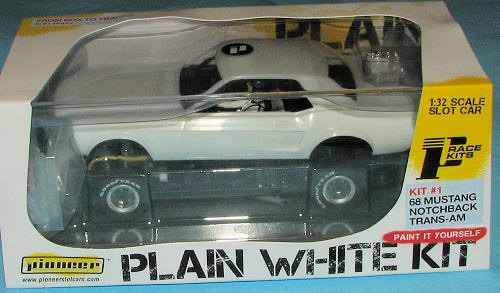 For
those of you not involved in slot cars, a white kit is basically a kit with
an unpainted body. Generally, the entire body is unassembled and that is the
case here with a
For
those of you not involved in slot cars, a white kit is basically a kit with
an unpainted body. Generally, the entire body is unassembled and that is the
case here with a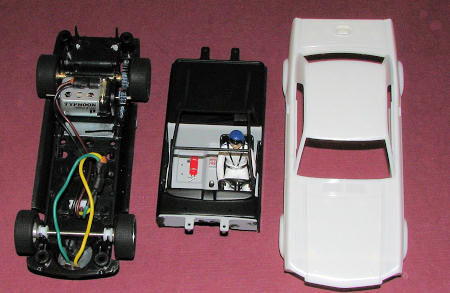 ll
the bits and pieces to attach to the body being provided in separate small
polybags. Unlike some other white kits, this one has a fully painted
interior. This considerably speeds up construction. Like most other white
kits, this one has a fully assembled chassis and running gear. Some kits
also provide the chassis unassembled. Also included but not shown are the
body mounting screws, and a bag with a replacement pair of rear rubber
tires, a deeper guide, a replacement pair of copper braid and another set of
mirrors. These latter items are much appreciated as they are usually the
first pieces broken off after some hard racing.
ll
the bits and pieces to attach to the body being provided in separate small
polybags. Unlike some other white kits, this one has a fully painted
interior. This considerably speeds up construction. Like most other white
kits, this one has a fully assembled chassis and running gear. Some kits
also provide the chassis unassembled. Also included but not shown are the
body mounting screws, and a bag with a replacement pair of rear rubber
tires, a deeper guide, a replacement pair of copper braid and another set of
mirrors. These latter items are much appreciated as they are usually the
first pieces broken off after some hard racing.
 The
kit also supplies four decal sheets, allowing the builder to do
The
kit also supplies four decal sheets, allowing the builder to do
 any
of five different racing numbers. If one takes into consideration that the
#1 car raced in three different colors with some changes to markings, then
that increases the number of options to seven. Personally, I really like
this idea and Pioneer is also kind enough to supply some extra sponsor
decals for use with other car projects. 1/32 waterslide decals are not the
easiest to come by so any additional bits like this are much appreciated.
any
of five different racing numbers. If one takes into consideration that the
#1 car raced in three different colors with some changes to markings, then
that increases the number of options to seven. Personally, I really like
this idea and Pioneer is also kind enough to supply some extra sponsor
decals for use with other car projects. 1/32 waterslide decals are not the
easiest to come by so any additional bits like this are much appreciated.
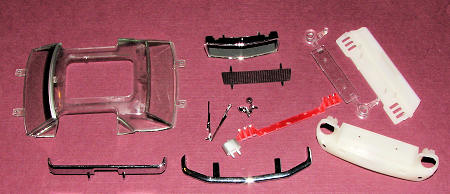
Now to the lone down side of the kit. No instructions. It is assumed that most who are smart enough to paint their own bodies can easily figure out how to assemble the cars. I can agree with that as figuring out how to assemble this car will not be much of a challenge. There are holes started on the underside of the body for the mirror installation (once one figures out if the car they are modeling use them) and one can easily drill holes for the windscreen wipers (again assuming the car had them installed). The kit also includes front and rear bumpers, something that competition cars frequently did not use. In fact, if one fills in the fuel receptacle on the trunk deck, one could easily make a stock bodies '67 Mustang.
Along with the no instructions are no painting and decal instructions. This is a bit more of a challenge as just checking with Google did not pick up but one of the markings options provided. Fortunately, discussing the matter with Pioneer provided not only photos of each of the markings options, but also a promise to include this info on their web site and perhaps to include a painting guide in future releases.
| CONSTRUCTION |
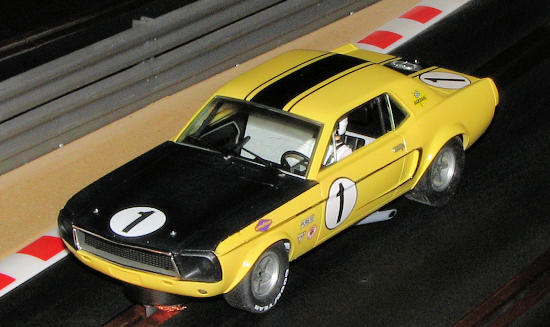
Step one was to remove what little flash there was and to sand
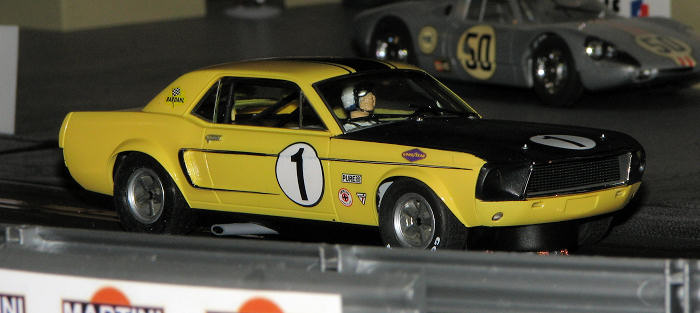
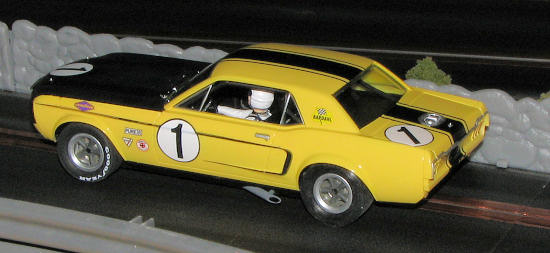
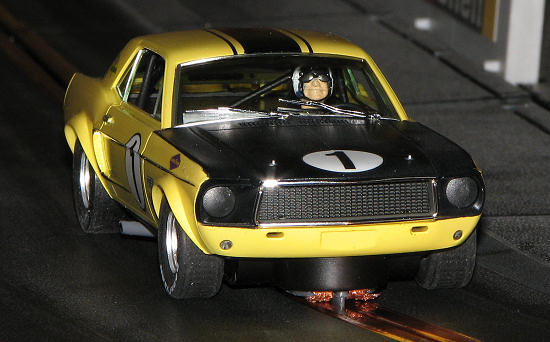
down all the mold seams I could find. Next, I chose the scheme I wanted to do
which was the light yellow #1 car with the black hood that was campaigned by
Jerry Titus. I
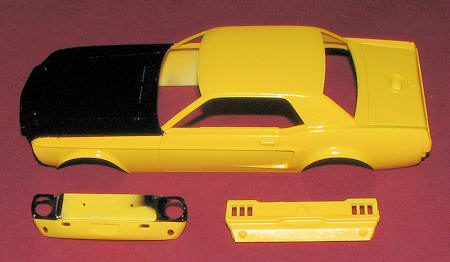 fully expect
to do some of the other scheme at time permits. As I did not have this yellow in
a premixed paint, I put some Reefer White into a bottle and then started adding
Insignia Yellow until it reached a shade I liked. This was then sprayed on the
car. The car was then masked so that the hood and the forward grille piece could
be painted black. For this I used Testors Racing Black. This is a lacquer
designed for painting clear Lexan bodies, but I have found that if one thins it
about 50/50,it makes for a very good standard car paint.
fully expect
to do some of the other scheme at time permits. As I did not have this yellow in
a premixed paint, I put some Reefer White into a bottle and then started adding
Insignia Yellow until it reached a shade I liked. This was then sprayed on the
car. The car was then masked so that the hood and the forward grille piece could
be painted black. For this I used Testors Racing Black. This is a lacquer
designed for painting clear Lexan bodies, but I have found that if one thins it
about 50/50,it makes for a very good standard car paint.
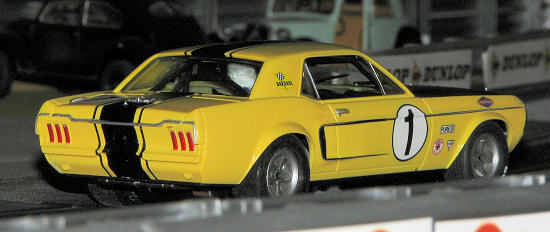
Once the paint had dried, I gave the body a coat of Testors One-Coat clear gloss to prepare for the decals. I chose the livery of Jerry Titus' car that he ran in 1967.
Using warm water, I slid off the first number decal to
put on the black hood to check opacity. It seems to be quite opaque though once
it dries thoroughly, I'll put on another decal to see if the roundel appears any
whiter (it did). As I bought two kits, I can use the second set for this purpose. I then
put on the side C stripe, which broke into several pieces. The roof stripe decal
also proved to be rather brittle and cracked when I tried to curve. it
over the roof to the underside. I then gave all three decals a coating of Solvaset to see if it might help them conform to the surfaces. This seemed to
work fairly well, though I still had problems with the decals cracking and
chipping even after applied. I found that putting them in the general location
and then flooding the decals with Solvaset helped to soften them. I ran into
problems doing this on the rear where there were many convolutions, finding that
the decals did 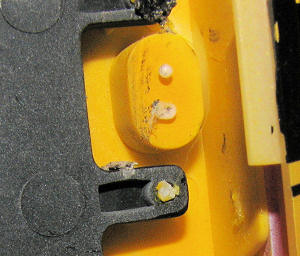 not always set straight. I also found when putting the roundels
over the side stripes that the white was not opaque enough to prevent the stripe
from showing through so I doubled the decals on all positions. Eventually, I had
to use Microsol Liquid Decal Film on the side stripes as they kept breaking up
into small pieces.
not always set straight. I also found when putting the roundels
over the side stripes that the white was not opaque enough to prevent the stripe
from showing through so I doubled the decals on all positions. Eventually, I had
to use Microsol Liquid Decal Film on the side stripes as they kept breaking up
into small pieces.
Once all the decals were in place (and I had a tiny
perio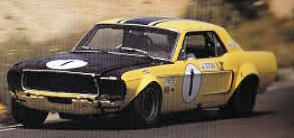 d
image from which to figure out what went where. Shown on the right), some detail
painting was done and the front and rear clips were tacked to the body. The body
then had a coat of Testors one-coat clear gloss applied. When dry, the hood was
painted a matte clear. I then painted the driver's helmet white using a
broad brush and several applications, and drilled out the holes for the
windscreen wipers. These cars did run in the rain and the photo I had showed
these installed. The car in the photo did not have bumpers or side view mirrors
so those items were not installed.
d
image from which to figure out what went where. Shown on the right), some detail
painting was done and the front and rear clips were tacked to the body. The body
then had a coat of Testors one-coat clear gloss applied. When dry, the hood was
painted a matte clear. I then painted the driver's helmet white using a
broad brush and several applications, and drilled out the holes for the
windscreen wipers. These cars did run in the rain and the photo I had showed
these installed. The car in the photo did not have bumpers or side view mirrors
so those items were not installed.
Then the rest of the body was put together. These cars, when assembled in China or Spain or Italy, do not have the parts glued, but instead, the tabs are melted with a pencil soldering iron. Not having one on my work bench, I used a match instead. After striking the match and letting burn for a few seconds, it was blown out and the heat of the match head was enough to melt a few pins at a time without damaging the surrounding area. You can see that in the image.
 With all the
bits in place, I then screwed it down to the chassis. The chassis was modified
slightly by removing the magnet (yep, modern slot cars generally have magnets in
the chassis to help hold them to the track), putting a bit of weight in the nose
and then replacing the stock guide with one supplied that is 1mm deeper. Getting
the wires and braid out of the old guide was a real chore as was reassembling
these pieces in the new guide. Some companies make it easy to do these things,
but not Pioneer. At least I won't have to worry about the wires coming loose.
The rubber rear tires were replaced with silicone compound tires that provide
better traction on my plastic track.
With all the
bits in place, I then screwed it down to the chassis. The chassis was modified
slightly by removing the magnet (yep, modern slot cars generally have magnets in
the chassis to help hold them to the track), putting a bit of weight in the nose
and then replacing the stock guide with one supplied that is 1mm deeper. Getting
the wires and braid out of the old guide was a real chore as was reassembling
these pieces in the new guide. Some companies make it easy to do these things,
but not Pioneer. At least I won't have to worry about the wires coming loose.
The rubber rear tires were replaced with silicone compound tires that provide
better traction on my plastic track.
The motor and axles were lubed and the car put on the track to see how it runs. This is the third Pioneer 67/68 Mustang I have with the other two coming already painted and ready to run. This one turns lap times that are about a third of a second a lap quicker than the other two, which have the same tires, the same amount of weight and the magnets also removed. It could, of course, be pure luck as the speed of the motors that drive these cars are usually plus or minus 5 per cent in terms of how they run (in other words, you could get one motor that runs 10% faster than another if you had the luck of the draw to get one from each end of the spectrum).
Anyway, it is a lot of fun to run around the track and if our club chooses to run a Trans Am class in the next season, this will be in it.
| CONCLUSIONS |
I fully realize that many of you reading this care not
a whit about slot cars, but you should reconsider as they are a lot of fun. This
is one of the nicer 'white kits' and despite the lack of building or painting
instructions, was enjoyable to build. It took me about 10
 days from
opening the box to placing it on the track, about the norm for one of these. I
like it so much, that I have a second car ready to paint (of course, I bought
two at once so was planning on the second car). If I had a complaint it would be
about the quality of the decals. The white areas are more transparent than I'd
like and the decals themselves are brittle, not a good thing when one has to
have stripes conform over convoluted surfaces. However, these can be overcome
somewhat by over-coating the decals prior to use and doubling up on the white
decals (which I did as I bought two kits and so had two sets of decals from
which to choose).
days from
opening the box to placing it on the track, about the norm for one of these. I
like it so much, that I have a second car ready to paint (of course, I bought
two at once so was planning on the second car). If I had a complaint it would be
about the quality of the decals. The white areas are more transparent than I'd
like and the decals themselves are brittle, not a good thing when one has to
have stripes conform over convoluted surfaces. However, these can be overcome
somewhat by over-coating the decals prior to use and doubling up on the white
decals (which I did as I bought two kits and so had two sets of decals from
which to choose).
Bottom line is that these cars are recommended and for those who want to do a street version (at least from the outside), the kit comes with the bits that are needed to do so if you have the talents to do the few mods required.
| REFERENCES |
http://en.wikipedia.org/wiki/Ford_Mustang_%28first_generation%29
November 2010
Thanks to me for this one. It can be found on discount at several on-line
shops.
If you would like your product reviewed fairly and quickly, please
contact
me or see other details in the
Note to
Contributors.