Scalextric 2001 Pontiac Grand Prix
A month or so back, I was attending the St. Louis slot car show, a
twice a year event. I am always able to find a bargain or two in terms of cars
that need work and look for those that are relatively complete so the overhaul
isn't major.
I have a bit of a fondness for NASCAR when it comes to doing repaints as the
colors are vibrant and the schemes are often interesting. An old Scalextric
Grand Prix was offered for $20 with the commentary that 'it is all there and it
is fast'. It looked like the dickens with a poorly applied 'Viagra' scheme, but
it was all there and testing it on a track that was set up proved it to be quick
in a straight line.
First step when I got it home was to take it apart and clean it as it had seen
some action. I pulled out what had to be a half pound of lead and put the
Slot.it wood guide in the bits drawer. The body disassembly was literally a snap
and in 5 minutes, it was soaking in a bath of 91% alcohol. Meanwhile, I
considered replacing what appears to be a Slot.it white endbell motor as it had
 '29k' scratched on it, but I didn't have anything suitable so left it in. I also
left in the notchy gears and the tires that had been installed. These tires had
very large air cavities on the inside and not a lot of grip on my Scalextric
Sport track, but I kept them as I had no replacements on hand. I reglued the
front wheels to the axle as they easily fell off. The previous owner had hot
glued a piece of tubing for the front axle. A spare stock Scalextric guide was
located and snapped in place. I then added a touch of weight to the front of the
chassis and ran it for a number of laps to be sure all was well. The motor
smelled very strong of ozone and was running a bit warm so I have to assume
that, once again, I had bought a car whose motor was on its last legs. This has
happened more often than not in the past and I guess one has to expect people to
put all their rotten eggs in one basket.
'29k' scratched on it, but I didn't have anything suitable so left it in. I also
left in the notchy gears and the tires that had been installed. These tires had
very large air cavities on the inside and not a lot of grip on my Scalextric
Sport track, but I kept them as I had no replacements on hand. I reglued the
front wheels to the axle as they easily fell off. The previous owner had hot
glued a piece of tubing for the front axle. A spare stock Scalextric guide was
located and snapped in place. I then added a touch of weight to the front of the
chassis and ran it for a number of laps to be sure all was well. The motor
smelled very strong of ozone and was running a bit warm so I have to assume
that, once again, I had bought a car whose motor was on its last legs. This has
happened more often than not in the past and I guess one has to expect people to
put all their rotten eggs in one basket.
But back to the body. After an overnight soak (overkill I know, but it makes
sure I get all the paint and markings off), the body was scrubbed down until
there was gleaming bare plastic. This was a somewhat translucent white that I'd
not seen before, but it was a great basis for a paint scheme. I like to remove
as much of the usual mold seam lines as I can and while this body was quite
clean in that regard, there is always some to be found. After the usual sanding
and polishing, it was ready for paint. Had it been some other color, I'd have
applied a white undercoat, but in this case it wasn't needed.
 While it had been soaking, I'd searched for a scheme. Frankly, there isn't much
out there for the Grand Prix that had not already been covered by the ready
painted cars sold by Scalextric. I did find a scheme for a car that was a
back-marker so I knew that it wouldn't have been used by Scalextric. It was also
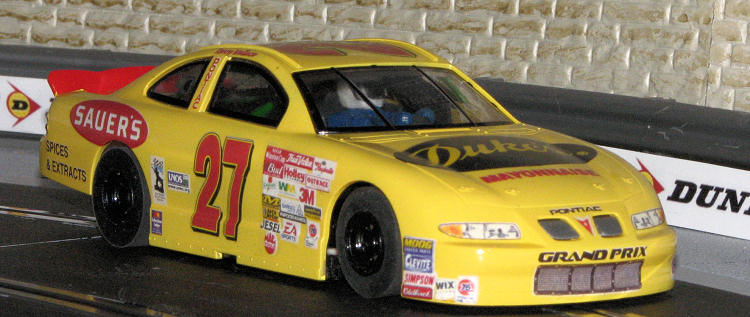
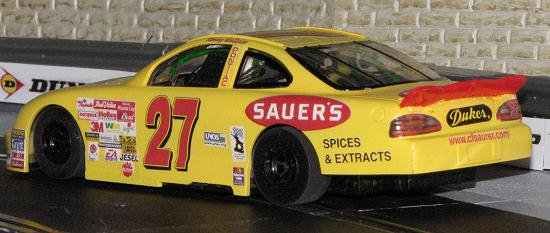
driven by local driver Kenny Wallace and sponsored by a mayo company. The paint
scheme was simple with the majority of the car a semi-pale yellow with red
spoiler. Perfect. I ordered the sheet from Pattos of Australia, expecting the usual mess and
while I wasn't totally vindicated, it was close. This time,
there was little in the way of pixellation and most of the markings allowed me
to trim closely to them. Normally, I copy the sheet and print a new one on white
backed paper, but not this time.
While it had been soaking, I'd searched for a scheme. Frankly, there isn't much
out there for the Grand Prix that had not already been covered by the ready
painted cars sold by Scalextric. I did find a scheme for a car that was a
back-marker so I knew that it wouldn't have been used by Scalextric. It was also
driven by local driver Kenny Wallace and sponsored by a mayo company. The paint
scheme was simple with the majority of the car a semi-pale yellow with red
spoiler. Perfect. I ordered the sheet from Pattos of Australia, expecting the usual mess and
while I wasn't totally vindicated, it was close. This time,
there was little in the way of pixellation and most of the markings allowed me
to trim closely to them. Normally, I copy the sheet and print a new one on white
backed paper, but not this time.
I first sprayed on several thin coats of Testors Metallizer Sealer. This is by
far the best material I've used for this purpose. It is so thin it is like it
isn't there, yet holds the decal tight. One of the problems with Pattos'
markings is that they are brittle. If you trim close to a marking, it will chip.
The additional sealer prevents that. Everyone has his favorite clear coat for
decals and I've tried just about all of them. The Testors Sealer works the best.
The yellow of the car is not one of those shades you'll find in a rattle can.
You'll have to do as did I and mix your own. Starting with Testors Boyd's Gloss
White, I started adding drops of Insignia Yellow until I reached a point where
what I sprayed on the car looked like the two photos I found on the internet (Pattos
provides just decals, no placement guide, no references, no color information).
Several thinned coats were applied (I use hardware store lacquer thinner to thin
enamels as it speeds up the drying time considerably). Once I hit the color, the
paint was left to dry overnig ht. Then the area around the rear spoiler was
masked off and it was painted with Tamiya Red acrylic. The masking was removed
and the next day I started applying markings.
ht. Then the area around the rear spoiler was
masked off and it was painted with Tamiya Red acrylic. The masking was removed
and the next day I started applying markings.
Pattos provides two sets to help prevent underlying colors from
showing through and because the inks are thin and you need two sets in most
cases to get the proper color saturation. Each marking has to be trimmed close
as the 'clear' areas are not clear, but a dirty light grey that is apparent when
applied on a light background such as yellow or orange or red or white or light
blue....... After each decal application, I used Solvaset decal setting solution
to help the decals stick. This is quite important for the ribbed tail lights and
some other areas that have to mold around curves. Alone, the Pattos decals won't
conform and may well crack if you try to push them in place without the help of
this strong decal solvent. Once the solvent is applied it needs to be left alone
until it is dry. This means hours. This also means that your decalling will take
days, but the results are well worth it.
Once all the markings are in place, the body is given a gentle wash with warm,
soapy water to remove residue, rinsed and left to dry. For a clear coat, the
best I have found has been Testors One Step Lacquers. I use the clear gloss and
it can be applied in one session. It provides a hard protection for your
markings, doesn't stink as much as you'd think when spraying and dries to the
touch in about an hour. One is wise to leave it overnight before doing a lot o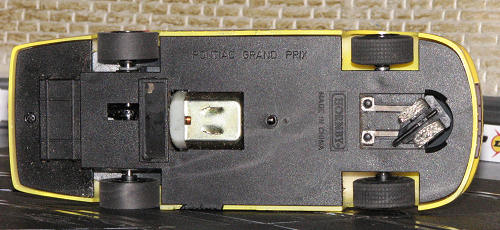 f
handling as the heat from your hands can somewhat soften the coating until it is
cured.
f
handling as the heat from your hands can somewhat soften the coating until it is
cured.
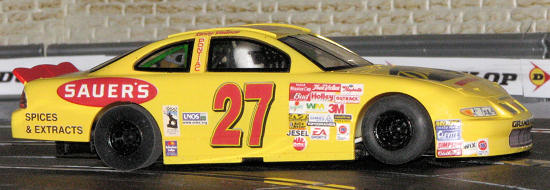
All that was left was to reinstall the windows and the interior. I painted the
gold front wheels black to match the rears and that was it.
The car is pretty quick with its 29k motor and handles fairly well. As
mentioned, the motor is too much and will be replaced with an 18k version. I've
also ditched the rear tires for Super Tire silicones as they provide superior
grip to the urethanes that were originally on it. The car looks very nice along
with the other older NASCAR stockers I have on the shelf.