Record 1/43 Ferrari 330 GTS Spyder
| KIT #: | 39 |
| PRICE: | $20.00 'used' |
| DECALS: | No options |
| REVIEWER: | Scott Van Aken |
| NOTES: | Resin kit with metal and vacuform parts |
| HISTORY |
The Ferrari 330 was a series of V12 powered automobiles produced by Ferrari in 2+2 GT Coupé, two-seat Berlinetta, spyder, and race car versions between 1963 and 1968.
The first, the 2+2 330 America, was a 250 GT/E with a larger 3.3 litre engine; the 330 GTC/GTS shared its chassis with the 275; the 330 GT 2+2 had its own chassis and bodywork; the mid-engined 330P racer was part of the Ferrari P series, produced in four models. Production ended in 1968 with the introduction of the Ferrari 365 series.
 All 330 models used an evolution of the 400
Superamerica's 4.0 L Colombo
V12 engine. It was substantially changed, with wider bore spacing and an
alternator replacing a generator.
All 330 models used an evolution of the 400
Superamerica's 4.0 L Colombo
V12 engine. It was substantially changed, with wider bore spacing and an
alternator replacing a generator.
The 330 GTC and 330 GTS were more like their 275 counterparts than the 330 GT 2+2. They shared the short wheelbase of the 275 as well as its independent rear suspension. These models were more refined than earlier Ferraris, quieter and easier to drive. It has been stated that this "was probably the first Ferrari in which you could actually enjoy a radio".
The GTC berlinetta was introduced at the Geneva Motor Show in March, 1966. It was a two-seater coupé with a Pininfarina-designed body. A 1967 GTC was given one-off bodywork by Zagato at the behest of American importer Luigi Chinetti in 1974. This car was called the "Zagato Convertibile", since it was of a targa-style.
The GTS spider followed at the Paris Motor Show. About 600 coupés and 100 spiders were produced before the 1968 introduction of the 365 GTC and GTS.
| THE KIT |
I will readily admit that I like 1/43 car kits. In fact, if I actually complete a car kit, odds are that it is in 1/43. They are generally simple to build, nicely detailed and take up very little space. Generally, I concentrate on racers, but I found some very nice street sports cars on e-paid at quite reasonable prices so I went for them.
This is one of them. It is a convertible, which is
also something I generally don't build, but it looks particularly nice.
Interestingly, many of the kit makers who switched from cast metal to resin many
years back were based in France. I say were for I believe most of them have
since gone out of business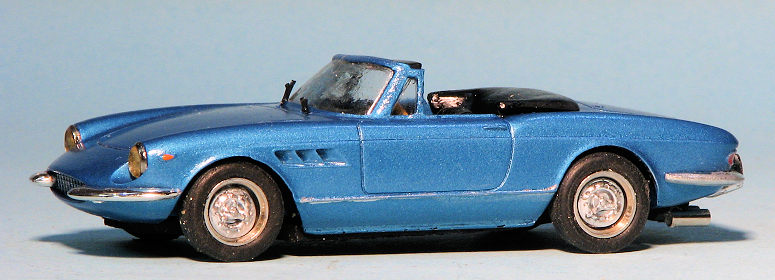 . This particular one is by Record and is quite
typical of the genre.
. This particular one is by Record and is quite
typical of the genre.
The major components are in resin, it comes with metal wheels and detail bits, rubber tires and a vacuform windscreen. I have left all the small pieces in the bag to keep from losing them. Unusually, this kit came without any instructions. Normally they are included, but perhaps that is why this and the others I bought were so inexpensive.
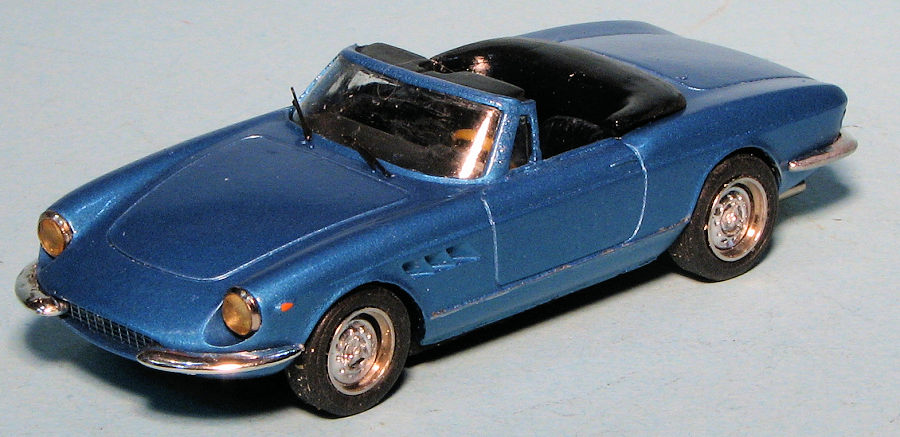
Finding interior and exterior color information is truly not an issue as there are lots of photos on the Internet to help out. As you can see, the casting on the resin is actually very good and based on other kits I've built from Record, this one should be rather trouble-free and make a nice model.
| CONSTRUCTION |
 These early multimedia car kits are generally fairly easy to
build. Unless the kit has a lot of photo etch or other small bits, they can be
finished in less than a week from starting. For me this is really lightning
speed as it usually takes me a minimum of two weeks to complete even the
simplest aircraft kit.
These early multimedia car kits are generally fairly easy to
build. Unless the kit has a lot of photo etch or other small bits, they can be
finished in less than a week from starting. For me this is really lightning
speed as it usually takes me a minimum of two weeks to complete even the
simplest aircraft kit.
First step was to deal with the resin parts. It is not uncommon for there to be some pinholes and even bubbles on the lower part of the body, This one had a rather large bubble on one of the visors. These were all dealt with using super glue. Starter had some resin pour stubs in some very difficult locations and it took a low speed motor tool with a grinding bit to remove those. The resin parts save for the wheel inserts, were then washed in soapy water and then provided a nice coat of primer grey so that I could find areas I'd missed.
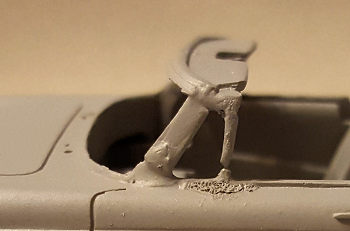
Then; disaster!
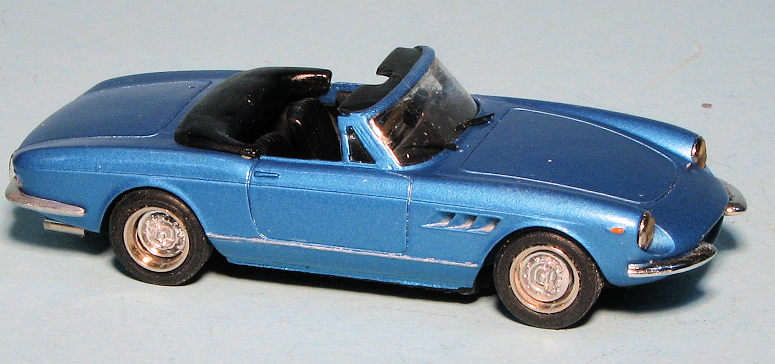
I dropped the freshly washed body on the kitchen floor. Having no real bracing, the windshield support broke and that piece went flying. I found the upper section with the sun shades, but all the braces were gone. After some sounds of despair, I got busy with repairs. What it meant was cutting small slivers of card stock and using them to hold up the extant piece. I used superglue and I have to tell you that the finished repair was not pretty. I sprayed the body with primer to see how much more I'd have to do. As you can see from the photo, ugly it is and more work was needed. Eventually, I got things relatively squared away and cleaned up. I know some of you reading this would have given up and trashed it, but I guess I'm stubborn. I used the vac windscreen to ensure that it wasn't too tall by test fitting it a lot. The wind wing openings are actually too big, but it did not turn out to be that much of an issue. What the astute will notice is that one side is higher than the other. This did not make itself readily apparent to me until I looked at the picture of the finished model.
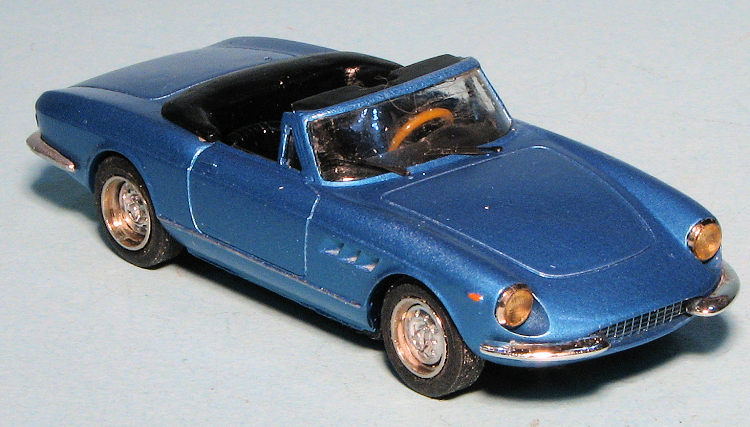 Slowly the
car came together. I painted the body with a nice metallic blue that I had in a
rattle can. Naturally, it orange peeled a bit, but I don't do contests so no
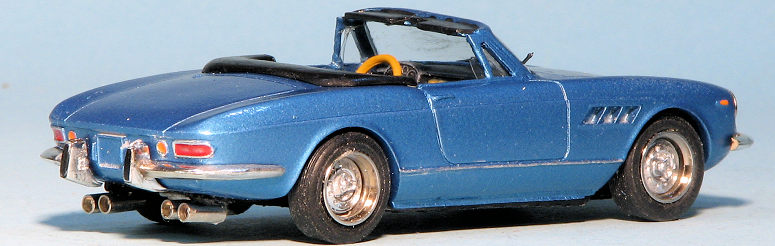
worries on this end. On the underside one is supposed to fit four metal exhaust
pieces. To say these are a biyatch to install would be an understatement and it
took multiple tries to get something I could live with. The wheels are loose on
the axle and the ones installed on the front are a bit too wide. Not wanting to
cut aluminum, I left them as they are. Getting the vac windscreen to fit was
also some work, but eventually, I got it to fit fairly well. Detail painting
needed to be done for the rear lights and such. Headlights consisted of polished
metal housings with resin lights. In case you are wondering why they are
yellowish, it is either due to the age of the resin, or because in France (where
the kit was made) yellow headlights were mandated. I thought about painting them
over, but wasn't all that happy with the last kit I built where I did that.
Slowly the
car came together. I painted the body with a nice metallic blue that I had in a
rattle can. Naturally, it orange peeled a bit, but I don't do contests so no
worries on this end. On the underside one is supposed to fit four metal exhaust
pieces. To say these are a biyatch to install would be an understatement and it
took multiple tries to get something I could live with. The wheels are loose on
the axle and the ones installed on the front are a bit too wide. Not wanting to
cut aluminum, I left them as they are. Getting the vac windscreen to fit was
also some work, but eventually, I got it to fit fairly well. Detail painting
needed to be done for the rear lights and such. Headlights consisted of polished
metal housings with resin lights. In case you are wondering why they are
yellowish, it is either due to the age of the resin, or because in France (where
the kit was made) yellow headlights were mandated. I thought about painting them
over, but wasn't all that happy with the last kit I built where I did that.
The bumper pieces are chrome plated resin. One of the
fronts was missing the very tip. The bumpers also do not conform to the curve of
the body in the vertical so the upper side is a tight fit while you can easily
see the mounting tabs on the underside. In the back, there are override bumpers
that need to be attached. These do not fit so both the slot and the tab onto
which they fit need to be opened up/sanded down. This means repainting chrome.
Fortunately, I have a couple of Liquid Chrome pens and they were able to handle
this and the chrome for the wheel centers. With those taken care of, I assembled
the p.e. windscreen wipers. These were designed by spaw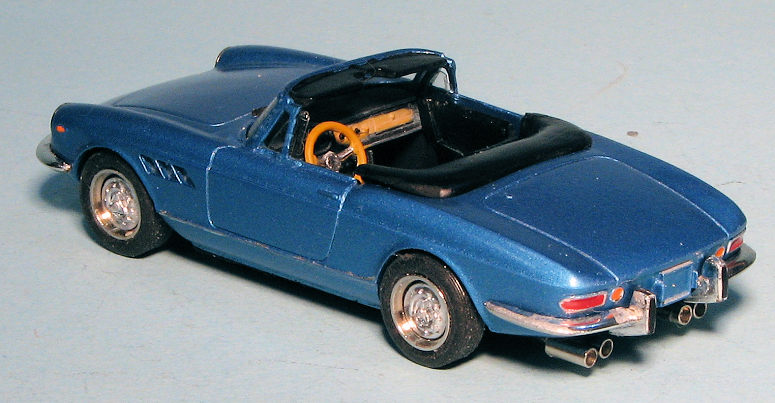 n
of the devil. You get a separate arm and wiper section. There is a teensy slot
in the arm into which an equally teensy tab is to be fitted. If both my eyes
were working properly, I might not have had so much of an issue, but it took an
age to get them assembled and glued. The last step was screwing on the bottom,
which also holds the front axle. The mounting screws are about twice as long as
they need to be. I gently screwed them down as far as they would go, then used a
cutting disc on my motor tool to chop off about half the length. This worked
fairly well except in the front where the too-wide wheels keep it from fitting
flush.
n
of the devil. You get a separate arm and wiper section. There is a teensy slot
in the arm into which an equally teensy tab is to be fitted. If both my eyes
were working properly, I might not have had so much of an issue, but it took an
age to get them assembled and glued. The last step was screwing on the bottom,
which also holds the front axle. The mounting screws are about twice as long as
they need to be. I gently screwed them down as far as they would go, then used a
cutting disc on my motor tool to chop off about half the length. This worked
fairly well except in the front where the too-wide wheels keep it from fitting
flush.
| CONCLUSIONS |
You may be wondering after reading this 'Why bother with these?'. You could easily ask why bother building your umpteenth P-51 or Panzer. I do it because I like it. For many of us, the challenge is part of the process and while a Tamiya quality kit is nice I don't want to have a diet of nothing else but. Even with all these issues, this one was done is about a week. I like 1/43 car kits and these older ones have less in the way of fussy bits than the newer ones, even if it is at the expense of great fit. This is my first civilian car in this scale as I tend towards racers. I have other civvies in the stash and can easily see myself doing another.
| REFERENCES |
https://en.wikipedia.org/wiki/Ferrari_330#330_GTC.2FGTS
June 2017
Copyright ModelingMadness.com. All rights reserved.
Thanks to
for the preview kit. You can find this kit at your favorite hobby shop
or on-line retailer. If you would like your product reviewed fairly and
fairly quickly, please
contact
the editor
or see other details in the
Note to
Contributors.
Back to the Main Page
Back to the Review
Index Page
Back to the Previews Index Page