Bandai 1/72? Science Special Search Party Exclusive Vehicle
| KIT #: | 0209050 |
| PRICE: | 500 yen SRP |
| DECALS: | Two options |
| REVIEWER: | Scott Van Aken |
| NOTES: | 2016 tooling |
| HISTORY |
Ultraman (ウルトラマン Urutoraman) is a Japanese tokusatsu
television series that first aired in 1966. Ultraman is a follow-up to the
television series Ultra Q, though not technically a sequel or spin-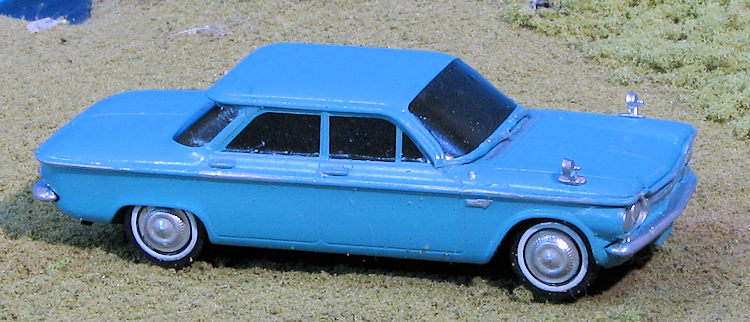 off. The show
was produced by Tsuburaya Productions, and was broadcast on Tokyo Broadcasting
System (TBS) from July 17, 1966 to April 9, 1967, with a total of 39 episodes
(40, counting the pre-premiere special that aired on July 10, 1966).
off. The show
was produced by Tsuburaya Productions, and was broadcast on Tokyo Broadcasting
System (TBS) from July 17, 1966 to April 9, 1967, with a total of 39 episodes
(40, counting the pre-premiere special that aired on July 10, 1966).
Although Ultraman is the first series to feature an Ultra-Crusader, it is actually the second show in the Ultra Series. Ultra Q was the first. In fact, Ultraman opens with the Ultra Q logo exploding into the Ultraman logo. Ultraman, and its titular hero, became a major pop culture phenomenon in Japan, spawning dozens of sequels, spin-offs, imitators, parodies and remakes.
| THE KIT |
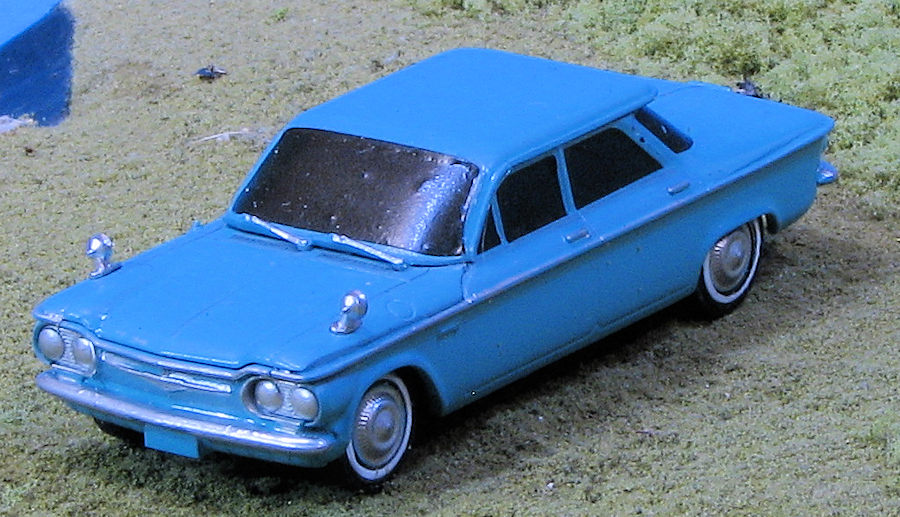
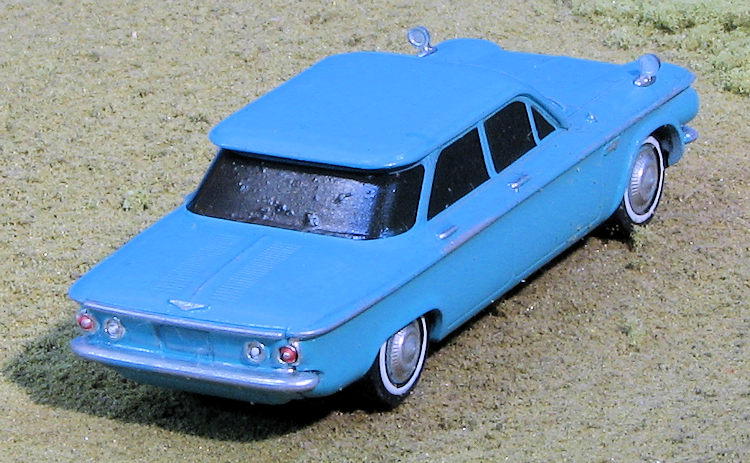
Allow me to preface this by saying I know nothing about the series other than what I've occasionally glimpsed on Saturday morning TV from time to time. This kit was purchased from a Japanese hobby site as I was browsing for something interesting. As soon as I saw this, I knew I had to order it. It should be no secret that this vehicle is actually a Chevy Corvair, and a four door version at that. It looks to be the 1964 model year, but I know so little about the cars, other than having driven them in my youth, that it could be any of the early versions.
There are three sprues, two in grey plastic and one in black. No clear parts are included nor is there an interior, which I guess is fine for this scale. There are also no chrome parts.
 The overall design of the kit is a bit unusual. you
have a right and left half that has the side of the car molded in place. The
roof, hood, trunk as well as the fore and aft body sections all attach to this.
The light pieces are separate and will fit into the front and rear pieces after
things have been painted. Wheels are in two pieces with separate tires, allowing
those bits to be pre painted before attaching.
The overall design of the kit is a bit unusual. you
have a right and left half that has the side of the car molded in place. The
roof, hood, trunk as well as the fore and aft body sections all attach to this.
The light pieces are separate and will fit into the front and rear pieces after
things have been painted. Wheels are in two pieces with separate tires, allowing
those bits to be pre painted before attaching.
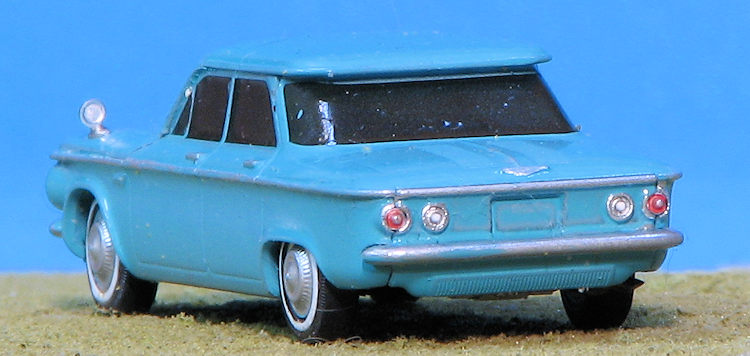
Instructions are written on the inside of the box top in both Japanese and English. No color information is provided, but fans of the series probably know what shades to use. Since this car operated in Japan, it has side mirrors out on the fenders. I don't know if this was or is a law, but it is something you see all the time in country. The attachment holes are large. A standard water slide decal sheet is provided that has black decals for the windows and one of two different Ultraman markings for the side. it even includes the whitewalls for the tires, and red dots for the tail lights.
| CONSTRUCTION |
Since this is a pretty simple kit, one would think that building it would be a snap. Well, it pretty much is, however, if one wishes to paint it, then that brings into the story a lot of preparation.
The kit provides little in the way of guidance when it comes
to painting this beast. Make no bones about it, one does have to pretty much
prepaint all the parts prior to assembly. First thing I did was to figure out
what colors would be typical for a 1964 Corvair and then match what I found with
the paints t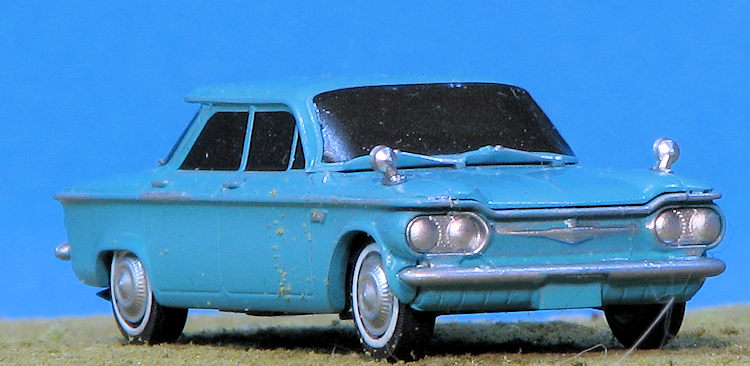 hat I had. A 'coral blue' shade, which
seemed to be close to a can of Tamiya paint I had in the stash so that was
chosen.
hat I had. A 'coral blue' shade, which
seemed to be close to a can of Tamiya paint I had in the stash so that was
chosen.
Initially, all the parts were painted on the sprue, then removed, the sprue attachment point cleaned up and the part then repainted. I also painted the tires with NATO black along with the chassis piece. This latter item was drybrushed to help bring out some detail using Vallejo aluminum. This shade was used on the engine and the exhaust was painted Tinny Tin. When I painted the body, I also painted the back section of the wheels and the hub caps. The hub caps (actually wheel covers) were then painted polished aluminum from the Alclad II range, as were the mirrors.
Then I started building. The two body halves were cemented together, followed by the hood, engine cover and finally the roof. These lock into place. The wheels were then built up and attached to the chassis. If you want to use the whitewall decals these need to be added prior to installing the chassis.
After painting the headlight and taillight pieces
polised aluminum, they were inserted into the nose and rear pieces. There are
large tabs on the chassis for these and they help to keep things in place. Fit
is very tight. I then painted all the chrome trim (at least a lot of it) using
Testors silver in the 1/4 ounce bottles. Mine is pretty old having a 15¢ price
printed on the lid. The amount you paint will depend on your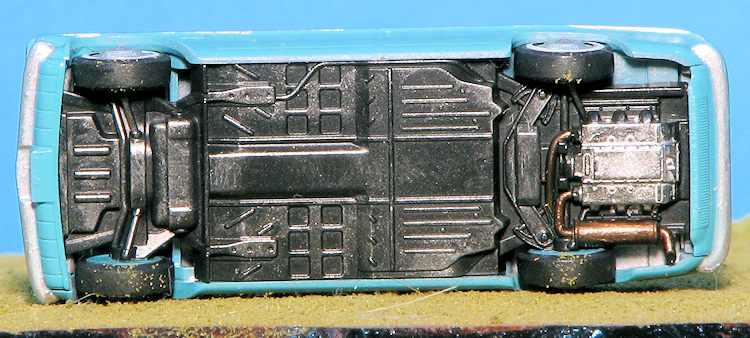 steadiness and the size of your paint brush. I did notice that the hood is
narrower than the body sides so the side trim sticks out quite a bit. I also
painted the tail lights and back up lights prior to inserting this piece.
steadiness and the size of your paint brush. I did notice that the hood is
narrower than the body sides so the side trim sticks out quite a bit. I also
painted the tail lights and back up lights prior to inserting this piece.
With all that in place, I used the window decals. These actually fit well and look good when done. I used Microsol to help them snuggle down and that worked just fine. I did not use any of the Ultraman markings on this one. The last things to be attached were the mirrors. The placement of these is what lets you know this car was operated in Japan as a US Corvair would have had them much closer to the windshield. I guess I could have put them closer, but the large slots in the fenders would have to have been filled.
| CONCLUSIONS |
 I bought this because it was a kit of a 4 door
Corvair and I needed an auto for this month's club contest. It fills the bill
and when placed next to 1/72 aircraft, looks like itis about the same scale.
That makes it a pretty useful diorama piece for a mid/late 1960 scene. If you
want something to build that will help clear out the cobwebs, this would be a
good one. I used no filler anywhere.
I bought this because it was a kit of a 4 door
Corvair and I needed an auto for this month's club contest. It fills the bill
and when placed next to 1/72 aircraft, looks like itis about the same scale.
That makes it a pretty useful diorama piece for a mid/late 1960 scene. If you
want something to build that will help clear out the cobwebs, this would be a
good one. I used no filler anywhere.
I also notice that I got a bunch of 'stuff' on the window areas that show up as lumps under the decal. This is not all that noticeable in person, but really shows in the photos. Guess that is because all of these are greater than life size, the actual model being only about 2.5 - 3 inches long.
| REFERENCES |
https://en.wikipedia.org/wiki/Ultraman
3 February 2017 Copyright ModelingMadness.com. All rights reserved If you would like your product reviewed fairly and fairly quickly, please
contact the editor
or see other details in the
Note to
Contributors. Back to the Main Page
Back to the Review
Index Page
Back to the Previews Index Page