Arii 1/32 1967 Honda N360
| KIT #: | 41075 |
| PRICE: | 800 yen from Hobby Link Japan (about $10.50) |
| DECALS: | One option |
| REVIEWER: | Scott Van Aken |
| NOTES: | Includes diorama base and structures |
| HISTORY |
The
Honda N360 is a
kei car,
designed and built by Honda and produced from March 1967 through 1970, while its
larger N600
brother lasted three more years. After a January 1970 facelift, the N360 became
the NIII360
and continued in production until 1972. The car featured front wheel drive and
an air-cooled, four stroke, 354 cc, 31 hp (23 kW) two-cylinder engine, and was
borrowed from the Honda CB450 motorcycle. The displacement was reduced so as to
comply with kei
car legislation which stipulated maximum allowable engine displacement.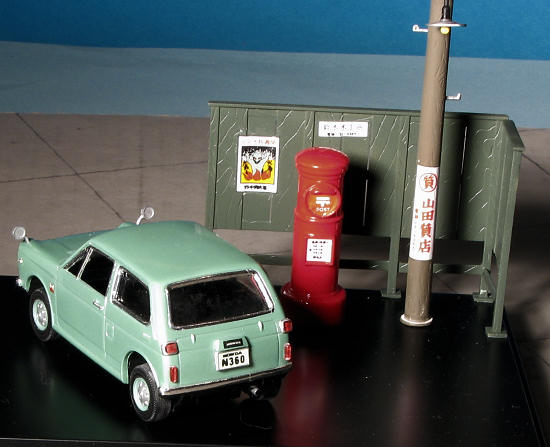 This
same engine was also used in the Honda Vamos, with a beam axle/leaf spring rear
suspension. The "N" prefix stands for the Japanese word "norimono"
which means "vehicle" in English. The exterior dimensions were in compliance
with Japanese government regulations concerning kei cars, however, vehicles
installed with the 402 cc and 599 cc engines were too large for the category,
and were largely intended for international sales.
This
same engine was also used in the Honda Vamos, with a beam axle/leaf spring rear
suspension. The "N" prefix stands for the Japanese word "norimono"
which means "vehicle" in English. The exterior dimensions were in compliance
with Japanese government regulations concerning kei cars, however, vehicles
installed with the 402 cc and 599 cc engines were too large for the category,
and were largely intended for international sales.
A two-door sedan was the original body style, with a two-door wagon (considered a commercial vehicle in Japan, and therefore called a "Van") called the LN360 coming in June of the first year. An upgraded 36 hp (27 kW) engine was added in October 1968 for the N360 T. A 402 cc engine was used in the similar N400. The engine's technology achievements reflected engineering efforts that were the result of the larger Honda 1300, which used an air-cooled 1.3 litre engine. One of the primary differences between the N360 and the Honda Life that followed was the N360-600 had an air-cooled engine, and the Life had a water-cooled engine. The water-cooled engine was better able to comply with newly enacted emission standards in Japan, and a move away from air-cooled, and two-stroke engines.
The Hondamatic-equipped N360AT which appeared in August 1968 was the first kei car equipped with an automatic transmission.
| THE KIT |
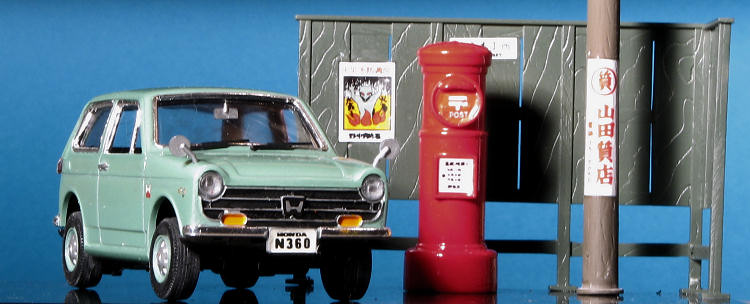
This is a rather neat diorama set from Arii. What it includes is the Honda N360 car as well as a few diorama items and a nicely done base.
The Honda has a well molded one-piece body with an
equally nicely done single piece chassis that includes the suspension bits
molded in place. Plastic axles are provided to which the plastic wheels with
vinyl/rubber tires are placed. The interior consists of a rear bench sea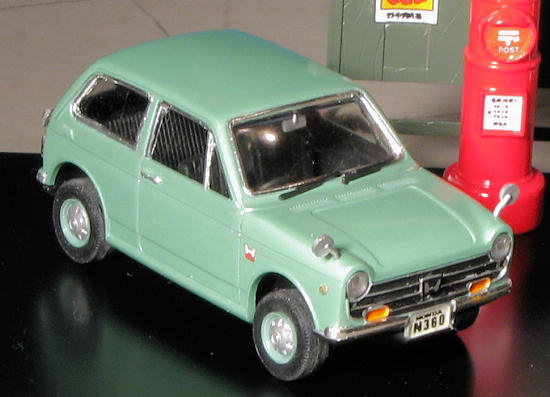 t and a
set of bucket seats in front with a
center hump on which the parking brake is attached. There are separate interior
side panels and an instrument panel with steering wheel and column shift lever.
Decals are provided for instruments.
t and a
set of bucket seats in front with a
center hump on which the parking brake is attached. There are separate interior
side panels and an instrument panel with steering wheel and column shift lever.
Decals are provided for instruments.
Clear bits include a one-piece interior glass section as well as clear headlights and tail lights. Other ancillery bits like windscreen wipers and mirrors are also separate as is the front bumper. The rear bumper is molded in with the chassis. This kit has no chrome-plated parts so that those bits will need to be painted or you can use chrome foil. The small decal sheet includes plates.
For the diorama bits, you have a nice base, a corner section of fence, a hand water pump with basin, a statue, and a mail box. There is also a power pole with a lamp attached to it. Though a recommended placement is given in the separate instructions, one can pretty well place these wherever one wants. A separate and very colorful decal sheet is included with the diorama bits that includes several posters and signs. As I cannot read Japanese, it is guesswork as to what they actually mean. Instructions for both parts of the set are in Japanese though some color information can be gleaned as Arii uses Gunze paint references.
To those who may be interested, the base is 5 x 7.5 inches and the car is 4 inches in length.
| CONSTRUCTION |
Checking over the instructions, I noticed that the
interior and chassis were painted black. So, I cemented the front seat assembly
as well as the back seats in place. Then, the axle retainer was glued in place
onto the chassis. The dash had the gear shift cemented in place and I glued on
the parking brake betwe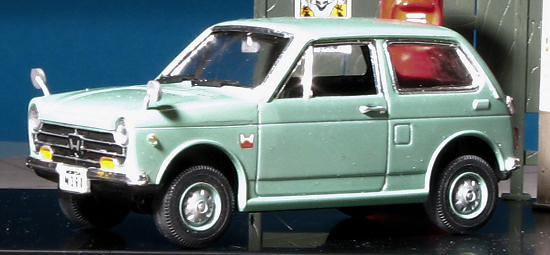 en the seats. I also painted the inside of the body
black.
en the seats. I also painted the inside of the body
black.
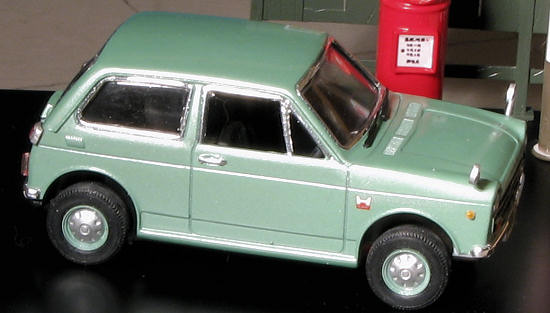
The body was cleaned up (as in removing the mold seams), given a light sanding and sprayed a pearlescent green using Tamiya rattlecan paint. When dry the bumpers got a covering with Bare Metal Foil Chrome. I also used this material for the trim around the windows.
Meanwhile, I started cleaning up the diorama bits I was going to use. I did not think that a pump and statue would be appropriate so simply assembled the power pole and the mail box. The fence sections were also cleaned up. These molds must have seen a lot of use as the back of the fence pieces had large, flat blobs of plastic closing up some of the gaps between the fence slats.
| COLORS & MARKINGS |
 This one is
pretty simple as car kits go. The interior and chassis were painted black and
then drybrushed with white so things would not be so monochromatic. The car body
itself was painted the aforementioned Pearlescent Green (TS-60). I really like
Tamiya paints for doing cars as it goes on well (as long as you do not overdo
it), and dries pretty quickly.
This one is
pretty simple as car kits go. The interior and chassis were painted black and
then drybrushed with white so things would not be so monochromatic. The car body
itself was painted the aforementioned Pearlescent Green (TS-60). I really like
Tamiya paints for doing cars as it goes on well (as long as you do not overdo
it), and dries pretty quickly.
Once the body had sit around for a day or so, I got out the chrome Bare Metal Foil and did the bumpers and window trim. The grille area was painted flat black and highlighted with Humbrol silver, which also went into the headlight area. I sprayed the wheels with the TS-60 and then brush painted the hub caps with the same silver. I also painted the interior of the car body with flat black after all this was done.
| FINAL CONSTRUCTION |
This took quite a bit of time as there are actually quite a few 'fiddly bits' to stick on this car, many of them in clear plastic. I'll state now that all the clear plastic bits save the window assembly and external bits were attached using clear gloss paint so as not to damage the paint surface.
Many of the clear bits had flash which needed to be
removed. The forward turn signal pieces would not fit into the housings so that
area just had orange paint brushed in. The backs of the side parking lights were
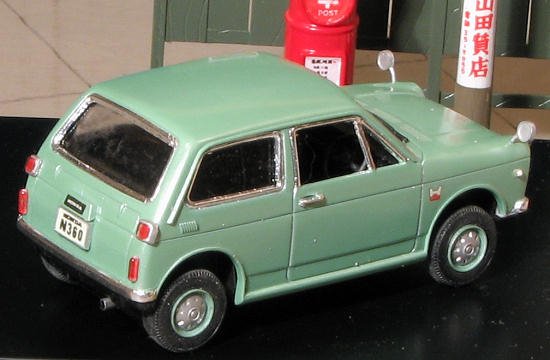
painted orange before those bits were glued in place. The tail lights and rear
turn signals were painted red and then had silver surround them as appro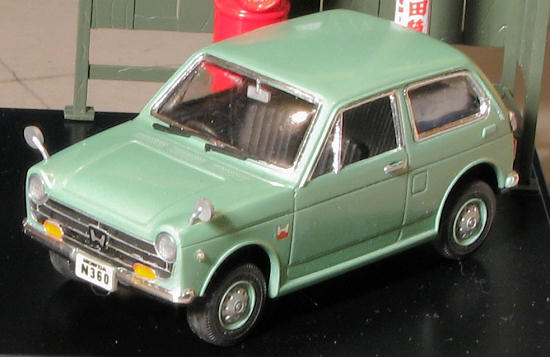 priate.
I had to hunt up photos of the real car to install these as there was some
ambiguity in the colors and position of them.
priate.
I had to hunt up photos of the real car to install these as there was some
ambiguity in the colors and position of them.
The window assembly is thick, has stress cracks and other molding defects in it so the concerned may wish to replace this with clear acetate. Attaching the dash took a bit of fiddling as the attachment lugs are small. The interior door sections just sort of slot in place once the dash is properly installed. There are no alignment lugs to help position these. I managed to break both windscreen wipers sanding off the sprue stubs. Decals are a bit thick and take a while to come away from the backing but otherwise are quite good. I used Mr. Mark Softer on them with some success. I slipped the tires over the wheels once I sanded away the mold seam. These were then glued on the plastic axles and slid through the openings. It does sit on all four wheels, something of which I have trouble with some kits. Finally, the chassis was glued to slots in the body with super glue and that was pretty much it for the car.
For the diorama base, I decided to not use the Buddha statue and the water pump. The mail box was sprayed Tamiya red but was too flat and too light so I brush painted Humbrol gloss red over it. The fence was painted RLM 82 and the power pole RLM 81. Once the rungs were painted all these items were glued onto the base. There are decals for some of these items so those were put in place. Apparently the accessory sheet is universal as there is no bus stop sign on which I can use those markings, for instance.
| CONCLUSIONS |
 Now I realize
that tiny, fuel efficient cars are not everyone's passion and those in 1/32 are
even less so, but I happen to have a fondness for these sorts of things. Some
say it because I use them around my slot car track and I cannot dispute that as
I do use them there when they are done. But I like to build non-complex kits
from time to time and these sorts of cars definitely fit into that category.
They are not snap tites and one does need some experiences to handle the small
parts. But they are fun to build and you will never see the air blue above the
desk when working on these.
Now I realize
that tiny, fuel efficient cars are not everyone's passion and those in 1/32 are
even less so, but I happen to have a fondness for these sorts of things. Some
say it because I use them around my slot car track and I cannot dispute that as
I do use them there when they are done. But I like to build non-complex kits
from time to time and these sorts of cars definitely fit into that category.
They are not snap tites and one does need some experiences to handle the small
parts. But they are fun to build and you will never see the air blue above the
desk when working on these.
| REFERENCES |
http://en.wikipedia.org/wiki/Honda_N360
March 2012 Thanks to Hobby Link Japan for the review kit. You
can get yours
here.
If you would like your product reviewed fairly and fairly quickly, please contact the editor or see other details in the Note to Contributors.