Minicraft 1/144 Boeing 377 Stratocruiser
|
KIT # |
14445 |
|
PRICE: |
MSRP $12.99 |
|
DECALS: |
One version: Pan American |
|
REVIEW: |
|
|
NOTES: |
|
HISTORY |
It is really hard to add to all the usual stuff I have said over the past year about this aircraft. I have always found it interesting that when one manufacturer brings out a kit that modelers have wanted for many years, all of a sudden we are 'inundated' by other kits of the same thing. One has to wonder what the marketing guys used for a barometer to see what we modelers would buy. For years, we all struggled with the POS kit that Airliners America had foisted on us. Then all of a sudden, there was a quality vacuform in 1/144 then a few years later this kit by Minicraft followed closely by the 1/72 Academy kit. Now as nice as all of these kits are, I can't see most of us building more than one of each. Wonder if anyone will be doing this in 1/48? :o)
Anyway, if you want a history of the 377, then I can recommend reading the opening to the Academy 1/72 377 Preview as it sure beats having to repeat it here!
|
THE KIT |
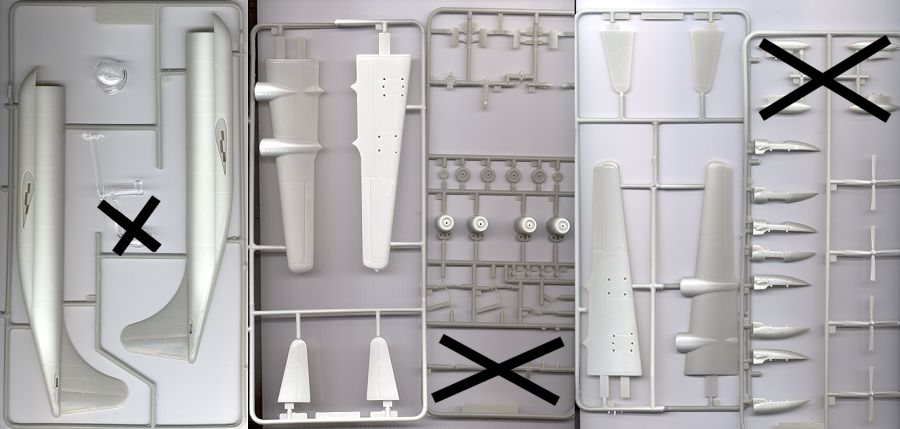
There is no difference at all in the parts of this kit and the previously issued KC-97G kit. In fact, there are parts missing off the 377 sprues and those have been x'd out on the image above (I used the image from the KC-97G kit rather than rescan the sprues). As nice as the Minicraft effort is, the kit is not really that highly detailed and suffers from toy-like wheels that have no detail in them at all and are too skinny. It also has zero engine detail in the nacelles and the props are close, but no cigar. Fortunately, there are replacements for the props and engines available in Cobra Company's set 44004. What can be done about the wheels I do not know.
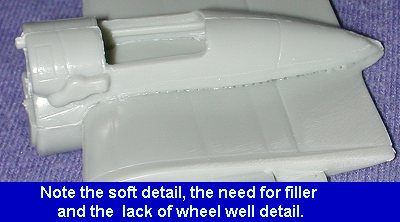
 As for other detail, there isn't much. There is no wheel well detail and they
are not even boxed in. The struts look quite weak, but perhaps they will be
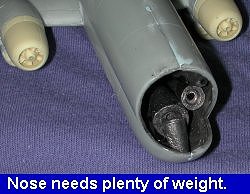
strong enough to hold up the kit. You do need to add quite a bit of weight to
the nose of this aircraft to keep it on its nose gear. One thing that I like
about this kit is that there are no cabin windows. While I'm sure that was just
so that they could do a KC-97 with the same fuselage, it makes it much easier.
Most airliner modelers would much rather use decals for windows than to mess
with clear bits that show no interior! Surface detailing is also not very
cleanly done. The wing tips, for example, are rather bulbous and there are large
lumps where the holes for the underwing tanks would go that will have to be
sanded down.
As for other detail, there isn't much. There is no wheel well detail and they
are not even boxed in. The struts look quite weak, but perhaps they will be
strong enough to hold up the kit. You do need to add quite a bit of weight to
the nose of this aircraft to keep it on its nose gear. One thing that I like
about this kit is that there are no cabin windows. While I'm sure that was just
so that they could do a KC-97 with the same fuselage, it makes it much easier.
Most airliner modelers would much rather use decals for windows than to mess
with clear bits that show no interior! Surface detailing is also not very
cleanly done. The wing tips, for example, are rather bulbous and there are large
lumps where the holes for the underwing tanks would go that will have to be
sanded down.
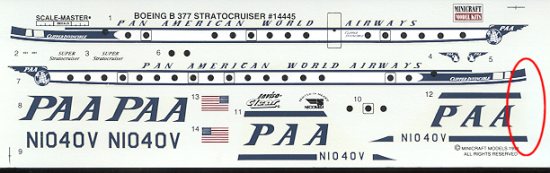
The instruction sheet is more than adequate for a kit of this type and has 6 easy construction steps. Other than the decals, color for this kit consists of aluminum, white, and black and those items that need painted are called out in the sheet. This kit is in the 'intermediate' PAA scheme with a white upper fuselage and tail. The early aircraft were in overall aluminum. The decal sheet is very well printed and fully in register, which is a big surprise for a Scalemaster sheet. However close inspection shows that it was printed in Mexico by Necomisa, which explains the clarity of the sheet. One thing I noticed on my sheet was that the clear coating on the decals was missing from the very far right part of the sheet. Look closely at yours and if you see a similar problem, you can fix it by coating it with Microscale Decal Film before using it. On the sheet below, it is the area circled in red.
|
CONSTRUCTION |
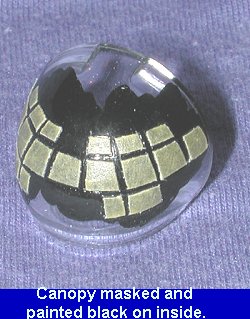
Since I had everything I needed to do a decent Stratocruiser, I figured I may as well get things underway. First order of business was to glue together the wings, tailplanes and fuselage. The fit is ok, but you will need to use filler on most of the seams as well as sandpaper on the parts to get rid of some extraneous pips and bumps that have crept into the mold. The interior of the fuselage had a very large weight superglued into it and was then painted flat black. I'll leave off the canopy section until the wings and tailplanes are on to see if more weight may be needed. Its 1/72 cousin needed a lot to keep from tailsitting.
 The fuselage required filler on the seams as well
as having a couple of holes in the aft fuselage filled. This is where a bank of
lights would have fit on the tanker version. I then tried to fit the tailplanes
into their slots. No go. It seems that either the tailplanes are too fat or the
area into which they fit is too thin. The easy recourse was to thin down the
tailplanes where they fit with some vigorous sanding. Once I got them to fit,
they needed a healthy slather of filler on the top to blend in with the rest of
the fuselage.
The fuselage required filler on the seams as well
as having a couple of holes in the aft fuselage filled. This is where a bank of
lights would have fit on the tanker version. I then tried to fit the tailplanes
into their slots. No go. It seems that either the tailplanes are too fat or the
area into which they fit is too thin. The easy recourse was to thin down the
tailplanes where they fit with some vigorous sanding. Once I got them to fit,
they needed a healthy slather of filler on the top to blend in with the rest of
the fuselage.
Then I went to work on the engine nacelles. These are a simple two piece affair with big alignment pins to make sure you don't mess it up. The nacelles are not that great a fit and the ones that house the landing gear are totally devoid of any detail or even enclosed wells. I'll leave it to the dedicated to fix that situation. Since I had to clamp the nacelles into place to get them to come close to fitting, it took several days to get all four of them situated on the wing. Even at that, they needed quite a bit of sanding and filler to smooth things out.
 Once the filler had dried and things were relatively
clean, it was time to attach the engines. Now the ones that come with the kit
are totally devoid of any engine detail. The rest of the detail isn't the best
either. This is where the aforementioned detail set comes in handy. First of all
the Cobra Company engines had to be removed from their resin blocks. Once that
was done, each
Once the filler had dried and things were relatively
clean, it was time to attach the engines. Now the ones that come with the kit
are totally devoid of any engine detail. The rest of the detail isn't the best
either. This is where the aforementioned detail set comes in handy. First of all
the Cobra Company engines had to be removed from their resin blocks. Once that
was done, each 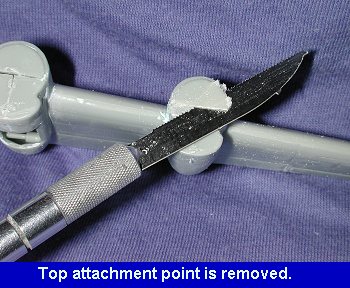 of the kit nacelles
had to have the original attachment points sanded off so that the new engines
would fit. This means providing a flush surface so I used a razor saw to remove
the excess plastic and then sanded the surface smooth with a sanding
block.
of the kit nacelles
had to have the original attachment points sanded off so that the new engines
would fit. This means providing a flush surface so I used a razor saw to remove
the excess plastic and then sanded the surface smooth with a sanding
block.
Once the nacelles were ready and the engines were ready, the mating surface had superglue applied to it and the resin engines were set into the glue. Naturally, I messed up most of them and it means that I'll have to run filler in the offending gaps. This was a real exercise in frustration. The shape of the cowlings and intakes combined with the poor fit of the engine nacelles made for a filler and filing nightmare. This was because so much was oddly shaped and still needed filler. The job was started and stopped many times over about a three week period. I eventually just bit the bullet and finished it! Before gluing the wings, I test fitted the props to the engines. They are a nice, snug press fit.
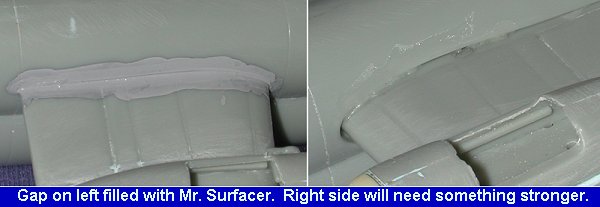 Now that the engines were done, it was time to glue
the wings to the fuselage. There is an interlocking system for the two wings,
but I found that to be more of a hassle than a help so trimmed them down. I then
glued one wing on and let it dry. Then the other wing was glued in place. It
will come as no surprise that there was a huge gap around one of the wings.
There were a few on the other wing as well, but not that bad. In fact, I filled
the smaller gaps with several applications of Mr. Surfacer, as you can see by
the image. The wing with the larger gaps needed regular filler to take care of those canyons!
Now that the engines were done, it was time to glue
the wings to the fuselage. There is an interlocking system for the two wings,
but I found that to be more of a hassle than a help so trimmed them down. I then
glued one wing on and let it dry. Then the other wing was glued in place. It
will come as no surprise that there was a huge gap around one of the wings.
There were a few on the other wing as well, but not that bad. In fact, I filled
the smaller gaps with several applications of Mr. Surfacer, as you can see by
the image. The wing with the larger gaps needed regular filler to take care of those canyons!
   |
Once
the wings were on, I went to the front. The transparency was masked with Tamiya
masking tape. Since there was nothing to see in the cockpit, I painted the
inside of the transparency black. After making sure that the weight I put in was
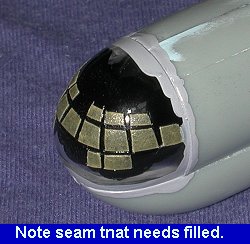
enough, the transparency was glued in place. Then the usual slathering of
filler was done to get rid of the rather large seam and it was smoothed down.
Then, it was off to the paint shop!
|
PAINT & DECALS |
 Initially, the kit
livery is one I didn't want to do. However, the only aftermarket decal sheet I
could find wasn't one I liked either so I prepared to do the kit markings. This
Pan Am livery is not the very first one carried by the 377, but the next
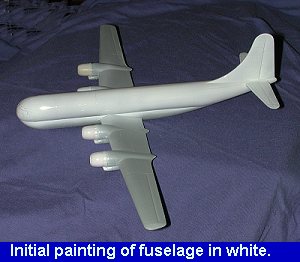
generation with a white top and tail. Since I was going to be using aluminum
Metallizer for the rest of the scheme, it meant that the entire aircraft would
get a gloss finish. This procedure was started by painting the upper fuselage
and tail in white. This way, I had somewhere to hold the kit while painting!
Initially, the kit
livery is one I didn't want to do. However, the only aftermarket decal sheet I
could find wasn't one I liked either so I prepared to do the kit markings. This
Pan Am livery is not the very first one carried by the 377, but the next
generation with a white top and tail. Since I was going to be using aluminum
Metallizer for the rest of the scheme, it meant that the entire aircraft would
get a gloss finish. This procedure was started by painting the upper fuselage
and tail in white. This way, I had somewhere to hold the kit while painting!
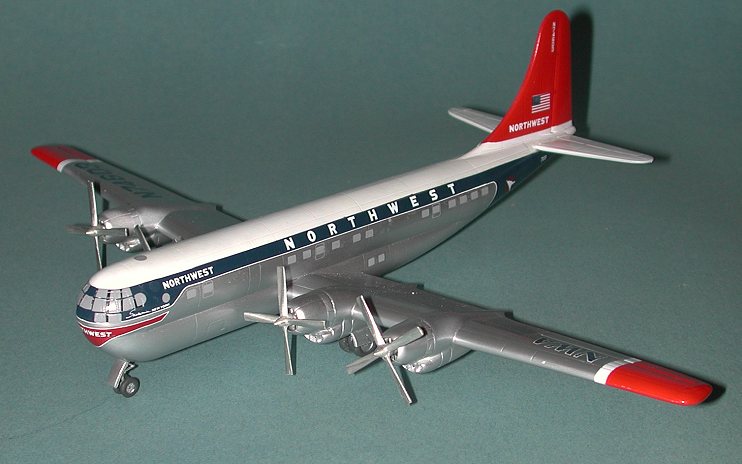
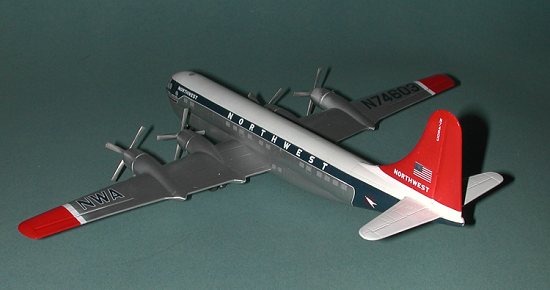
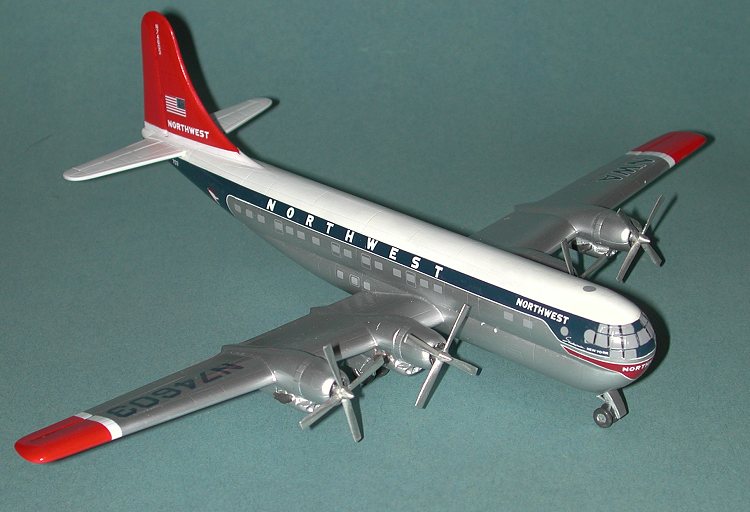
 While
that first shot was drying. I came across an old Airliner's America resin
Stratocruiser kit that I had started many years ago, but gave up on as it is
just a piece of junk. However, it did have some very nice Scalemaster decals for
Northwest Airlines. Here is what I would use for this kit. It meant a trip back
to the construction table to fill in the holes for the nose radome which wasn't
used on this aircraft. It also meant that I would have to do some additional
painting and masking that the PAA livery didn't have.
While
that first shot was drying. I came across an old Airliner's America resin
Stratocruiser kit that I had started many years ago, but gave up on as it is
just a piece of junk. However, it did have some very nice Scalemaster decals for
Northwest Airlines. Here is what I would use for this kit. It meant a trip back
to the construction table to fill in the holes for the nose radome which wasn't
used on this aircraft. It also meant that I would have to do some additional
painting and masking that the PAA livery didn't have.
 Once the
nose filler was dry and sanded, the rest of the airframe was painted white and
those parts I wanted to stay white were masked off with Tamiya masking tape.
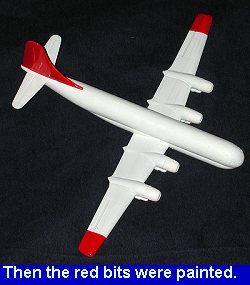
Then the tail and wing tips were painted red using Gunze Acrylics right from the
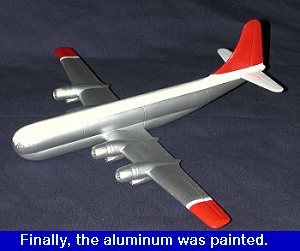
bottle. When that had dried, the parts I wanted to keep white were then masked
off and the rest of the airframe painted with Testors aluminum Metallizer.
That was the easy part. Now came applying the decal sheet. It was while
perusing the decal sheet that I noticed that I had painted the entire tail red.
It was supposed to have a bit of white on the bottom edge. Out came the airbrush
and on went the tape again while the lower section was repainted.
Once the
nose filler was dry and sanded, the rest of the airframe was painted white and
those parts I wanted to stay white were masked off with Tamiya masking tape.
Then the tail and wing tips were painted red using Gunze Acrylics right from the
bottle. When that had dried, the parts I wanted to keep white were then masked
off and the rest of the airframe painted with Testors aluminum Metallizer.
That was the easy part. Now came applying the decal sheet. It was while
perusing the decal sheet that I noticed that I had painted the entire tail red.
It was supposed to have a bit of white on the bottom edge. Out came the airbrush
and on went the tape again while the lower section was repainted.
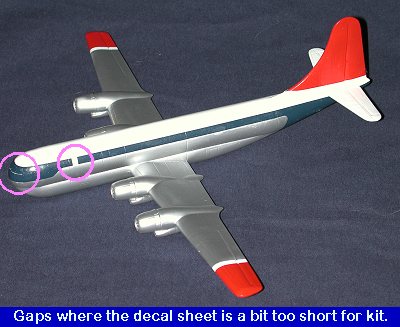 This
Scalemaster sheet has been sitting in a box for about 15 years. The sheet tells
one to first apply the large areas and then the pin striping. The first part I
applied were the dark blue bits. Naturally, they didn't fit too well as they
were designed for a different fuselage. There were some gaps in the front of the
fuselage and the stripes were not long enough. Fortunately, there was a small
section of decal added in for repair work and it was put to good use. It still
wasn't enough, but fortunately, I had an old sheet of Scalemaster stripes that
seemed to do the trick.
This
Scalemaster sheet has been sitting in a box for about 15 years. The sheet tells
one to first apply the large areas and then the pin striping. The first part I
applied were the dark blue bits. Naturally, they didn't fit too well as they
were designed for a different fuselage. There were some gaps in the front of the
fuselage and the stripes were not long enough. Fortunately, there was a small
section of decal added in for repair work and it was put to good use. It still
wasn't enough, but fortunately, I had an old sheet of Scalemaster stripes that
seemed to do the trick.
Putting on the rest of the decals was a
long term job. The white outline stripes fit rather well, but were a touch short
as well. Scalemaster stripes decals to the rescue again. When it came time to
install the cockpit decals, I wasn't sure if I wanted to use them or keep the
masked windows. Eventually I used the decals so they would match the window
decals on the side of the fuselage. They are too large and if I had to do it
again would not use them. Instead, I'd paint the kit windows grey, which is what
I should have done in the first place. Placement of the rest of the decals was
straight forward.
|
CONSTRUCTION CONTINUES |
Next were the gear doors. For the nose, there is but one
door. I removed the attachment point and butt glued it in place, otherwise it
would not have fit. The main gear doors were troublesome. On my sprue, one of
the doors had been nearly cut in half by something during the molding. By this
time I was in no mood to do any major work so left it alone. The doors are
supposed to attach via a C shaped attachment. However, either the C wasn't open
enough or the plastic too thick, but they didn't fit worth a hoot. They were
superglued in place as best I could get them.
 Now that the kit was decaled, it was time to add the landing
gear. The nose gear is designed to be installed before the fuselage halves are
glued together, however, I knew that I'd break it off so waited until the end.
The gear themselves are very flimsy and really need to have someone do metal
replacements for them. After trimming off the attachment lugs, I got the nose
gear in there fairly well. The main gear were easy as the holes were about twice
the size as the pins on the gear. Super glue was used in both cases. Same with
attaching the wheels. The wheels are really not well done and are very thin and
nearly toy-like. It would have been nice if Cobra Company would have done resin
wheels as well. Those fit well to the main gear using super glue.
Now that the kit was decaled, it was time to add the landing
gear. The nose gear is designed to be installed before the fuselage halves are
glued together, however, I knew that I'd break it off so waited until the end.
The gear themselves are very flimsy and really need to have someone do metal
replacements for them. After trimming off the attachment lugs, I got the nose
gear in there fairly well. The main gear were easy as the holes were about twice
the size as the pins on the gear. Super glue was used in both cases. Same with
attaching the wheels. The wheels are really not well done and are very thin and
nearly toy-like. It would have been nice if Cobra Company would have done resin
wheels as well. Those fit well to the main gear using super glue.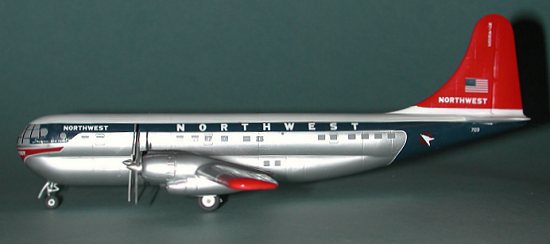 Final step
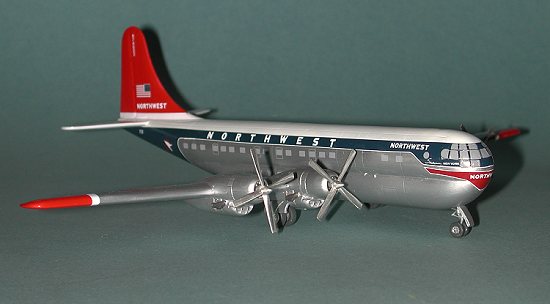
were the props. The Cobra Company metal props are nicely done and were given a
light sanding to add some sheen before press fitting into the engines. Last
thing was a misting of clear acrylic to seal things in.
Final step
were the props. The Cobra Company metal props are nicely done and were given a
light sanding to add some sheen before press fitting into the engines. Last
thing was a misting of clear acrylic to seal things in.
|
CONCLUSIONS |
Frankly, it looked for a while as if I'd never get the kit done. The uneven molding and soft detail matched to the less than perfect fit turned this kit into a chore. It is almost a shame to waste the fine Cobra Company resin engines on such a kit, but it really needed it. Beginners should stay clear of it and most intermediate modelers will find it a frustrating kit to build. However, perseverance can eventually give you a kit that will look nice on the shelf. After building it, I can see why I have never seen one at a show.
Recommended to those who MUST have a 1/144 Stratocruiser and are willing to do the work needed.
Copyright ModelingMadness.com. All rights reserved.
Review kit courtesy of me and my credit card, detail set courtesy of Cobra Company.
If you would like your product reviewed fairly and fairly quickly, pleasecontact the editor or see other details in the Note to Contributors.
Back to Reviews Page 2021