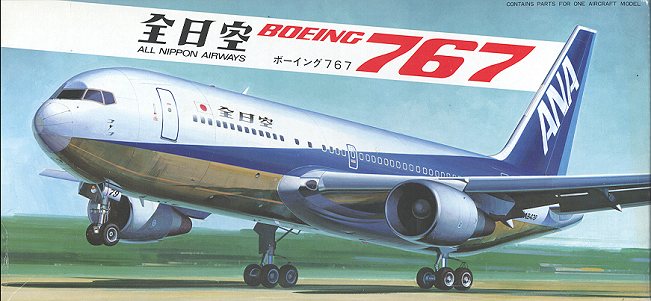
Hasegawa 1/200 B.767-200
A Primer on building Airliner Models
|
KIT # |
Lc13 |
|
PRICE: |
$17.00 |
|
DECALS: |
See review |
|
REVIEW : |
|
|
NOTES: |
|
A primer on building airliner models
|
HISTORY |
The 767 is a fourth-generation airliner developed with an eye on
improved fuel economy, better performance and the desire for a 'wide body'
medium/long range airliner. To give this, the 767 has 3-2-3 seating in coach
class, fuel efficient high-bypass turbofans and the ability to fly on only one
engine, thanks to the excess thrust provided by its new engines. The 767 is also
one of the earlier airliners to go to the 'glass cockpit' design of digital
instruments and CRTs. The aircraft is still in production at Boeing's plant in
Washington state.
|
THE KIT |
While it may be
a model of a fourth generation airliner, this is a first generation Hasegawa
airliner. As a result, nearly all the panel lines are raised. It also has a
separate transparency for the windscreen, though none for the cabin windows.
There is no interior or cockpit in this scale. The kit is designed to be built
wheels down so any desire to display it in flight will require some card stock
and filler. A nice nose weight in the form of a big screw is provided. To
display it on its stand, a hole in the fuselage bottom will have to be
opened. Just
a note, this is a 767-200. Most of the currently available kits are the longer
-300 version. There is a note in the Liveries Unlimited sheet stating that the
-200 molds were permanently modified to make the -300, however a quick
check of the Hobby Link Japan website does show a couple of -200 kits still
available. It is quite possible that these are left-overs from the -200
production run and just reboxed with new decals. 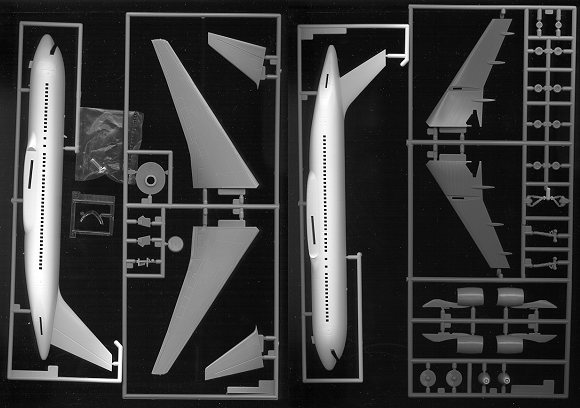
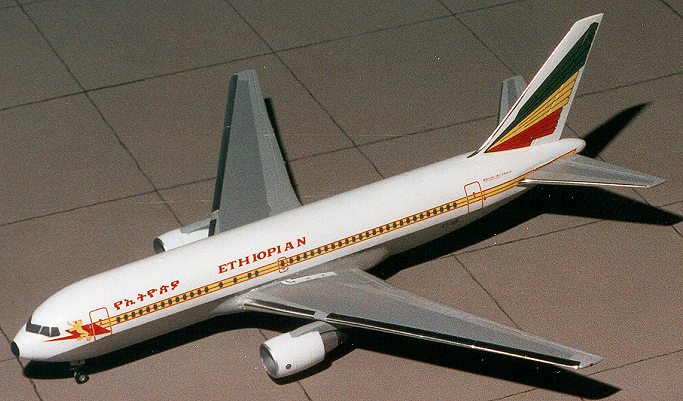
 I bought this kit on the second hand market and as
such, it didn't come with a decal sheet. Not a problem as I plan on using
Liveries Unlimited's new 767 Ethiopian Airlines sheet for this one.
I bought this kit on the second hand market and as
such, it didn't come with a decal sheet. Not a problem as I plan on using
Liveries Unlimited's new 767 Ethiopian Airlines sheet for this one.
|
CONSTRUCTION |
Meanwhile, I glued together some of the other components
including the wings and the engines. You can leave off the aft section of the
engine until the final construction as they just pop right in. Back
at the fuselage; after four filler applications (actually, it isn't as bad as it
sounds because the third and fourth application were just spot ones to take care
of some rough spots), the fuselage was pretty smooth and ready to go. The way to
tell if you have it smooth enough is
to run your finger over the window areas. If you can
Once
the wings were smoothed up a bit on the leading edge, any areas that needed some
filler were attended to. Then the wings were glued onto the wing root. Mine fit
pretty well, though the very front part was in need of filler. I suspect I had
gotten too eager with the sandpaper doing the fuselage! Once all
that was done, the kit was set aside for about two weeks. This let the filler do
a good job of completely curing. After that time, it was obvious by running my
finger over the fuselage windows that another application of filler was needed.
That was done and smoothed down. Another day or two of curing and it was of to
the paint shop for the first application of paint.
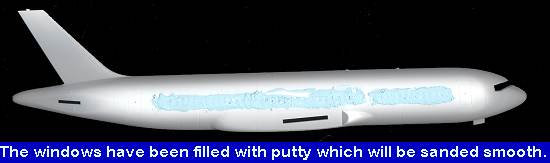
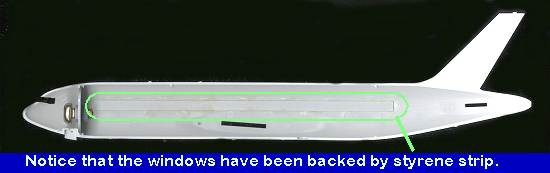 The first step was
to decide if I wanted to fill in the cabin windows. Most airliner modelers
replace these with decals and since the decals I am going to use included
windows, that is what I did. First of all, I used some strip styrene to back up
the windows so that I wouldn't have an interior full of bits of putty. Then the
nose weight was installed in one fuselage half. This wasn't painted as suggested
in the instructions as the windscreen would be filled in as well for the
decal.
The first step was
to decide if I wanted to fill in the cabin windows. Most airliner modelers
replace these with decals and since the decals I am going to use included
windows, that is what I did. First of all, I used some strip styrene to back up
the windows so that I wouldn't have an interior full of bits of putty. Then the
nose weight was installed in one fuselage half. This wasn't painted as suggested
in the instructions as the windscreen would be filled in as well for the
decal.
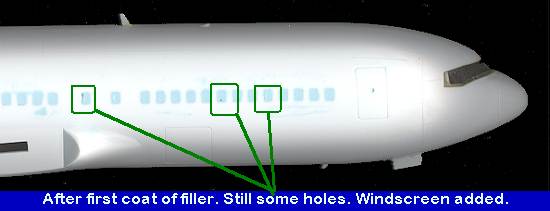
 When dry, the first
of several coats of filler was applied. I say several coats as fillers tend to
shrink, leaving indentations of where the windows were. For the decals to be
effective, the fuselage must be very smooth. After the first coat was applied,
the fuselage halves were glued together. Once the fuselage halves were
dry, the windscreen was glued in place. I figured I may as well get all
the fuselage puttying done at the same time!
When dry, the first
of several coats of filler was applied. I say several coats as fillers tend to
shrink, leaving indentations of where the windows were. For the decals to be
effective, the fuselage must be very smooth. After the first coat was applied,
the fuselage halves were glued together. Once the fuselage halves were
dry, the windscreen was glued in place. I figured I may as well get all
the fuselage puttying done at the same time!
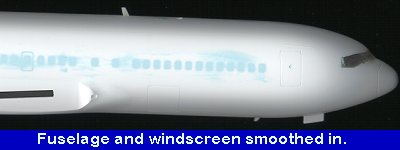 feel the windows, it needs
more filler. Alternatively, you can get it as smooth as you can and hope that
the paint will take care of any minor rough spots. You can see my final result
on the image to the left. It was now time to add the wings.
feel the windows, it needs
more filler. Alternatively, you can get it as smooth as you can and hope that
the paint will take care of any minor rough spots. You can see my final result
on the image to the left. It was now time to add the wings.
|
PAINT |
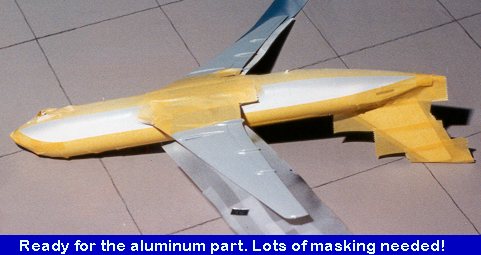
During all of this, the
engines and pylons were painted. Despite being rather small bits, they require
the same three colors that the rest of the aircraft does as well as some extra.
The pylons are in the grey color. These were then masked and the cowlings
painted white. Then the body was masked and just the edges of the intake and the
inside of the intake were painted aluminum. The exhaust cones are two colors,
aluminum and a darker metal. I used Magnesium. Again, the Aluminum Metallizer
was masked with no problems. The landing gear components and wheel wells are
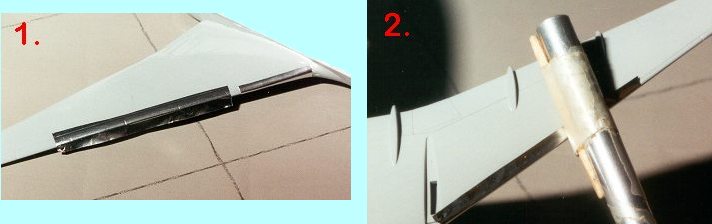
grey (like the underside) and the wheels are aluminum. USING BARE METAL FOIL Next step was to apply the
Bare Metal Foil (BMF) on the leading edges of the tail, tailplanes and wings.
This stuff really is great. The one thing those of you new to it will notice, is
that you tend to waste most of it. This cannot be helped as you want to make
sure you have enough to cover the spot. Putting it on is actually quite
simple. Just follow the steps below. The pictures of various steps are
numbered and shown below.
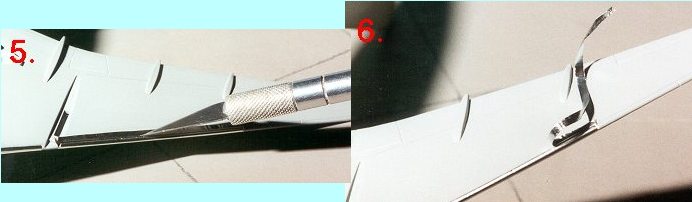
First, you cut a section out of the sheet. By this,
I don't mean you actually cut the backing, but you do want to slice through the
foil itself. A new blade is paramount for using BMF. Take the piece and
place it over the area to be foiled (1). Then burnish down one side of it. I use an
Xacto knife handle wrapped in tape(2). The tape is softer than the handle and has
some give to it. You can also use a toothpick as it is handy for tight places.
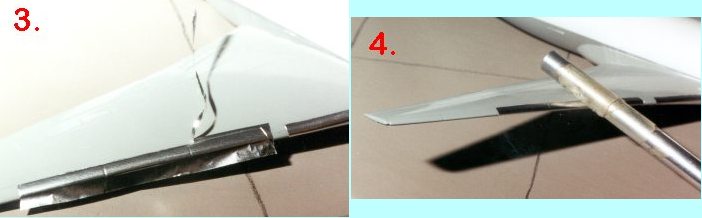
Once the one side is burnished down, you'll see where to cut it. In this case it
is a slat groove. Cut one side and remove the excess(3). Then burnish
it down again to smooth out any ragged edges you may have from cutting it(4).
Burnish
the rest of
the BMF around the leading edge and onto the underside. Again, cut the BMF(5). I make sure that I cut the foil at a natural break in the aircraft
metal like a panel line or something similar. This is especially helpful when
doing a long area. That way, you can do it in segments. If there are no seams to
follow, as on the tail, then you just have to freehand it. Others have told me that
they can burnish overlapping foil areas and have the seam disappear, but I have
never been able to do it to my satisfaction. Once the foil is cut,
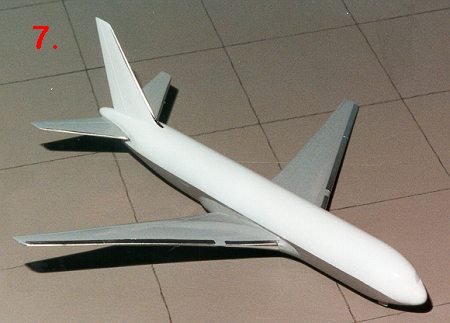
then carefully remove the excess(6). Then burnish
this piece down on the aircraft. If you want, you can follow up by burnishing
the completed section with a Q-tip or cotton bud. That will help push the foil
into seams. After all the areas are finished(7),
you are ready to go onto the next stage.
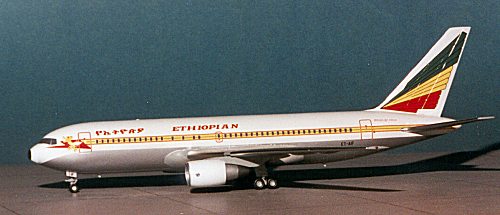 The Ethiopian Airlines planes are, like most airliners today,
mostly white and grey. Being a Boeing aircraft, there is a non-standard grey
that is used on all their aircraft. This color is made by Xtracolor, but the
paint is often difficult to find. After many e-mails and inquiries, I was told
that probably the best substitute is Testors Canadian Voodoo Grey, a paint that
is quite easy to find. The tailplanes were snapped into place and they, as well
as the wings and engine pylons, were painted in Voodoo Grey. All the areas of
filler were also painted this color. The reason being is that regardless of how
many coats of white one puts over bare filler, the filler always seems to show
through! The Voodoo Grey also helps to fill any tiny pinholes that inevitably
show up in fillers.
The Ethiopian Airlines planes are, like most airliners today,
mostly white and grey. Being a Boeing aircraft, there is a non-standard grey
that is used on all their aircraft. This color is made by Xtracolor, but the
paint is often difficult to find. After many e-mails and inquiries, I was told
that probably the best substitute is Testors Canadian Voodoo Grey, a paint that
is quite easy to find. The tailplanes were snapped into place and they, as well
as the wings and engine pylons, were painted in Voodoo Grey. All the areas of
filler were also painted this color. The reason being is that regardless of how
many coats of white one puts over bare filler, the filler always seems to show
through! The Voodoo Grey also helps to fill any tiny pinholes that inevitably
show up in fillers.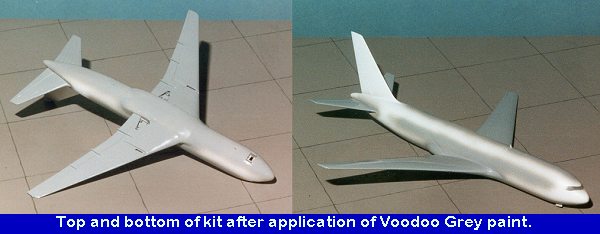
|
DECALS |
Once finished with the BMF, I used a product by
Liveries Unlimited called Corroguard Inspar Panels. These are decals that are
used for the sections in the middle of wings and stabilizers. On real airliners,
these areas are treated with a material called Corroguard that helps prevent
corrosion. These decals duplicate that material and save you having to paint
them in. They are available for all sorts of aircraft in both 1/144 and 1/200
scale and cost between $2-$5 depending on the aircraft. Naturally a set for the
747 will be more expensive than for a DC-9. They are easy to apply and really
look nice when done.
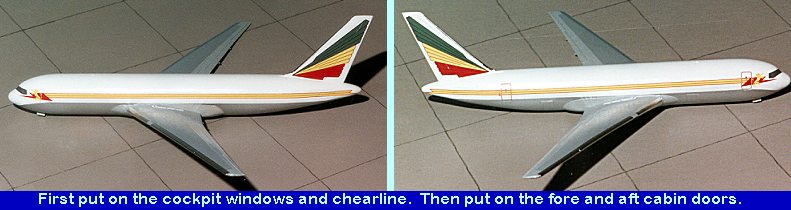
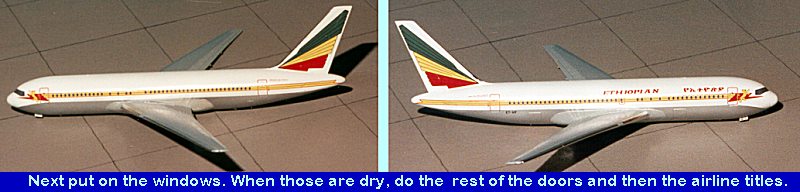
Next the decals were applied. I used Liveries Unlimited set AGA2-101 for an
Ethiopian Airlines 767-200. It is a very nice and colorful scheme and hasn't
been turned into a billboard like so many other airlines. The first parts I
applied were the cockpit windows and the tail markings. I did the cockpit early
so that I would have a reference for the cheat line and cabin windows. The
next part to be added was the cheat line. This will determine the placement of
most of the rest of the decals. I lined mine up and made sure it went through
the tail plane attachment slot. It is important that you do NOT glue the
tailplanes on this kit until the very end or this sequence will be a real
disaster as you can see from the images below. I also put on the big tail marking at this time.
Once
the cheat lines are in place and dry, you can add the fore and aft cabin doors.
It was at this time that I discovered that I put my cheat line too high! Well,
this makes error # 5,384,704 in my modeling career! I just had to grin and
bear it as my success rate with refloating decals of this size is about zero.
Once the fore and aft cabin doors were in place and dry, I put on the first of
the cabin windows. The front one is rather easy to put in place. Just remember
not to put them in backwards. The part with all the gaps is to the aft. The rear
section looks like a uniform row, but you'll notice one decal slightly
farther away from the others. This is for the emergency exit so needs to go to
the front of that decal section.
Once those are dry, there
is another decal that overlays them that is for window frames. You can omit it
if you wish and no-one would be the wiser as they are not very obvious. I used
them. Now you can put on the wing emergency exit door. It goes over the one
window in the aft section that stands a bit apart of the others. Once that is on
and dry, you can place the wing emergency exit walkway under that door. The
rest of the decals are pretty easy to put on. Just follow the guide and take
your time. The most difficult of the other decals is the black outline to the
lion on the front of the cheat line. Again, easy does it. The 'Boeing 767-200'
logos for aft of the rear cabin door are handed so make sure the proper one goes
on the proper side. Throughout the decaling operation I used the Microscale
setting solutions. These work very well and don't cause the colors to bleed, a
problem you may encounter with stronger solutions. After the decals are good and
dry, wipe down the aircraft with water and dry it thoroughly. You can then spray
on your favourite clear overcoat to seal them in. 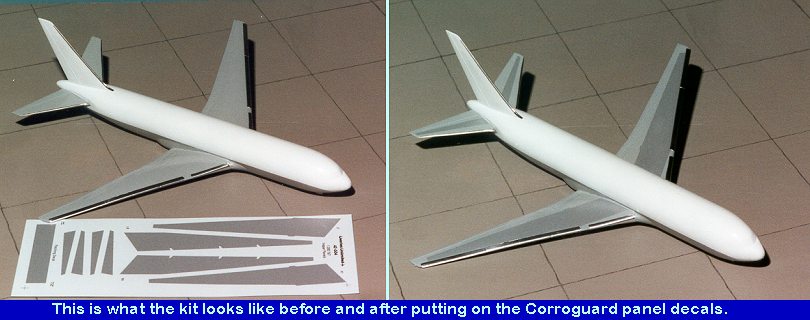
|
CONSTRUCTION |
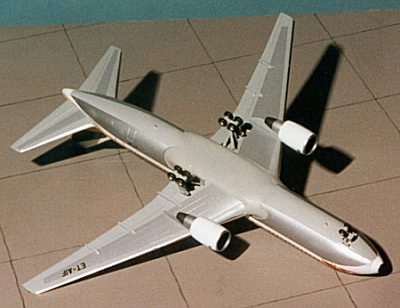
The final constructions of sorts consisted of snapping
the nose gear into place as well as gluing the main landing gear and struts into
the wings. A helpful hint is to let the gear dry with the weight of the aircraft
on it. That way you can be sure that all the wheels touch the ground. Make sure
this is done on a solid, flat surface. Last but not least, the engines were
pressed into place under the wings. As you may have noticed, I prefer to press
fit as much as possible. This leaves less chance for glue to mess something up,
especially with all the decals used on this aircraft.
 Now you should have a pretty complete-looking aircraft. The only
things left to put on it are the horizontal stabilizers, engines, and the
landing gear stuff. With my kit, the stabilizers just snapped into place without
the need for glue. Same with the engines and pylons. The landing gear components
that had previously been painted, were now assembled. I don't know about you,
but painting all those tiny wheels was not my idea of tons of fun. I'm just glad
I wasn't building a C-5! These were then glued into place in their respective
locations.
Now you should have a pretty complete-looking aircraft. The only
things left to put on it are the horizontal stabilizers, engines, and the
landing gear stuff. With my kit, the stabilizers just snapped into place without
the need for glue. Same with the engines and pylons. The landing gear components
that had previously been painted, were now assembled. I don't know about you,
but painting all those tiny wheels was not my idea of tons of fun. I'm just glad
I wasn't building a C-5! These were then glued into place in their respective
locations.
|
CONCLUSIONS |
There you have it. A completed airliner kit. These construction
techniques can be used with airliners of any scale and complexity. What looks
like a quick build can take a bit of time, but the result is well worth the
effort. The nice thing about most of these 1/200 kits is that they can be built
in just a very few hours if one wants to. It is a nice introduction to the genre
for newer modelers and one doesn't have to fuss with interiors or other things
like that.
I can recommend any of the Hasegawa 1/200 kits to those who like
airliners or just want to do something different.
July 2000
Copyright ModelingMadness.com. All rights reserved Review kit courtesy of me and my wallet; decals 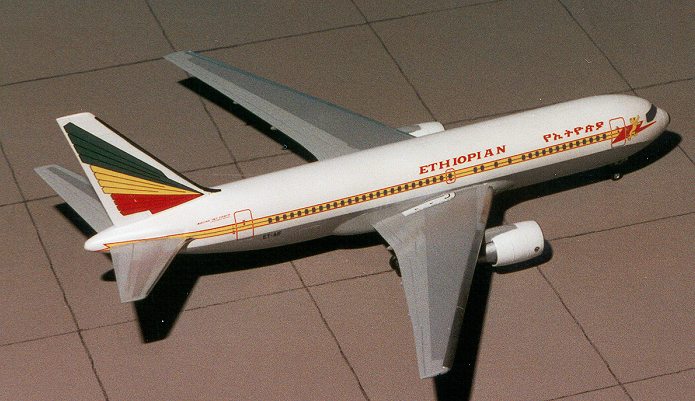
If you would like your product reviewed fairly and fairly quickly by a site that has over 1,000 visits a day, pleasecontact the editor or see other details in the Note to Contributors.