Miku Models 1/72 Zlin 526A
| KIT #: | 72078 |
| PRICE: | Approx $15 from http://hobbyshop.cz |
| DECALS: | Two options |
| REVIEWER: | Scott Van Aken |
| NOTES: | Resin with vacuformed canopy. |
| HISTORY |
Zlin aircraft have been producing trainers, aerobatic aircraft and standard civil aviation light aircraft since 1934. Their aerobatic models have won several of the world aerobatic championships in the 1950s and 1960s with light and easy to fly aircraft, mostly powered by in-line six cylinder air-cooled engines based on the German Argus engines of WWII, but evolved with more modern accessories. The series 526 was one of the more popular types and was exported to a number of countries for use by enthusiasts in the late 1960s and early 1970s.
| THE KIT |
Opening the small and somewhat plain box with a nice side view of the aircraft on it, you will find a small ziplock bag with the various resin parts in it. Most are molded so that there will be little resin to remove in order to free the parts from the pour stubs. In fact, I'd say a sharp hobby knife will work for most of the parts. Others can be sanded free and those in the wafers will be easily removed with the knife.
 The parts are nicely molded in a tan resin, and while I
did find a few glitches (slightly short shot aft cockpit floor, some minor pitting and a piece
of crud or two on the surface), the overall molding is very well done. It is
quite obvious that Miku Model has several similar Zlin kits as there is a second
seat included with this one for the later two seat trainer version. The only
real options are whether or not to install the wingtip fuel tanks and a
choice of propellers depending on if you choose the British registered or German
registered aircraft. The modeler will have to add a couple of sections of
stretched sprue for the landing gear as well. The single transparency (why can't
these folks supply two?) is well done, though a tad cloudy.
The parts are nicely molded in a tan resin, and while I
did find a few glitches (slightly short shot aft cockpit floor, some minor pitting and a piece
of crud or two on the surface), the overall molding is very well done. It is
quite obvious that Miku Model has several similar Zlin kits as there is a second
seat included with this one for the later two seat trainer version. The only
real options are whether or not to install the wingtip fuel tanks and a
choice of propellers depending on if you choose the British registered or German
registered aircraft. The modeler will have to add a couple of sections of
stretched sprue for the landing gear as well. The single transparency (why can't
these folks supply two?) is well done, though a tad cloudy.
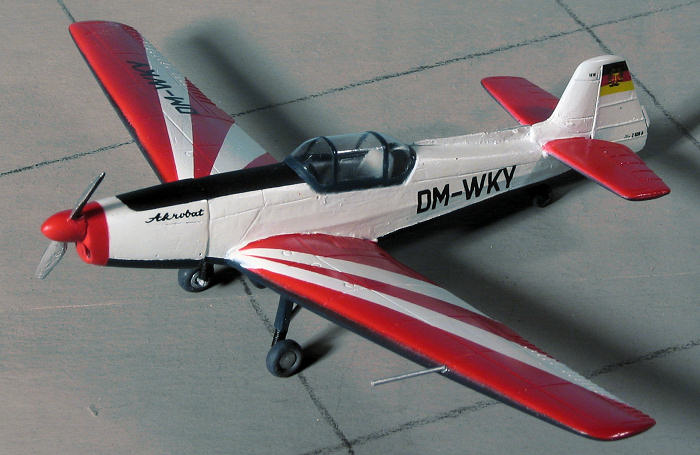
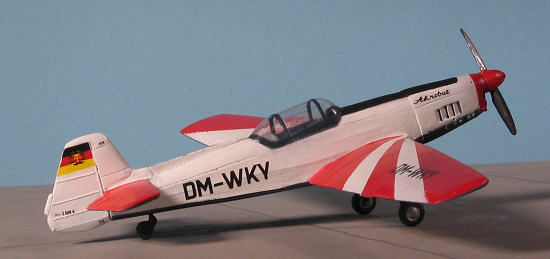
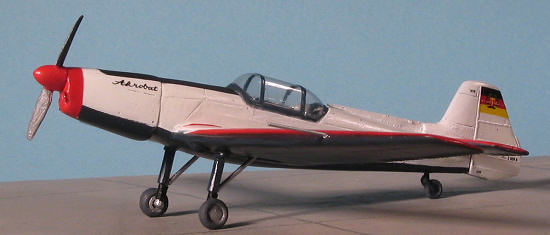
Instructions consist of a folded sheet of paper that has a parts layout, eight well drawn construction steps, and a painting and decal guide. The British aircraft is from the 1970 Aerobatics Championship and sports a blue cheat line and 'rays' on the upper wings and tail planes. It also appears that the lower fuselage and wings (and perhaps tail planes) are painted red. The red parts will have to be painted on. The German aircraft is from the 1968 Championship and has an all blue lower fuselage and wing. Not sure if the lower tail planes are also blue as the drawing doesn't show. It looks as if a cheat line decal is provided for this one as well, but it isn't noted on the instructions. Both have black anti-glare panels. In with the sealed decals are acetate instrument panels for several aircraft versions. The decals appear to be well printed and are in register.
| CONSTRUCTION |
This is a typical garage kit style short run resin kit. That means that the parts are nicely done and will probably need a bit more work than you'd get from one of the high-buck resin companies. However, I should say that despite the rather large number of air pockets on the lower part of the fuselage half and a small pocket on a wing tip, I found the moldings to be quite well done.
 First step was to remove the bits from the sprues. I
was able to use a sharp hobby knife for all these parts as there are none of the
large sprue blocks that we old-timers have come to expect from a resin kit. In
fact, I was quite pleased at how quickly I was able to remove the various bits
and pieces. I then sanded smooth all the edges. When removing the left wing, I
opened up a very large air pocket. This was filled with epoxy filler and later
sanded smooth.
First step was to remove the bits from the sprues. I
was able to use a sharp hobby knife for all these parts as there are none of the
large sprue blocks that we old-timers have come to expect from a resin kit. In
fact, I was quite pleased at how quickly I was able to remove the various bits
and pieces. I then sanded smooth all the edges. When removing the left wing, I
opened up a very large air pocket. This was filled with epoxy filler and later
sanded smooth.
First job was the interior. Quite basic with little bit
a floor, seat, control stick and instrument panel. The kit obviously is for
several versions of this aircraft including a two seater as there is an extra
seat, control stick and panel. Unfortunately, both of the control sticks had
broken off their mounts. I glued the mount in place and then the stick atop it.
There is a small corner section to help align the floor on the fuselage sides.
Once the interior was painted (along with the fuselage sides, and I used a
medium grey enamel), I scraped away the paint and glued in the floor. Test
fitting the other fuselage half noted that the other alignment mark was forward
of the first one and interfered. It was cut off and the fit was quite good. I
glued the fuselage halves in sections starting from the tail and working
forward. This worked quite well. The instrument panel was then glued in place
after the halves were together. The design of this makes it easy to install as
it comes with a section of anti-glare shield the fits under the forward
cockpit/fuselage join. With the 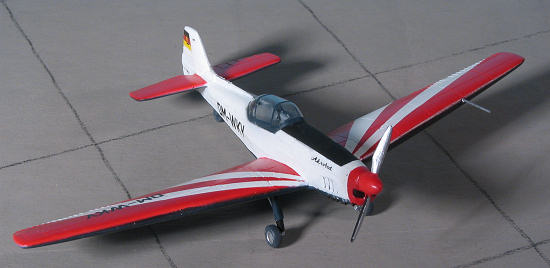 halves together I noticed that the control stick
was way too tall. It later broke off again and was set aside until later.
halves together I noticed that the control stick
was way too tall. It later broke off again and was set aside until later.
A filler application was put on the fuselage seam and later sanded smooth, trying not to destroy any detail along the way. I did manage to open a few pinholes on the bottom during sanding. Next the nose piece was attached. This is smaller than the forward fuselage section to which it is mated so again, sanding and filler were used. The tiny exhaust are molded onto the right fuselage with one on the forward section. I'm seriously considering removing these and replacing them with fine tubing as I can't see how to fill the rest of the nose seam without damaging the one attached therein.
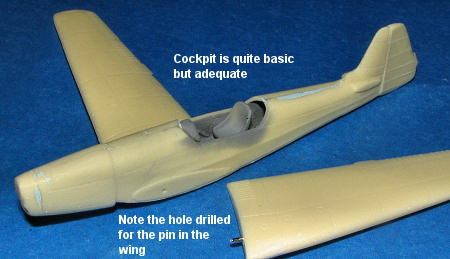 I
then went to attaching the wings. I first drilled a hole in each wing root and
inserted a small piece of paper clip. Then I eyeballed things and drilled a
corresponding hole in the wing root. several test fittings later, I applied glue
and attached the wings. I made sure the upper root was the tightest fit. This
left a bit of a gap on the underside, but otherwise the wings would have had
anhedral. Even then th
I
then went to attaching the wings. I first drilled a hole in each wing root and
inserted a small piece of paper clip. Then I eyeballed things and drilled a
corresponding hole in the wing root. several test fittings later, I applied glue
and attached the wings. I made sure the upper root was the tightest fit. This
left a bit of a gap on the underside, but otherwise the wings would have had
anhedral. Even then th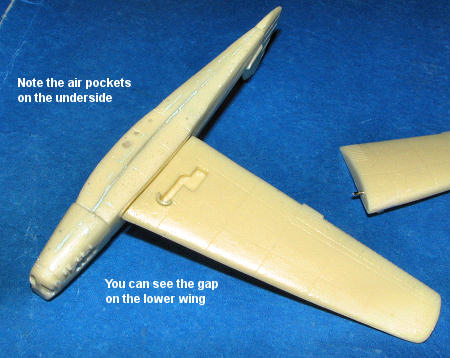 ey
were too straight out. I fixed this by heading some water in a kettle to near
boil and the pouring it over the wing roots. This allowed me to provide a teeny
bit of dihedral, which made things look a lot better. Also allowed me to
straighten out some droop in the outer wing sections. Now for a confession. The
wings are not on straight. In fact, one angles back more than the other. This is
all my fault for not paying attention to details. One of the wings needs to be
sanded better at the roots in order to cure this and I just didn't do it. You
have been warned!!
ey
were too straight out. I fixed this by heading some water in a kettle to near
boil and the pouring it over the wing roots. This allowed me to provide a teeny
bit of dihedral, which made things look a lot better. Also allowed me to
straighten out some droop in the outer wing sections. Now for a confession. The
wings are not on straight. In fact, one angles back more than the other. This is
all my fault for not paying attention to details. One of the wings needs to be
sanded better at the roots in order to cure this and I just didn't do it. You
have been warned!!
Then I attached the horizontal stabs. These are a bit thicker than the attachment points on the fin, but nothing too bad. Next step was to apply filler and since the lower wing gaps were rather large, I used epoxy filler. I also opened up as many of the large subsurface air pockets on the lower fuselage as I could see and filled those at this time. After sanding off the epoxy filler, there were still some small pinholes so a couple of applications of Mr Surfacer 500 were needed for these and those along the leading edge of the wing. I then attached the main landing gear and made some retraction struts out of plastic rod. One has to be quite careful to be sure the main gear lets are the same length. I drilled some holes in the wheel well to accept the gear legs and then trimmed the legs to get things as close to the same as I could (they are not molded the exact same length or the depth of the wheel wells is not the same). A hole was drilled for the tail wheel and that was inserted (but not glued) at this time. I also trimmed the vac canopy until I was able to get it to fit.
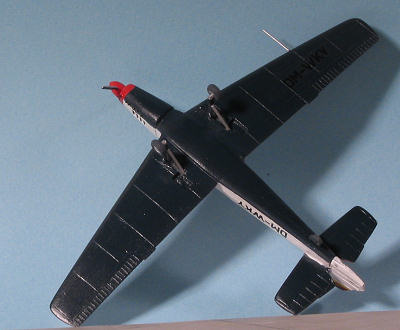
| COLORS & MARKINGS |
One thing about aerobatic aircraft is that they are
generally not an overall color. Same goes for this one. Both schemes liberally
use red, white and blue in their make-up. I'd decided on doing the East German
scheme and so first painted the the entire airframe in white, after first
masking off the cockpit. Floquil Reefer White was chosen for this. When cured, a
couple of coats of clear 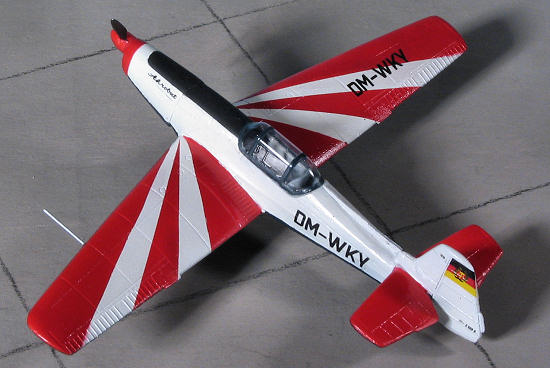 gloss
were applied. Then the fuselage was masked off in its entirety, and this
included the full forward cowling. Though the painting guide is very faint and
difficult to follow, it seems that this aircraft had a red forward cowling,
upper tail planes and a red ray for the upper wings. The underside is blue as is
the canopy framing, though no shade is provided. I used a dark blue for the
underside, mainly because I already had some mixed and also because, try as I
might, I couldn't find an illustration of this particular aircraft (I'm sure
someone will supply one just to show me that I screwed up).
gloss
were applied. Then the fuselage was masked off in its entirety, and this
included the full forward cowling. Though the painting guide is very faint and
difficult to follow, it seems that this aircraft had a red forward cowling,
upper tail planes and a red ray for the upper wings. The underside is blue as is
the canopy framing, though no shade is provided. I used a dark blue for the
underside, mainly because I already had some mixed and also because, try as I
might, I couldn't find an illustration of this particular aircraft (I'm sure
someone will supply one just to show me that I screwed up).
With the blue in place, I then masked the upper wing in preparation for the ray pattern. This wasn't as difficult as I'd imagined, but it still took several attempts and considerable tape to get things looking the way I thought would be good. For the red on the forward cowling, upper tail planes, wing and prop hub, I used Gunze Red Madder acrylic. Naturally, I had to do some back and forth on the red and white to take care of some minor irregularities. When that was all done, the black anti-glare panel was masked off and painted.
I then attached the canopy first using white glue to get it in position and then a touch of super glue on the outside to hold it in place. Sometimes this works and sometimes it doesn't! I then applied the decals. These are quite thin and seemed to work well with the Microscale system. I noted that the yellow on the rudder flag was quite a bit brighter on the white rudder than on the somewhat darker decal paper. For some reason, a blue cheat line is supplied for the German plane, but it isn't shown at all on the markings guide. I may have mentioned that the color scheme guide is so faint as to be nearly invisible. I would highly recommend to Miku Models that they improve that.
| FINAL CONSTRUCTION |
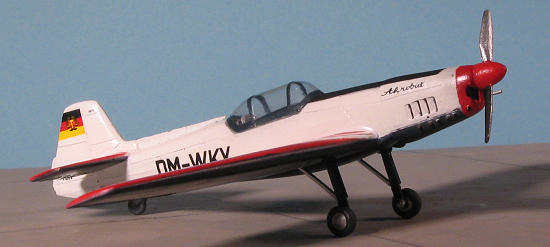 Not really much to add to it. I painted the gear legs
silver and the oleo boots with matte black. Then I glued on the wheels (after
trimming back the axles and enlarging the holes in the wheels). The tail wheel
was just pushed in place. I painted the small exhaust stubs with Burnt Iron. I'd
recommend replacing these with micro-tubing as they are not really that well
molded and it would make attaching the nose piece a lot easier. In case you are
wondering why I didn't do all these things, when I build a kit I'm given to
review, I build it as close to out of the box as I can. I know that others pour
in the aftermarket and do major upgrades, but I believe it better to be as
honest in terms of what the kit provides as I can. The prop was cemented onto
the nose, a pitot tube cut from thin plastic rod, and the masking removed from the canopy. That was basically it.
Not really much to add to it. I painted the gear legs
silver and the oleo boots with matte black. Then I glued on the wheels (after
trimming back the axles and enlarging the holes in the wheels). The tail wheel
was just pushed in place. I painted the small exhaust stubs with Burnt Iron. I'd
recommend replacing these with micro-tubing as they are not really that well
molded and it would make attaching the nose piece a lot easier. In case you are
wondering why I didn't do all these things, when I build a kit I'm given to
review, I build it as close to out of the box as I can. I know that others pour
in the aftermarket and do major upgrades, but I believe it better to be as
honest in terms of what the kit provides as I can. The prop was cemented onto
the nose, a pitot tube cut from thin plastic rod, and the masking removed from the canopy. That was basically it.
| CONCLUSIONS |
 Overall, I found it to be an enjoyable build. Those wanting to add more
detail will have the opportunity to do so if desired. The general quality of the
kit is good, though it had more pinholes that I would have liked. Filling these
are always time consuming and all of the large parts have them. Like almost all
short run resin kits (and Miku Models are MTO (Made to Order)), it is the
subject that sells and I can guarantee you that I've not seen a Zlin Akrobat
kitted anywhere else. It was a great change from the norm and I suggest you try
something similar next time.
Overall, I found it to be an enjoyable build. Those wanting to add more
detail will have the opportunity to do so if desired. The general quality of the
kit is good, though it had more pinholes that I would have liked. Filling these
are always time consuming and all of the large parts have them. Like almost all
short run resin kits (and Miku Models are MTO (Made to Order)), it is the
subject that sells and I can guarantee you that I've not seen a Zlin Akrobat
kitted anywhere else. It was a great change from the norm and I suggest you try
something similar next time.
Sept 2006
#1430 in a series
Copyright ModelingMadness.com. All rights reserved.
My thanks to http://hobbyshop.cz for the review sample. You can order yours direct from the link.
If you would like your product reviewed fairly and fairly quickly, please contact the editor or see other details in the Note to Contributors.
Back to the Review Index Page 2018