Revell 1/96 Fokker F.27
Kit Number: 4245
Price: $10.00 (approximately)
Decals : One version: Iceland Air
Date of Review: 3 May, 1996
Comments: The Fokker F.27 was designed as a short range turboprop commuter airliner to fly passengers from major hubs to smaller regional airports. As a design it was extremely successful, flying short routes around the world. Many are still in service both with airlines and air forces, and the type has been in continual upgrade since its first flight back in the late 1950s. Today, the most recent version, the Fokker 50, is still distinguishable as having its beginnings with the F.27.
I don't know when the Revell kit was first introduced, but its strange scale of 1/96 was either an attempt to start a new scale line along with several models from Frog and Lindberg, or it just happened to be the scale of the kit that fit the box. Either way, the Revell F.27 has been around in several different versions, all basically just a decal change. This particular version was featured in a model shop in Reykjavik, Iceland with a photo of the aircraft pasted on the box top over the SAS version pictured on the sides. This looked to me to be an opportunity to build a kit that very few others would have access to so I bought it.
When the box was finally opened, it was obvious that this was not a modern kit. There were moveable ailerons and the wheels snapped over some very toy-like landing gear. In spite of this, I was determined to make a decent kit of it. The first thing I did was to install the windows and putty over them. To me, airliners look much better having the windows represented as decals than being clear. Besides, there was no interior to see and the windows were very thick. After this was complete, it was time for normal building. The parts fit acceptably well although there was a bit of problem with the wings and engine nacelles. These items did not fit very well at all and required quite a bit of filing and putty to get it all right. I also had to do a bit of puttying to get a good wing/fuselage joint. It is also necessary to line things up well when joining the wings as the wings are quite long and so prone to sagging while the glue dries.
Once most of the airframe is complete (sans gear and propellers), it is time to get it ready for paint. As the cabin windows were puttied over, the canopy was also glued and puttied into place and the entire airframe was painted white. Don't forget nose weight as it is a tailsitter. The wings, engine nacelles, and lower fuselage were painted light aircraft grey and the de-icer boots were painted black. Conversely one could use decals for these boots.
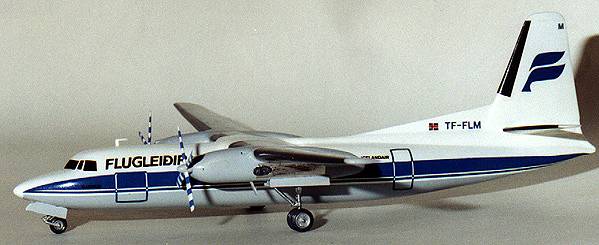
The decals that came with the kit were large and quite complete for TF-FLM of Flugleidir (Iceland Air). The only problem and one that is typical of many non-US decals is that they had yellowed. This meant that they had to be carefully cut out to eliminate or at least minimize the yellowing, particularly on a white background. Particularly helpful was that single piece and very wide fuselage cheat stripe. It had cutouts where the windows were supposed to be so it was a relatively simple matter to cut black decal and place it under the window holes in the cheatline. The cockpit windows were applied using the frames as a reference and since they were all of rectangular section, were easy to do. The most difficult part was the necessity to cut out all the individual letters of the airline name and the registration. There are basically two ways of doing this cutting: before and after application. I chose to do a combination of the two. I knew that I would never get it straight if I cut out all the letters, so I cut out all the clear except a small attachment at the top and bottom. I used a brand new #11 blade and scored the areas to be cut and left prior to wetting the decal. Once the decal was on the model, I cut off the remaining parts that were critical to alignment. By no means a quick job, but if you have a reasonably steady hand, it is to me the simplest way of dealing with yellowed decals. Of course you are doomed if the decals are white, but this was not a problem as I also cut away the white parts of the fuselage cheat line to expose the white underlying paint. Naturally, I had to leave the really small stuff yellowed, but it does not detract too much and is the price I had to pay for an unusual scheme.
Overall the Revell F.27 is not that bad a kit considering its age.
Although some might not like the scale of the kit, the only other F.27
kits I am aware of are two in 1/72 by Airfix and Esci, both being military
types, and a 1/144(approx), by IM. This aircraft is further hampered by a
lack of available aftermarket decals, which is a shame as it is an important
type in the history of civil aviation. Recommended to those with some
experience.
Copyright ModelingMadness.com. All rights reserved.
Back to Reviews Page 2021