Kiwi Resins 1/48 Percival Mew Gull
| KIT #: | |
| PRICE: | NZ$50.00 plus shipping |
| DECALS: | One option |
| REVIEWER: | Scott Van Aken |
| NOTES: | Resin kit with vacuform parts and decals. |
| HISTORY |
 The Percival Mew Gull was a British racing aircraft of
the 1930s. It was a small, single-engine, single-seat, low-wing monoplane of
wooden construction, normally powered by a six-cylinder de Havilland Gipsy Six
piston engine. During its racing career it set many records and was considered a
significant, efficient design, one that eventually reached a top speed of
265 mph (425 km/h) on a modest 205 hp (153 kW) in its final 1939 form. A
modern-day observer has characterized the Mew Gull as "the Holy Grail of British
air racing". During the second half of the 1930s, Mew Gulls were dominant in
air-racing in the UK and consistently recorded the fastest times until the
outbreak of war stopped all civilian flying in late 1939.
The Percival Mew Gull was a British racing aircraft of
the 1930s. It was a small, single-engine, single-seat, low-wing monoplane of
wooden construction, normally powered by a six-cylinder de Havilland Gipsy Six
piston engine. During its racing career it set many records and was considered a
significant, efficient design, one that eventually reached a top speed of
265 mph (425 km/h) on a modest 205 hp (153 kW) in its final 1939 form. A
modern-day observer has characterized the Mew Gull as "the Holy Grail of British
air racing". During the second half of the 1930s, Mew Gulls were dominant in
air-racing in the UK and consistently recorded the fastest times until the
outbreak of war stopped all civilian flying in late 1939.
| THE KIT |
This latest offering from Kiwi Resin is one of the more famous British racing planes. Unlike the US, there was little if any pylon racing, and so races were distance events from one place to another. Generally over rather long distances.
 Kiwi Resin kits are very much garage kits, which means they
are not mass produced in a pressure chamber so there will be some small voids, a
few pin holes, some flash, and perhaps some resin blobs that will need to be
taken care of. This one has a few of these things, but none are major and all
will be able to be taken care of by anyone with resin kit experience. My sample
was sent in a soft packet which resulted in the transparencies being crushed
during shipping, despite being protected with bubble wrap. I was able to pop
them back out, but they are creased and Kiwi Resins is sending replacements.
They will also be shipping these in boxes to prevent this from occurring again.
Kiwi Resin kits are very much garage kits, which means they
are not mass produced in a pressure chamber so there will be some small voids, a
few pin holes, some flash, and perhaps some resin blobs that will need to be
taken care of. This one has a few of these things, but none are major and all
will be able to be taken care of by anyone with resin kit experience. My sample
was sent in a soft packet which resulted in the transparencies being crushed
during shipping, despite being protected with bubble wrap. I was able to pop
them back out, but they are creased and Kiwi Resins is sending replacements.
They will also be shipping these in boxes to prevent this from occurring again.
The detail on the resin parts is actually quite good with nicely engraved panel lines, though there are not many since the Mew Gull was a wood skinned plane. The fuselage is a single piece with the tail fin/rudder molded in place. There is a hollow interior into which the seat parts, bulkhead and instrument panel bit is attached. The rudder pedals and control stick will need to be made by the builder. One will also need to build the aileron counterbalances and the tail skid.
Wings are also a single casting on each side and butt join
to the fuselage, same with the tail planes and the integrated spats/wheels. The
prop and spinner are all separate parts. The upper fuselage section incorporates
the windscreen and canopy and is a single piece. It is recommended that one fill
the area 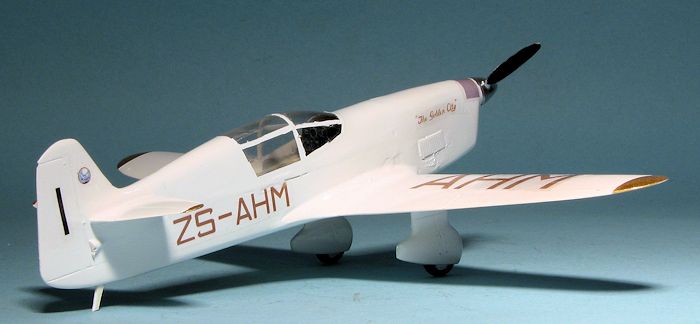 behind the bulkhead for additional rigidity when installing this part.
I would think that epoxy filler would not be a bad choice as it offers a long
working time and
will allow
one to get the transparency to fit snugly with no gaps.
behind the bulkhead for additional rigidity when installing this part.
I would think that epoxy filler would not be a bad choice as it offers a long
working time and
will allow
one to get the transparency to fit snugly with no gaps.
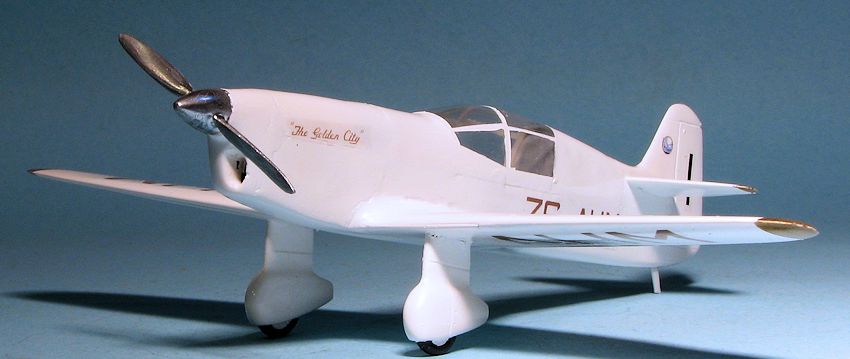
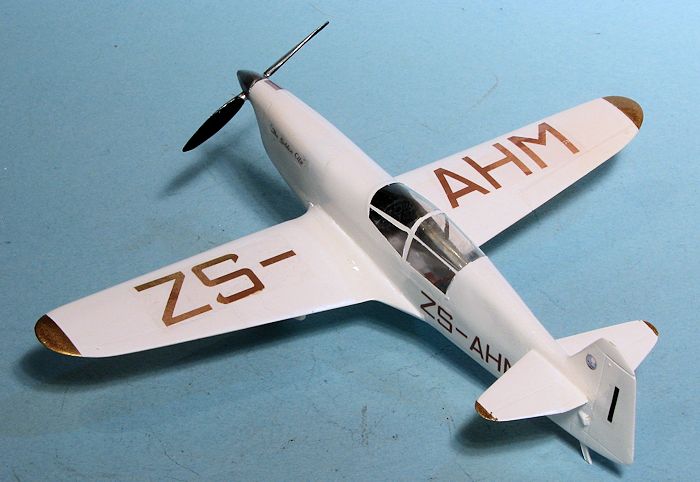
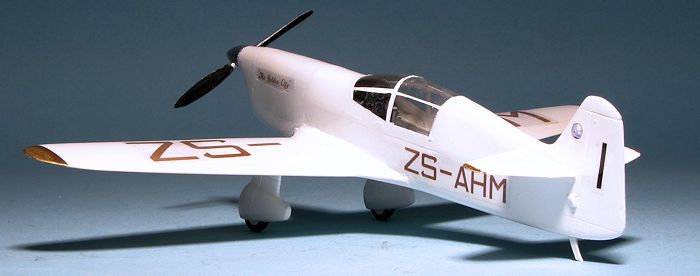
Markings are provided in this kit by the famous G-AEXF when it was registered in South Africa as ZS-AHM. In this case, the trim was in gold vice green. The decals provided are inkjet printed so will benefit from a clear coat prior to use. Both gold and black markings are provided as photos are unclear as to which color was used. There is no construction drawing as it is really unnecessary for such a simple kit and for its target audience. There is full placement and painting information for the decals.
| CONSTRUCTION |
Let me begin this by stating that Kiwi Resins is a true garage kit maker. No expensive manufacturing nor pressure chambers for letting the resin outgas. What that means is that these are not for the faint of heart. Expect to put in a considerable amount of work in getting the kit to completion. I knew from previous kits, that this would take me several months to complete, so consigned it to the slow track; something to work on while other projects reached slow areas.
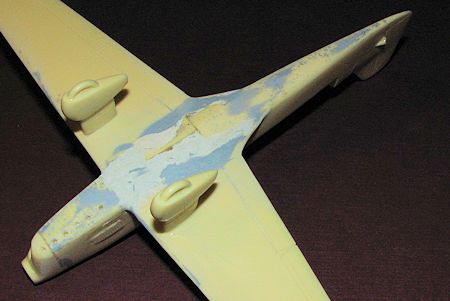
It took me considerable time just to get the wings and fuselage properly treated. The underside of the fuselage was a mass of small air bubbles and some larger voids. This is basically where the pour stub was located and where any air bubbles would tend to congregate. There were two ways to tackle this. One was to deal with the fuselage separately and the other was to attach the wings and do it as a construct. I chose the latter.
The wings were a fair fit, though had their issues as well in terms of casting glitches, especially along the leading edge where the pour stubs were attached. Once together, several months of on and off filler and sanding commenced. I used epoxy filler to blend in the wings and fuselage on the underside. This helped to mask some of the holes found there. For the others, I used a combination of standard filler, Mr. Surfacer and super glue. I also had to drill out the exhaust areas and during all this I attached the front of the cowling, which had its filler requirements as well. In all, I would hazard to say that I went over this area at least a dozen times.
Once that was done, I attached the landing gear. These seem to have the mountings at too steep an angle according to the drawing so I sanded those flatter before installation.
Now before attaching the tailplanes, the interior needs to be
dealt with. Kiwi Resins provided a clear piece that covers over half the
fuselage length and includes more than just the clear bits. There is a resin
piece that fits into the front of the fuselage to which you can attach the
transparency and to provide some bulk to fill the seam that will be there. When
I installed the forward section (which includes the instrument
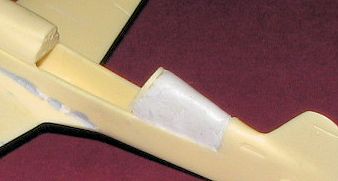 panel) and the
rear bulkhead, I made sure these were centered enough to provide a small lip
onto which the transparency would fit. I put the rear bulkhead right at the back
of the cockpit opening and canted it back a bit. With no visual instructions,
placement of bits likethis is a bit of a guess.
panel) and the
rear bulkhead, I made sure these were centered enough to provide a small lip
onto which the transparency would fit. I put the rear bulkhead right at the back
of the cockpit opening and canted it back a bit. With no visual instructions,
placement of bits likethis is a bit of a guess.
I then cut out the clear piece and test fit it. It seemed to fit quite well. I then filled the area behind the bulkhead with epoxy filler and used the clear bit to squeeze down on things a bit to get a proper shape. In hindsight I should have let the filler dry a bit more as I had issues with it sticking to the clear plastic. Eventually that was done and I then added the seat and made a control stick out of stretched sprue. The interior was painted a medium grey color. Then the instrument panel, forward cockpit piece was glued in place with the panel painted black.
With the interior done, I attached the transparency, after
masking it. For this I used super glue in the forward and rear sections as there
would be no clear areas to fog. For the other areas, I used clear paint a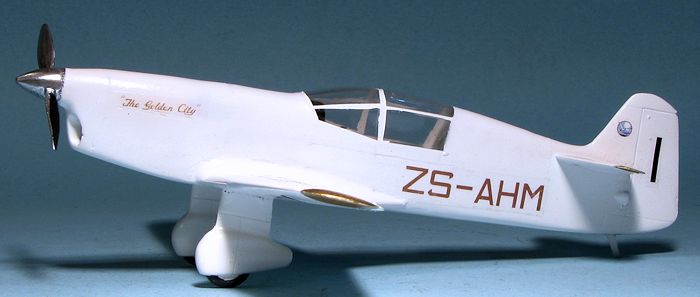 nd
when dry, overcoated them with super glue. Then began a long process of filler
to get things as smooth as I could. Doing this over the rather thin vacuformed
plastic was not an easy task and while far from perfect, I reached a point of
diminishing returns and called it done. (In fact, this was true of the entire
kit as it certainly will not win awards at contests).
nd
when dry, overcoated them with super glue. Then began a long process of filler
to get things as smooth as I could. Doing this over the rather thin vacuformed
plastic was not an easy task and while far from perfect, I reached a point of
diminishing returns and called it done. (In fact, this was true of the entire
kit as it certainly will not win awards at contests).
Next task was the installation of the spinner. Normally this would be left off until the end, but mine was quite oversized and I thought the best way to cure that would be to do a bit of sanding first, then attach it to the fuselage to get a better fit. This seemed to work fairly well. The tailplanes were the next step and were butt joined to the tail .
| COLORS AND MARKINGS |
Seemed like a good time to paint it. First a coat or two of
Tamiya extra fine white primer and a bit more putty work. Then several coats of
Tamiya X-1 gloss white. I put it on rather heavy in hopes it would fill some of
the pinholes still remaining and it worked fairly well in that regard. When dry,
the tips of the wings and horizontal stabilizers were masked and painted gold.
There are decals for the wing tips, but I figured
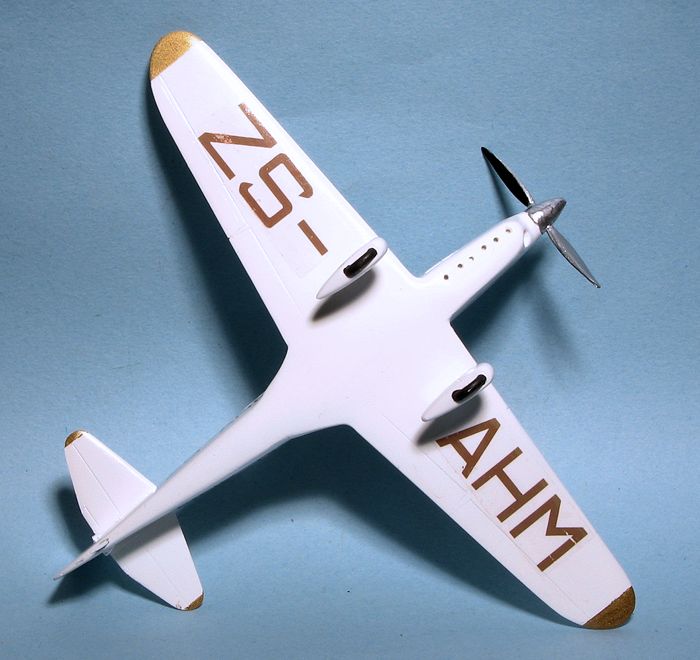 painting
would be easier.
painting
would be easier.
With that done, there was a groove cut into the lower rear fuselage and the tail skid was made from some plastic card and inserted. In the front, I opened the holes for the prop blades. These were then sanded and the tips rounded a bit as there were some air pockets at the tip that I knew would be very difficult to fill. The blades were then installed and the prop/spinner combo brush painted with Testors chrome silver.
Next, the decals. These are ink jet printed and need to be coated with a clear of some sort. I brushed on some Microscale decal film. While this helped, I still had a few issues and thankfully there were spares sent to me when I got the replacement clear bits. Getting the decals cut and applied took a little bit, but there were no major issues. I did not apply any setting solution in case it caused some issues with the decals sticking or smearing so when I applied the final clear coat, there was some silvering.
I did some touch up painting (as in the wheels and intake) and that was it.
| CONCLUSIONS |
 This is
not a kit for beginners due to the nature of it and the amount of work one will
need to put into it. Those who would consider themselves intermediate resin
builders will find this within their skill level and the experts will be able to
add the sort of detail that will make the kit really stand out.
This is
not a kit for beginners due to the nature of it and the amount of work one will
need to put into it. Those who would consider themselves intermediate resin
builders will find this within their skill level and the experts will be able to
add the sort of detail that will make the kit really stand out.
Some things I did not do were install some very short exhaust stubs or build up some of the rather large aileron external balances. Those with greater skill/time than I will undoubtedly do that. The end result of even my limited skills is a nice looking racing plane of the 1930s and if you have a fondness for that era, then this is one you should seriously consider.
| REFERENCES |
http://en.wikipedia.org/wiki/Percival_Mew_Gull
August 2014
Thanks to Kiwi Resins
for the preview kit. To order yours, e-mail
skygodnz@clear.net.nz
If you would like your product reviewed fairly and fairly quickly, please contact the editor or see other details in the Note to Contributors.