Revell of Germany 1/720 Zepplin 'Hindenburg'
| KIT # | 4802 |
| PRICE | $17.50 |
| DECAL OPTIONS | Just the original Hindenburg |
| REVIEW BY | Scott Van Aken |
| NOTES: | No swastikas (no surprise) |
HISTORY
Whenever you mentions airships or zeppelins, the one that everyone thinks of is the Hindenburg. The last and greatest of the German airships that lead back to before the First World War, it offered the most luxurious air travel ever offered up to that time. Faster than steamships, a flight in the Hindenburg was considered to be very upscale. Most of it's routes were over the north and south Atlantic with scheduled trips to the US and South America. Unfortunately, the Hindenburg had an Achilles' Heel; the gas used to keep it in the air. Like today, the US had a virtual monopoly on helium, a buoyant inert gas. German designers had no choice but to use the more buoyant, but highly flammable hydrogen to keep the Hindenburg in the air. That was it's undoing as an explosion on board during a landing in Lakehurst, NJ turned the Hindenburg into a fireball and basically ended the era of giant passenger carrying airships. Nowadays airships are not uncommon, but used for advertising and not for paying passengers. The Hindenburg was the last of an era.
THE KIT
 Revell's
kit of the Hindenburg is the first that I have ever seen and it is done
completely in injected plastic. Before the only other airship kit I know of is
the very rare AMT kit of the Akron/Macon, and that kit has, I believe, a
vacuformed envelope. It is also a bigger kit. The Revell Hindenburg
is what seems to be a return to the old 'box scale' kit where the kit is no
bigger than a standard sized box. However it's scale of 1/720 is close enough to
the standard Waterline ship scale of 1/720 to make no difference and it produces
a kit that is relatively easy to display.
Revell's
kit of the Hindenburg is the first that I have ever seen and it is done
completely in injected plastic. Before the only other airship kit I know of is
the very rare AMT kit of the Akron/Macon, and that kit has, I believe, a
vacuformed envelope. It is also a bigger kit. The Revell Hindenburg
is what seems to be a return to the old 'box scale' kit where the kit is no
bigger than a standard sized box. However it's scale of 1/720 is close enough to
the standard Waterline ship scale of 1/720 to make no difference and it produces
a kit that is relatively easy to display.
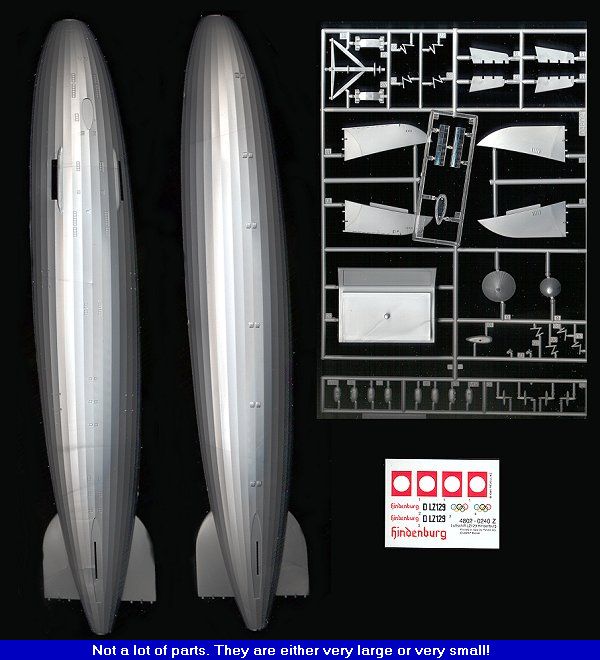
The first thing one notices upon opening the box is that the kit parts come in two sizes; very large or very small. The two envelope halves take up about 75% of the plastic in this kit. It is split into upper and lower halves. The other parts make up the upper and lower fins and rudders, the tiny engine pods and supports as well as a stand and an anchoring tower. In order to use the stand as designed, a hole needs to be opened in the bottom envelope half.
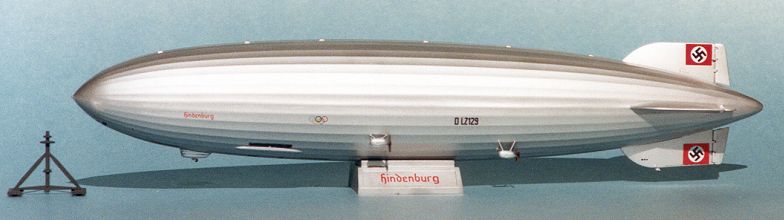
A fine set of decals comes with the kit, giving markings for the airship as well as the stand. Since this is a German-made kit, it comes with no swastikas so those will have to be scrounged from another source. Painting of the Hindenburg is simplicity as well as it is overall silver. Only the tires and propeller blades offer any relief from the expanse of silver. Also included are the main cabin windows and a clear gondola. Good luck masking these off!!
CONSTRUCTION
The first part to be installed are the main cabin windows. Fit is excellent
as has been the case of newer Revell of Germany kits. Now is the time to open
the hole for the stand if you are going to use it. I didn't. The next parts to
come together are envelope halves. As was sort of expected, they are warped and
will require gluing by stages and clamps to hold it together while the glue
sets. I started at the rear, adding the tail cap right off. Make sure the nose
and tail caps are properly aligned when you glue them on!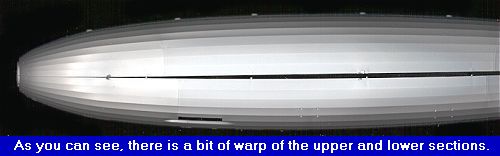
While all this was drying, the mooring stand was assembled and the engine pods glued together. These last items are really small so care needs to be taken not to lose them. The upper and lower fin halves were also glued together and set aside to dry. As frequently happens, the seam on one side of the fuselage ended up quite good while the other needed filler as there was quite a step. During this phase, some sink marks were found where the alignment pins go so they were filled as well. The fins needed only a bit of sanding. I fear there will be a seam that will be tough to deal with for the nose and tail caps. When it comes time to paint, I'll see how bad it looks.
After many fillings and sandings later, the fuselage looks pretty good. I used a very fine polishing stick to smooth out all the filler marks. As I has suspected, the tail and nose caps were not a perfect fit and the seam needed filled and sanded as well. Fortunately, it doesn't look as horrible as I initially thought it would. The fins and rudders fit very well and then it was time for the engines. Now I am sure that the braces are not scale, but the fit of them and the engines was not at all bad. I would highly recommend having the tiny engines ready to install along with the braces as some fussing around is needed to get a good fit. The braces lean in toward the engines so it isn't a choice of glue on the braces and when dry attach engines. They must be done at the same time. The really dedicated will want to add the wire braces for these items. I didn't. The propellor blades were left off until after painting and decaling
PAINTING AND DECALS
Here is a real no-brainer of a kit to paint. The airship is overall aluminum. The only areas that break up the huge silver gas-bag are the brown props, the few windows (most of which were painted black with a Rapidograph art pen) and the decals. The base was painted steel just to break up the monotony and the mooring mast was painted RLM 66 dark grey. I used Model Master Metallizer for the aluminum and Aeromaster for the grey and brown. The kit was oversprayed with Future before and after the decals were applied. As you might guess, I had to scrounge for the swastika decals on this one. I used an Xtradecal sheet of swastikas and tried the first size that I though would fit. It was too small and left a lot of white area around the edge. The next size was too big as it overflowed onto the red, but to complete this Goldilocks story, the third size I tried seemed to me to be the perfect fit.

CONCLUSIONS
Other than the rather poor fit of the envelope, which could have easily been my fault, this kit was a pretty easy build. It does make a really nice change from the usual aircraft kit that I build, yet keeps up the interest. This kit is great for all but the bare beginner due to the small and rather fragile engine brace parts. Looks really nice on the shelf. Probably the only downside of this kit is that almost no one will ever build more than one!
REFERENCES
Didn't use any, just the kit info.
Copyright ModelingMadness.com. All rights reserved.
Back to Reviews Page 2021