| KIT #: | 1 |
| PRICE: | $90.00 |
| DECALS: | Three options |
| REVIEWER: | Scott Van Aken |
| NOTES: | Resin and cast metal kit |
| HISTORY |
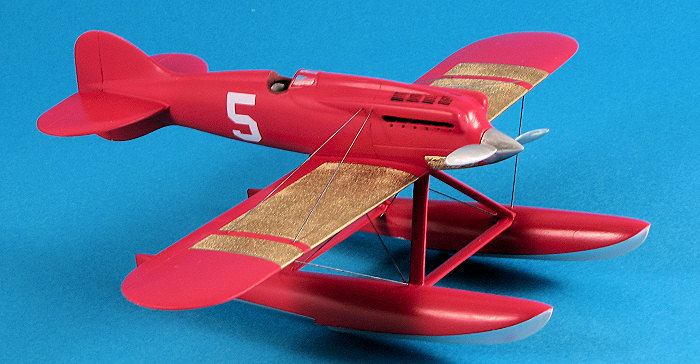
The Macchi M.39 was a racing seaplane designed and built by the Italian aircraft company Macchi Aeronautica in 1925-26. The plane, piloted by Mario Bernardi was one of three entered and won the 1926 Schneider Trophy.
 The M.39 was designed by Mario Castoldi as a single
seat, twin-float racing plane. Castoldi went on to design some of the most
beautiful fighter aircraft of WWII. Powered by a Fiat engine producing some 880
hp it reached a winning speed of 396 km/h (246 mph) at the Schneider Trophy
contest held at Hampton Roads, Virginia, besting an international group of
entries.
The M.39 was designed by Mario Castoldi as a single
seat, twin-float racing plane. Castoldi went on to design some of the most
beautiful fighter aircraft of WWII. Powered by a Fiat engine producing some 880
hp it reached a winning speed of 396 km/h (246 mph) at the Schneider Trophy
contest held at Hampton Roads, Virginia, besting an international group of
entries.
According to Jane's Encyclopedia of Aviation, Macchi was essentially ordered to produce a winning plane by Italy's fascist dictator Benito Mussolini. Later Italian seaplanes (the M.52, M.52R, and M.67) failed to defeat rival entries (mostly from the United Kingdom). However, the final seaplane created by Macchi, the M.C.72 set a world speed record (over water) on April 10, 1933 with a speed of 682 km/h (424 mph). This was also the absolute speed record and stood for five years until broken by the Heinkel He-100 in 1939. It is still the absolute speed record for float planes.
| THE KIT |
Upon
opening the sturdy cardboard box, I found the 'standard' compartmentalized bags
holding only a few of the resin parts each. All of the resin is superbly molded
and completely flawless. Yep, not a mold glitch to be found; not even a tiny
pinhole. I was able to test fit several of the major components and though the
fuselage halves were a bit warped out, I found that when gently
 squeezed, they
fit superbly. Same with the wing attachment point.
squeezed, they
fit superbly. Same with the wing attachment point.
There are also several bags of cast metal parts. These are as flawlessly cast as the resin with only a tiny mold seam to clean. Airframe parts, the launching float, and the single piece floats are in resin while the struts, prop, exhaust and some interior bits are in cast metal. You also get a cast metal pilot figure. A single semi-thick vac windscreen is also included. Decals are provided for the various race numbers used by this aircraft.
Instructions are somewhat basic in that it is just an exploded view, but really, little more is needed. This is a simple aircraft and so a simple kit. My instructions are in Japanese, but DMC Models has English translations for your kit and has e-mailed me a set. Markings are for one of three planes and you can paint it any color as long as it is Italian Racing Red! About the only actual 'work' will be adding the rigging, a rather simple task on this very simple kit.
| CONSTRUCTION |
You'd think this would be an easy kit to build and for
most of you, that would be correct. Noix Models has 'uncomplicated' things as
much as one could ever expect to find on any kit. Very little cleanup is needed
and the resin is absolutely first rate with n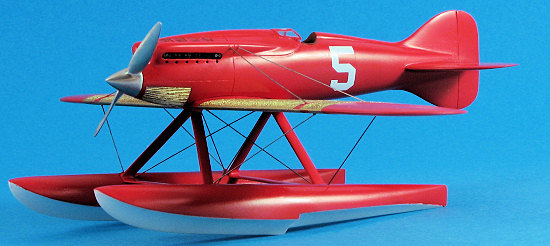 o
pin holes, no chunks, no problems. Quite a delightful change from some of the
other resin kits I've been doing.
o
pin holes, no chunks, no problems. Quite a delightful change from some of the
other resin kits I've been doing.
The metal parts do have small mold lines that need to be cleaned up and I used several grades of sandpaper to do that. Floats are a single casting and though there is a bit of more seam work to do around the edges than on other bits, it was quickly handled. It is a good idea to primer these items once one is done as I found later that I'd missed quite a bit and had to go back and take care of that.
 The
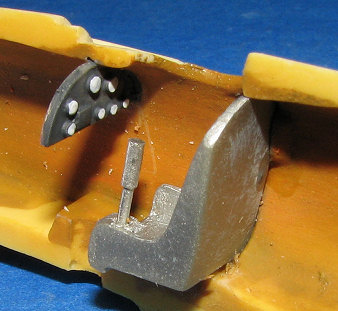
interior was brush painted with 'wood', leaving lots of streaks. I then sprayed
clear orange over it and the result was very convincing. Thanks to the folks on
the Forum for this idea. The only interior bits are the seat, control stick and
instrument panel. These were installed once any painting needed was done. Test
fitting is a must to be sure of placement, but the kit does provide good
alignment areas. I did have to drill out
The
interior was brush painted with 'wood', leaving lots of streaks. I then sprayed
clear orange over it and the result was very convincing. Thanks to the folks on
the Forum for this idea. The only interior bits are the seat, control stick and
instrument panel. These were installed once any painting needed was done. Test
fitting is a must to be sure of placement, but the kit does provide good
alignment areas. I did have to drill out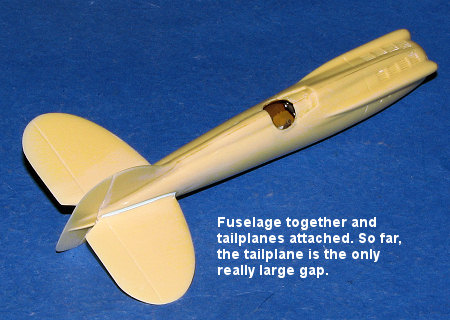 the control stick slot in the seat assembly to get it to fit properly.
I then cemented the fuselage halves together and used superglue to fill the seams. I then attached the one piece horizontal stabilizer. There is a considerable gap around this piece and this is the only place I really had to use lots of filler. It is important to get it smooth as one can as this is a racing plane. Once that was done, I filled the cockpit with tissue and started painting.
| COLORS & MARKINGS |
I realize it is a bit early for most to be painting,
but for a model like this, I felt it would be better to paint the major
subassemblies separately. I first primered everything with several coats of
Floquil Reefer white. It showed some areas that needed more work and
 so it was
done and reprimered. I then sanded it down with very fine paper. Just enough to
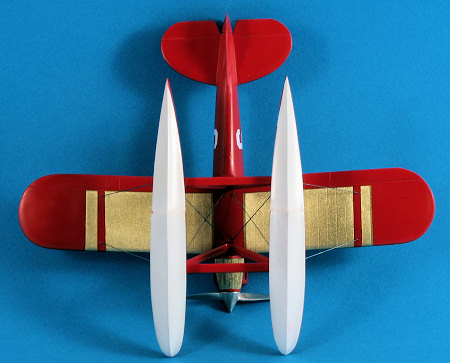
take off the roughness. I then sprayed clear gloss on the bottom of the floats
as they are supposed to be white. These were later masked off.
so it was
done and reprimered. I then sanded it down with very fine paper. Just enough to
take off the roughness. I then sprayed clear gloss on the bottom of the floats
as they are supposed to be white. These were later masked off.
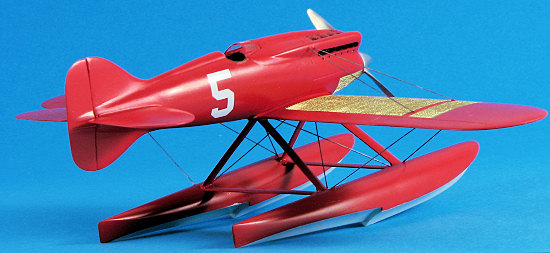
I then used mixed up some Tamiya Red acrylic thinned with rubbing alcohol and started spraying. Red isn't the easiest color in the world, but after putting on multiple thin coats, I got it to where it was presentable. On the wing, I masked every bit of red I didn't want to succumb to overspray. Same with the fuselage. I then sprayed the radiators with Testors Model Master Brass. This stuff had to go on rather thickly as my airbrush didn't like spraying it, even after multiple cleanings. The results, however, are very nice and it really looks great.
| FINAL CONSTRUCTION |
Now that all the bits were painted, I started more
gluing. The wing was first and it fit quite well. I then went to fit the float
struts to the floats. Something wasn't right and it appeared that I got two rear
float strut assemblies. An e-mail was sent to Dave at
 CoopersModels and he said
he'd get me a replacement. Two and a half weeks later, one arrived as he'd
contacted Noix to send another part. This one did fit, though it was cracked at
the apex. A bit of superglue was put into the crack to keep it from completely
breaking. It was painted and then stuck into the bottom of the fuselage. I then
attached the floats. Fit is fair for the float/strut joins. In reality, I should
spend another week or so filling and sanding the joins, but I was running out of
time and so left it as it was. There is a base of sorts that is a great
alignment guide for getting the floats properly set.
CoopersModels and he said
he'd get me a replacement. Two and a half weeks later, one arrived as he'd
contacted Noix to send another part. This one did fit, though it was cracked at
the apex. A bit of superglue was put into the crack to keep it from completely
breaking. It was painted and then stuck into the bottom of the fuselage. I then
attached the floats. Fit is fair for the float/strut joins. In reality, I should
spend another week or so filling and sanding the joins, but I was running out of
time and so left it as it was. There is a base of sorts that is a great
alignment guide for getting the floats properly set.
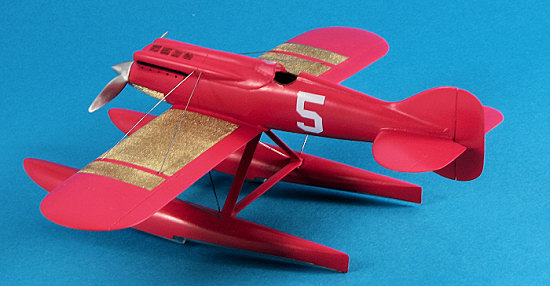
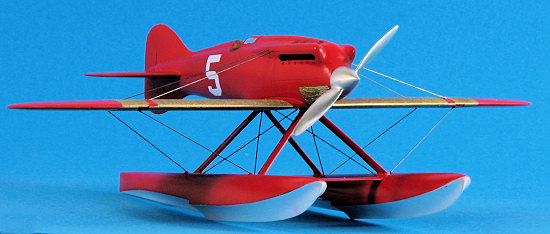
I glued the float assembly to the lower wing after drilling small pilot holes for the rigging. I used .0125 brass wire for rigging and it seems about the right size. Down side of brass wire is that it has to be painted. Up side is that it is inexpensive and easy to cut and trim. There are no attachment guides so one has to use the enclosed diagram to figure out where the wire goes. Naturally, the wire didn't want to fit into the holes I'd drilled though I used a .0135 drill bit. Eventually, I got all the wires attached and painted them all with Steel, though I'm sure I missed a spot here and there as paint doesn't like to stick to brass as well as I'd like.
The exhaust were painted in Burnt Iron and installed. There is a vac canopy and after masking it and trimming it (it is a tad too large), it was glued in place with white glue reinforced by super glue. The prop assembly had been polished and it was glued in place. The prop boss is a separate piece so once it and the hold cap is drilled out a bit for the shaft to fit, the prop is able to spin. A bit of touch-up painting and I was done.
There were two items I did not paint. One is the base that comes with the kit and the other is the very well done metal pilot figure.
| CONCLUSIONS |
 I have to say that I'm quite pleased with the results.
Sure, I could have done a better job, as I'm sure all of you say after you
finish your models. When doing review kits, I do the best I can in the time I
have. Were it not for the time that doing the website takes, I'd have more
modeling time than I know what to do with!
I have to say that I'm quite pleased with the results.
Sure, I could have done a better job, as I'm sure all of you say after you
finish your models. When doing review kits, I do the best I can in the time I
have. Were it not for the time that doing the website takes, I'd have more
modeling time than I know what to do with!
The Noix Models kit is just superbly done. The engineering is top notch and they give you all you need to build a superb model from the kit they give you. You probably won't find a better quality kit and it is one that I know you'll like.
June 2007
#1472 in a series
Copyright ModelingMadness.com. All rights reserved. No reproduction in part or in whole without express permission from the editor.
If you would like your product reviewed fairly and fairly quickly, please contact the editor or see other details in the Note to Contributors.