| KIT #: | S-05 |
| PRICE: | $3.00 or so when new |
| DECALS: | Two registration numbers |
| REVIEWER: | Scott Van Aken |
| NOTES: |
| HISTORY |
The RWD 5 was constructed by the RWD team of Stanisław Rogalski, Stanisław
Wigura and Jerzy Drzewiecki (their designs were named RWD after their initial
letters). It was a further development of earlier RWD aircraft series (RWD 1,
RWD 2, RWD 3 and RWD 7), especially of its direct predecessor, the RWD 4. It
 shared the same wing shape and construction, while the fuselage was totally new,
constructed of steel frame, unlike its wooden predecessors. The fuselage had a
modern shape and a closed canopy with panoramic windows (earlier models had
atypical fish-shaped fuselages with no direct forward view from the pilot's
seat).
shared the same wing shape and construction, while the fuselage was totally new,
constructed of steel frame, unlike its wooden predecessors. The fuselage had a
modern shape and a closed canopy with panoramic windows (earlier models had
atypical fish-shaped fuselages with no direct forward view from the pilot's
seat).
The first prototype (registration SP-AGJ) was flown on 7 August 1931 by its designer Jerzy Drzewiecki. It was built in new workshops of Warsaw University of Technology near Okęcie airport, from 1933 converted to Doświadczalne Warsztaty Lotnicze (DWL) company.
After successes of the prototype in air competitions, a small-scale series production was set up, mostly for the Polish Aero Club. Series aircraft had improved landing gear. Two were built in 1932 (registration SP-AJA and AJB), five in 1933 (including the single-seater RWD 5bis), eleven in 1934 (including one in Aero Club workshops in Lublin) and one more in 1937 (SP-BGX), for a total of 20 aircraft. In 1932, the RWD 5 was shown at the International Air Show in Paris. The RWD-5bis gained fame for flying the South Atlantic from Senegal to Brazil non-stop and setting a distance record for small light aircraft.
| THE KIT |
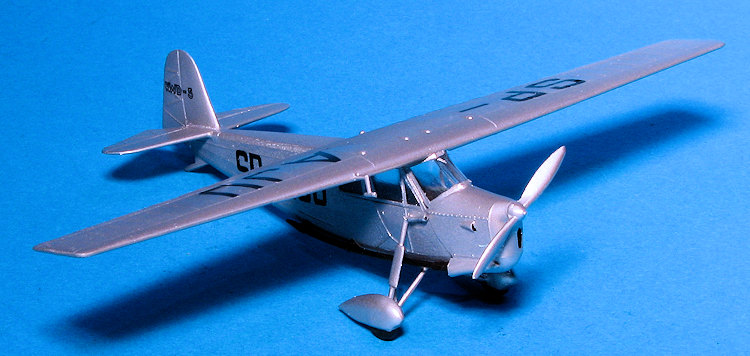
 One is able to build either the RWD-5 or RWD-5bis. The latter is the single
seat version and that is how the fuselage is molded. To do the more common
standard plane, one has to remove sections of plastic from the sides. This
area is clearly marked and one has separate side windows for each version.
The interior consists of a floor with room for a control stick and two
seats. If doing the bis version, there is an additional fuel tank that goes
in place of the rear seat.
One is able to build either the RWD-5 or RWD-5bis. The latter is the single
seat version and that is how the fuselage is molded. To do the more common
standard plane, one has to remove sections of plastic from the sides. This
area is clearly marked and one has separate side windows for each version.
The interior consists of a floor with room for a control stick and two
seats. If doing the bis version, there is an additional fuel tank that goes
in place of the rear seat.
| CONSTRUCTION |
 My first step was to clean up as many of the parts as I could while they were on
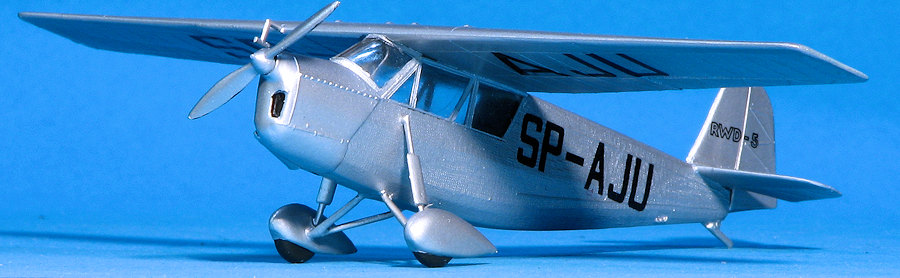
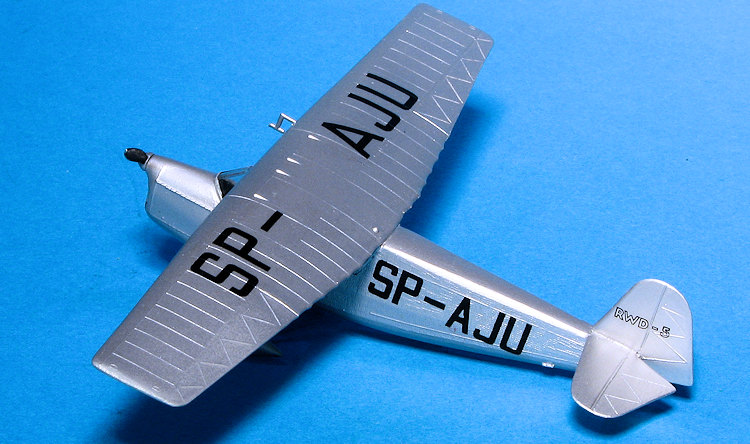
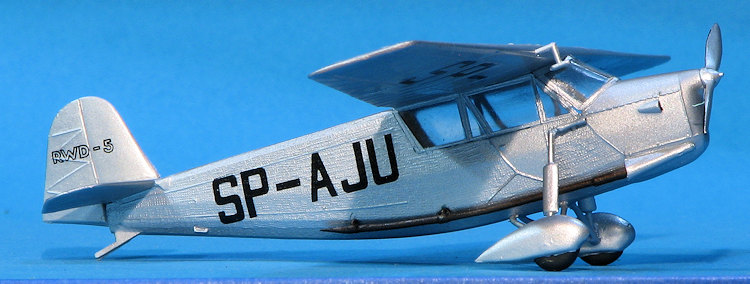
the sprue. I had decided to do the two seat version of the box art plane so I
had to cut out the fuselage where the longer windows would be attached. I used
cutters to rough out the area after scribing the plastic. Then files were used
to get things smoothed out. I test fit the windows a lot during this process.
My first step was to clean up as many of the parts as I could while they were on
the sprue. I had decided to do the two seat version of the box art plane so I
had to cut out the fuselage where the longer windows would be attached. I used
cutters to rough out the area after scribing the plastic. Then files were used
to get things smoothed out. I test fit the windows a lot during this process.
The interior bits were glued onto the floor (as in two seats and a control stick). This and the inside of the fuselage were then painted silver. The faces of the seats were painted a reddish brown. Then the interior was installed in the fuselage halves and the halves cemented together. I guess I missed something as I found it impossible to get the interior square. I also ended up sanding all the detail from the upper fuselage taking care of the seam.
Then came the rather fussy job of installing the clear bits. It took a while to get the fit to where it looked good. Once all three clear bits were glued in and solid, they were masked. In the meantime, I had glued the wings together as well as the wheel pants. With the windows installed and masked, the wing was then attached. One thing I like about this kit and is rather unusual for a light plane like this is that it has no struts for the wing or tailplanes.
 Since the standard RWD-5 option uses an exhaust shroud, I sanded away the
protruding exhaust stacks prior to gluing the shroud in place. The tailplane was
next and it proved to be a bit short for the opening into which it fit so the
section in front of it was filled and sanded. The fin was then added and also
sanded. I noticed that the rudder did not reach all the way down to the bottom
of the airframe in the back as shown on the drawings, so more diligent modelers
than I may well want to deal with that in some manner.
Since the standard RWD-5 option uses an exhaust shroud, I sanded away the
protruding exhaust stacks prior to gluing the shroud in place. The tailplane was
next and it proved to be a bit short for the opening into which it fit so the
section in front of it was filled and sanded. The fin was then added and also
sanded. I noticed that the rudder did not reach all the way down to the bottom
of the airframe in the back as shown on the drawings, so more diligent modelers
than I may well want to deal with that in some manner.
With all the flight surfaces in place, I added the landing gear. This is a bit fiddly. There is an opening in the lower fuselage that is too narrow for the gear. I widened it and used glue to help melt the surrounding plastic as I pressed the major strut piece into place. This still required some filler and sanding when done. The wheelpants fit onto an axle stub, which needs to be thinned down to fit into a hole on the pants. The section with the shock absorber is a bit too short to fit down onto the axle itself so I attached these to the inside of the wheel pants. The whole thing is very wiggly so I resorted to super glue to hold all the bits in place. During this time, I filled the seam in the lower wings as well. With that done, the venturi tube and pitot tube were attached and it was time for paint.
| COLORS & MARKINGS |
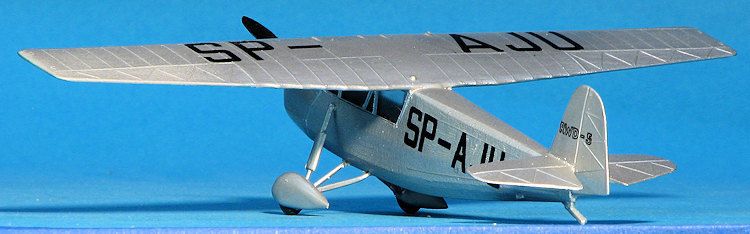
 The version I am modeling is overall aluminum dope. For the silver, I used Tamiya
AS-12, but it came out way too shiny so it was oversprayed with
TS-17 and that looked a lot nicer. The wheels were painted with Tamiya
XF-69 NATO black and the back of the prop was painted matte black. I
gave the exhaust a coat of Vallejo's tinny tin and glued it in place.
The version I am modeling is overall aluminum dope. For the silver, I used Tamiya
AS-12, but it came out way too shiny so it was oversprayed with
TS-17 and that looked a lot nicer. The wheels were painted with Tamiya
XF-69 NATO black and the back of the prop was painted matte black. I
gave the exhaust a coat of Vallejo's tinny tin and glued it in place.
| CONCLUSIONS |
Overall I was pleased with the results. The kit is not a slap together type and needs to be treated as a short run, though a good short run, kit. Some trimming and careful thought will be needed with some parts, but the end result is a pretty neat little civil type that we would never see done in an injected kit today.
| REFERENCES |
https://en.wikipedia.org/wiki/RWD_5
5 August 2016
Copyright ModelingMadness.com
Thanks to me for hanging on to this one for so long.
If you would like your product reviewed fairly and quickly, please contact the editor or see other details in the Note to Contributors.