Fine Molds 1/48 Savoia S.21F
| KIT #: | FG-3 |
| PRICE: | 2240 yen (about $28.00) from Hobby Link Japan |
| DECALS: | One option |
| REVIEWER: | Scott Van Aken |
| NOTES: | New Tool Kit |
| HISTORY |
A history will be difficult, for I
could find nothing on this particuilar aircraft and though there seems to be a history
in with the instructions (written in Japanese), it is apparently a
fictitious aircraft. It sure looks the part of a 1930s Savoia flying boat fighter,
 and there is precedence for such a thing as both Italy and Austria flew
these types during WWI. But that was about as far as things went. I would
be remiss to mention that both the British and the US flew prototypes of
full hulled jet fighters in the 50's but again, it was a dead end and went
nowhere.
and there is precedence for such a thing as both Italy and Austria flew
these types during WWI. But that was about as far as things went. I would
be remiss to mention that both the British and the US flew prototypes of
full hulled jet fighters in the 50's but again, it was a dead end and went
nowhere.
This particular aircraft is probably the inspiration of Hayao Miyazaki's fertile imagination and is the mount of the hero in Porco Rosso (which I believe translates to 'red pig') in one of his cartoon epics. In this movie, Porco is a bounty hunter who is often hired to protect Adriatic shipping against seaplane pirates. There is much additional excitement as he has his aircraft rebuilt in Fascist Italy, where he is a wanted man (pig). I won't blow the rest of the movie as it really is superbly done and if you aren't afraid of animation for your entertainment, you and your kids will thoroughly enjoy this one.
| THE KIT |
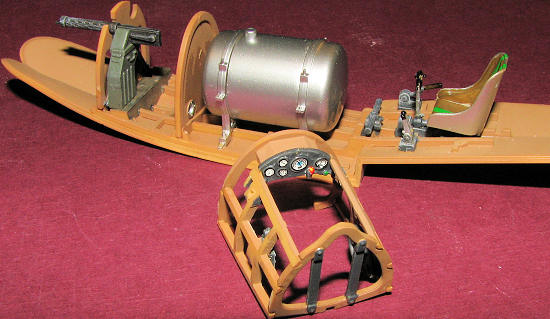
Of course, it is molded in red plastic for the fuselage sections with the interior bits and the lower hull in tan. So much to help you with the painting of the kit. Actually, the molding is quite well done with engraved panel lines, a teeny bit of flash and nicely done fabric representations. Since the plane is mostly wood, a clean finish is to be expected.
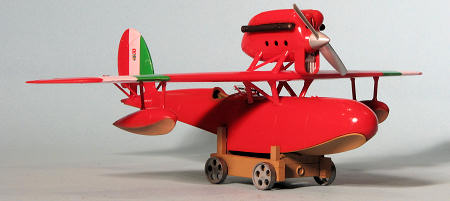
The kit is presented in its post rebuild form
with the newer Ghibli engine and engine cowlings. Also, it has the newer
wings that are swept back a little bit more than the original to give
more speed. To fit in with the newer plane, there is quite a bit of
interior
 detailing, including a well done cockpit, the large fuel tank
that we never see in the movie, as well as a single machine gun. The
other was removed to put a seat of sorts in there for his designer
passenger. The updated forward hatch with small windscreen is also part
of this upgrade. You get three figures in this one. Porco, his passenger
and his lady love, Gina are all included and they are very well molded.
Gina comes with her own base.
detailing, including a well done cockpit, the large fuel tank
that we never see in the movie, as well as a single machine gun. The
other was removed to put a seat of sorts in there for his designer
passenger. The updated forward hatch with small windscreen is also part
of this upgrade. You get three figures in this one. Porco, his passenger
and his lady love, Gina are all included and they are very well molded.
Gina comes with her own base.
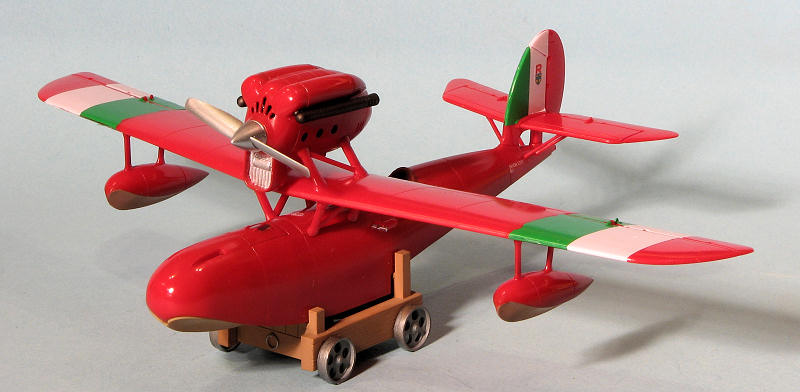
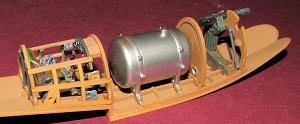
The kit also includes a beaching trolley that one only sees when the aircraft is being rebuilt. However, it provides an excellent display stand. I should mention that the plastic for the lower part of the kit, the beaching trolley and many of the interior bits are all in tan plastic, ostensibly to improve painting. This would account for the engine and machine gun being done in grey.
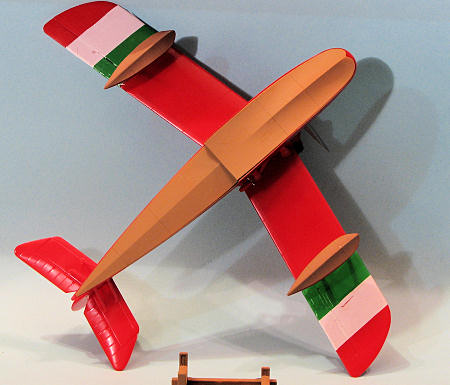
Instructions are in Japanese, though easy enough to follow. The paint chart is also in Japanese, but at least there is a column in English to help you out. It is basically in 'Red Madder' with wood undersides and the decal sheet has this wood as a decal for the underside of the wing floats, a nice touch. Markings are for a single aircraft. Apparently bounty hunters did not need to register their planes as there are no registration numbers. There are a bunch of decals that you probably won't use and their placement is not shown in the instructions. It will be interesting to see how well the white holds out against all that red paint!
| CONSTRUCTION |
This is pretty much standard airplane. I do appreciate the complete upper fuselage being molded in a single piece as it will make it so much easier to assemble. The instructions show the interior as well as the beaching dolly and lower hull being painted in RLM 79, so I broke out the Aeromaster enamels and painted these areas. I also painted the lower part of the outrigger floats with this color after those were assembled. The kit give decals for these, but the paint matched perfectly and so I decided to stick with the paint.
 About the only subassemblies that can be assembled
right away are the wing, fin, ammo can, and the interior fuel tank. These were
all glued together, had the seams dealt with and were painted using various
paints. I used Alclad II aluminum for the items that color, which are the fuel
tank and the pilot seat The ammo can was painted RLM 71 according to the
instructions. The various interior bits were painted according to the
instructions and glued in place.
About the only subassemblies that can be assembled
right away are the wing, fin, ammo can, and the interior fuel tank. These were
all glued together, had the seams dealt with and were painted using various
paints. I used Alclad II aluminum for the items that color, which are the fuel
tank and the pilot seat The ammo can was painted RLM 71 according to the
instructions. The various interior bits were painted according to the
instructions and glued in place.
Once the bulkheads, ammo can and fuel tank were glued in place, I removed and painted the gun. This was glued in place and the upper hull placed over it to keep it aligned as the attachment point allows a lot of side play. I then attached all the cockpit controls, which had been painted earlier. I have to say that the colors for all of these are not 100% in synch with the movie. For instance, the gun charging handles should be what looks like brass rather than aluminum, but I am going by the kit instructions on this one. I should also point out that the kit included two guns and ammo bins, but before its first flight, the modified plane had one removed. These items are undoubtedly there for the earlier version, which is also kitted.
While fiddling with this, I glued the wing halves together. I also started assembling the engine. This had most of it painted black. The beaching dolly was also assembled during this time. I am probably being a tad anal, but I did fill the seams on this though I am sure no one will notice or care. Again, RLM 79 is the predominant shade with the wheels being Neutral Grey. The prop and hub were assembled and the whole deal painted with Alclad II aluminum.
 The last bits
for the interior was to construct the frame around the cockpit. This includes
all the sidewall bits as well as the instrument panel. The kit gives you two of
them. One with detail and another flat to use for the decal. As with many newer
kits, the decal can be made to fit over all the detail with help of some setting
solution and looks a lot better. This is a very wiggly construct so it was set
in place and then the upper fuselage placed over it all until it dried. I then
did what touchup painting was needed on this 'cage' and it was
The last bits
for the interior was to construct the frame around the cockpit. This includes
all the sidewall bits as well as the instrument panel. The kit gives you two of
them. One with detail and another flat to use for the decal. As with many newer
kits, the decal can be made to fit over all the detail with help of some setting
solution and looks a lot better. This is a very wiggly construct so it was set
in place and then the upper fuselage placed over it all until it dried. I then
did what touchup painting was needed on this 'cage' and it was
 glued on. If
one builds the kit as intended, a lot of this detail will be lost from all but
those with a strong light and magnifying lenses.
glued on. If
one builds the kit as intended, a lot of this detail will be lost from all but
those with a strong light and magnifying lenses.
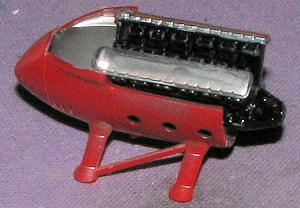 I then looked
into how much of the engine nacelle I could build without the engine being
installed. It would make painting and seam filling so much easier if I could get
most of it built before installation. Well, I discovered that I can build up the
lower section and two sides and still have the engine slide it. I tried putting
on the front and the upper rear piece, but no joy. I also built up the engine,
painting it black using Tamiya semi-gloss black with the valve covers painted
using Testors Chrome Silver. Both were done using a brush.
I then looked
into how much of the engine nacelle I could build without the engine being
installed. It would make painting and seam filling so much easier if I could get
most of it built before installation. Well, I discovered that I can build up the
lower section and two sides and still have the engine slide it. I tried putting
on the front and the upper rear piece, but no joy. I also built up the engine,
painting it black using Tamiya semi-gloss black with the valve covers painted
using Testors Chrome Silver. Both were done using a brush.
Back at the upper fuselage. I glued on the fin and attached the RAT. The forward hatch and wing pylon were taped in place for when I paint it and the cockpit opening was also covered from the inside.
| COLORS & MARKINGS |
This seemed like a good time to do some painting. The
instructions called for Gunze Red Madder and I just happened to have a small
amount left in a bottle. I thinned it with lacquer thinner and proceeded to
paint all the appropriate bits, some of which were
 still on sprues. The red of
the plastic is darn close to the same shade, but after filling and sanding, it
needed paint. It also showed some areas I missed so those were taken care of and
repainted.
still on sprues. The red of
the plastic is darn close to the same shade, but after filling and sanding, it
needed paint. It also showed some areas I missed so those were taken care of and
repainted.
I then returned to the bench and glued on the horizontal stabs and the struts. The engine cover pieces that had not been removed from the sprues were cleaned up a bit more and all this taken to the paint shop for more painting. This pretty much used up all my Gunze Red Madder, leaving just enough for me to brush paint the edges of the clear bits.
During this time, I decided that the only way to show any of the interior detail was to not glue the fuselage to the lower hull. Part of this decision was when I realized I would have to glue the wing strut section to the fuselage or it would keep falling off. At this time I put on the decals. These are quite thin and went on well. Problems did arise. You are to put on the aileron decals and then glue them to the wing. Well for the upper markings, this means the main ones will be too short, as I found out. I also had issues with it covering the aileron control horns. Finding a match to the green used turned out to be a real stumbling block. The white is also semi-transparent and while perhaps not obvious in the photos, is quite obvious when looking at the completed model.
| FINAL CONSTRUCTION |
This consisted of gluing the engine and engine cover
assembly. I did drill out the exhaust before attaching them and the upper cover
is just pushed in place. No worries with the wing floats, though one does have
to suspend the wing so th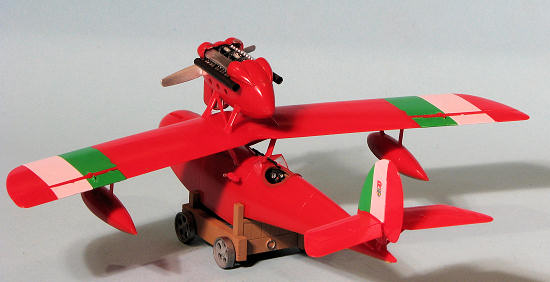 ey
will dry straight. I was going to use the decals for the lower wing floats after
getting a bunch of red overspray on them, but the decals proved to be oversize
so I brush painted the RLM 79 to cover it up. The prop had been assembled and
painted Alclad II Aluminum and that was just pressed in place. Removing the
windscreen resulted in a rough gouge in the clear. I really suck at cutting away
clear bits. If it isn't a gouge, it sends stress splinters in the clear. I
should get a precision hot knife, though I'd probably burn the place down with
it.
ey
will dry straight. I was going to use the decals for the lower wing floats after
getting a bunch of red overspray on them, but the decals proved to be oversize
so I brush painted the RLM 79 to cover it up. The prop had been assembled and
painted Alclad II Aluminum and that was just pressed in place. Removing the
windscreen resulted in a rough gouge in the clear. I really suck at cutting away
clear bits. If it isn't a gouge, it sends stress splinters in the clear. I
should get a precision hot knife, though I'd probably burn the place down with
it.
Anyway, the rest of the small bits, like the telescope sight and the RAT were glued on and finally the upper wing was glued on the struts. The forward hatch has a clear piece that can be built up or down. If using the figure that fits there, it needs to be up. As I was undecided about later installing this figure, I attached it with clear paint. I also drilled out the machine gun ports.
Meanwhile, the beaching dolly was assembled, painted RLM 79 with grey wheels and steel 'tread'. As I mentioned, I did not want all that interior detail to disappear and I might get around to painting the figures, so the hull bottom was not glued in place. This was all placed on the beaching dolly, which helps to hold things together.
| CONCLUSIONS |
 A very nice
kit that has excellent fit. I would have appreciated some spare colors for the
green and white and found the decals to be not only a bit small, but a bit
transparent as well. I would highly recommend painting on the green and white
stripes for the wings, even though this will lengthen the build. I have the
earlier version in 1/72 and when that is built, I will be doing this.
A very nice
kit that has excellent fit. I would have appreciated some spare colors for the
green and white and found the decals to be not only a bit small, but a bit
transparent as well. I would highly recommend painting on the green and white
stripes for the wings, even though this will lengthen the build. I have the
earlier version in 1/72 and when that is built, I will be doing this.
For those who enjoy building aircraft from movies, this one is a must have and it just looks cool.
| REFERENCES |
Multiple watchings of 'Porco Rosso'.
August 2012
Thanks to Hobby Link Japan for the review kit. You can buy yours here, assuming it is not backordered!
Copyright ModelingMadness.com. All rights reserved. No reproduction in any form without express permission from the editor.
If you would like your product reviewed fairly and fairly quickly, please contact the editor or see other details in the Note to Contributors.