ESCI/ERTL 1/48 Lockheed Vega
| KIT #: | 4100 |
| PRICE: | $Traded for it |
| DECALS: | Two options |
| REVIEWER: | Scott Van Aken |
| NOTES: | Out of production |
| HISTORY |
Designed by John Knudsen Northrop and Gerard Vultee,
both of whom would later form their own companies, the aircraft was originally
intended to serve with Lockheed's own airline routes. They set out to build a
four-seat aircraft that was not only rugged, but the fastest aircraft as well.
Utilizing the latest designs in monocoque fuselages, cantilever wings and the
best engine available, the Vega
 delivered on the promise of speed.
The fuselage was monocoque, built from sheets of plywood, skinned over wooden ribs. Using a large concrete mold, a single half of the fuselage shell was laminated in sections with glue and then a rubber bladder was lowered into the mold and inflated with air to compress the lamination into shape. Two fuselage halves were then nailed and glued over a previously made rib framework. With the fuselage constructed in this fashion, the wing spar had to be kept clear, so a single spar cantilever was mounted atop the aircraft. The only part of the aircraft that wasn't particularly streamlined was the landing gear, although production versions wore sleek "spats". It was powered by the Wright Whirlwind, which delivered 225 horsepower (168 kW).
| THE KIT |
This is, of course, the old AMT kit in an ESCI box, which means it is around 20 years old as ESCI went out of business in the 1980s. Italeri now has access to the ESCI molds, but has not felt like reissuing any of these Golden Age kits. It may be that AMT still has the molds.
Anyway, this kit is molded in a light grey plastic and while pretty much flash free, there are some rough edges to the mating surfaces that will need to be attended to.
The kit has no real cockpit or cabin. There is a
cockpit bulkhead with a piece jutting out of it on which to place a pilot
figure. Since little can be seen through the rather thick clear bits, this will
suffice. Cabin window s are separate and can be installed from the outside, which
alleviates the need for masking these items.
s are separate and can be installed from the outside, which
alleviates the need for masking these items.
Fin and tailplanes are two piece and butt fit. Once done, they will fit into slots in the fuselage. Wings are an interesting construct. One is supposed to install the lower wing halves onto the completed fuselage first. Then the upper wings, which join in a sturdy manner, are then glued on. Test fitting has shown that this works quite well. It also showed that for some of the smaller parts that have alignment pins, it is best to remove those pins as they do not line up perfectly.
There is a rather nicely detailed engine face that fits into two cowling halves before attaching to the airframe. The landing gear is quite sturdy looking and the wheels are molded into the spat halves.
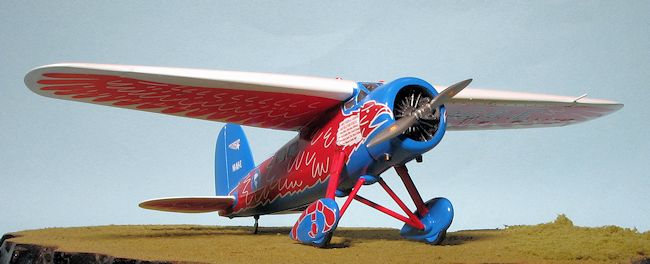
The kit instruction sheet is huge with most of either side taken up with a markings and painting guide. All of the drawings are large and due to the simplicity of the kit, should cause no issues. Markings are for two planes. One is the famous "Winnie Mae", flown by Wiley Post in 1933. The other is for a US Army Y1C-12 with yellow wings and blue fuselage. To be really accurate, the Y1C-12 should not have spatted wheels. The large decal sheet is well printed and my copy still may be viable as it has not yellowed. I'll not be using it so if any reader in the US needs the sheet for his build, let me know.
| CONSTRUCTION |
 First thing I did was to clean up the mating edges and,
on most parts, remove the alignment pins as they were preventing proper
alignment of the parts. This is fairly common with old kits like this. Then the
cockpit area was painted interior green and the cabin area in flat black. The
seat got a coat of brown paint at this time as well.
First thing I did was to clean up the mating edges and,
on most parts, remove the alignment pins as they were preventing proper
alignment of the parts. This is fairly common with old kits like this. Then the
cockpit area was painted interior green and the cabin area in flat black. The
seat got a coat of brown paint at this time as well.
I then assembled the wheel spats, fin, and horizontal stabilizers. I had to sand down some short but wide ejector towers on the fin and stab. Next was the installation of the cockpit bulkhead and the gluing of the fuselage halves. Fit is fairly good, but there are seams that will need to be filled. When that was done, the fin was installed and filler put around the gaps. Same for the tail planes.
Then came the wings. These do not have a firm gluing
surface so it will be important to have a flat area on which to allow the wings
to dry. I first installed the two lower sections and gave the glue an hour to
 set. Then I installed the upper wings. There is a major gap between the two wing
halves. One also exists on the rear of the lower wings along the length of the
back section and up the wing tips to the front. This took considerable time to
fill and smooth.
set. Then I installed the upper wings. There is a major gap between the two wing
halves. One also exists on the rear of the lower wings along the length of the
back section and up the wing tips to the front. This took considerable time to
fill and smooth.
Meanwhile the engine face was painted and installed in the cowling halves. I removed the alignment pins from one side of the cowling as it was pretty much out of alignment with them. With the flight surfaces pretty well smoothed out, I decided to install the landing gear. These fit fairly well, but I felt I needed three hands while making the assembly! Then one of the two tail skids provided was glued in place.
I then masked and installed the canopy. The fit is not all that great, but then on a kit like this, I did not expect it to be. I glued on the engine cowling, masked the engine and headed for the paint shop.
| COLORS & MARKINGS |
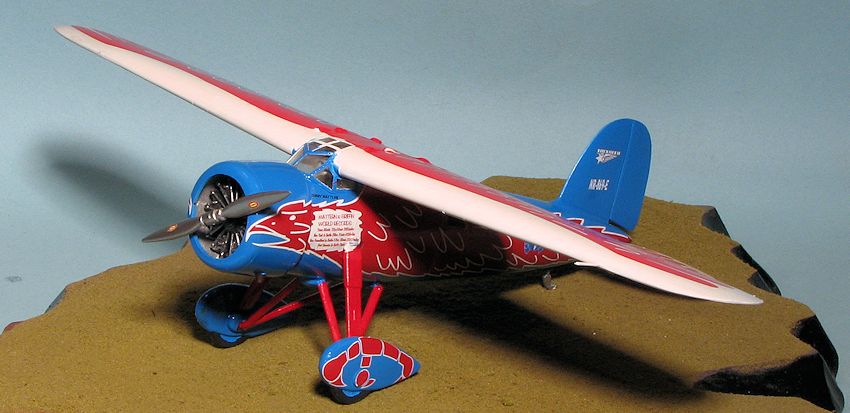
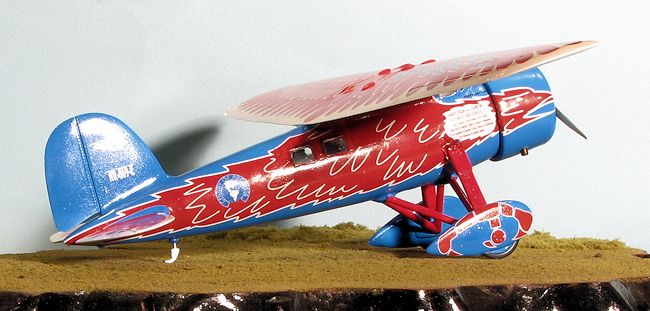
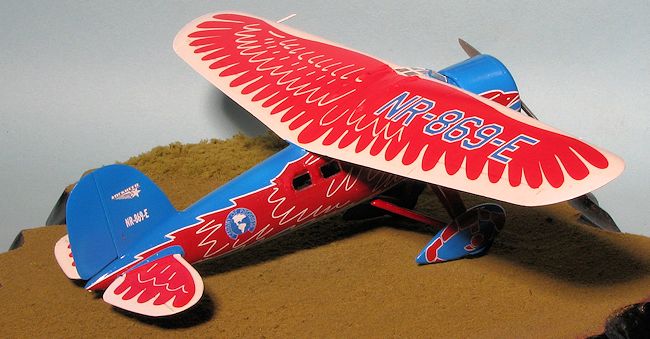
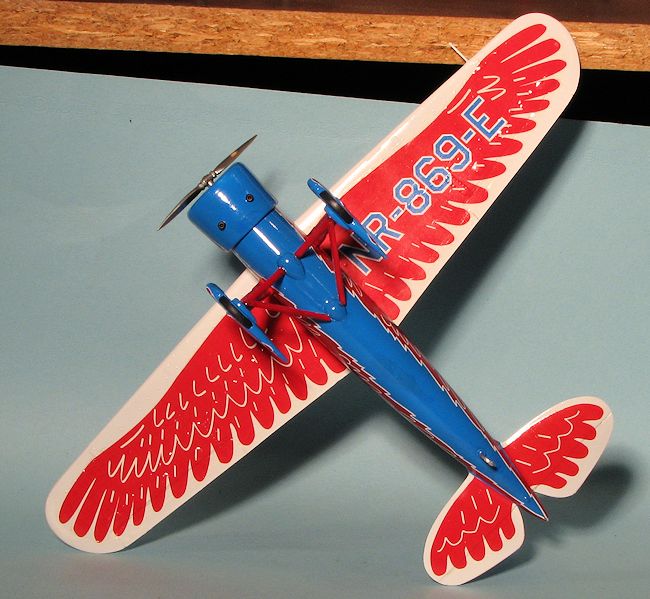
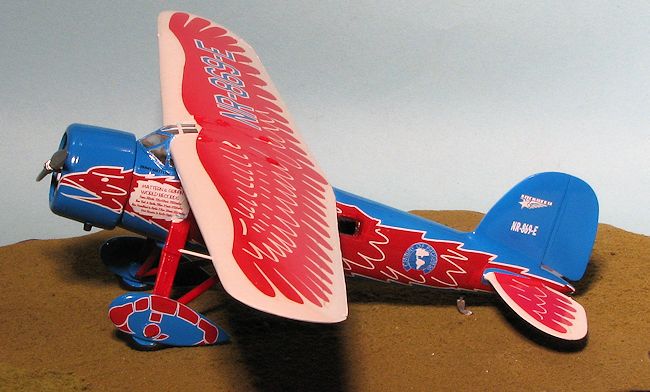
The base colors for this airplane are blue fuselage and fin, white wings, red struts and blue wheel spats. I decided to use Red Pegasus decals for the 'Century of Progress' aircraft, which is quite colorful. Red Pegasus recommends clear coating the two sheets so I applied a couple of coats of Testors Metallizer Sealer over the sheets. The airframe was first primed with Tamiya extra fine white primer so I could find any egregious errors in the build. A few were located so they were fixed up and the airframe resprayed with primer.
I t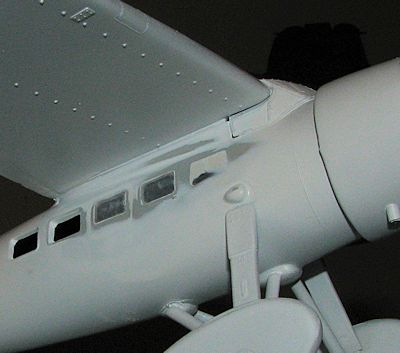 hen realized that this aircraft only had two
windows on each side near the rear. So I installed the front three windows on
each side and then filled them so I could sand things flush. This would have been
a lot easier to do before installing the wings and landing gear. Just goes to
show that one needs to pay attention to things like this early on. It also took
three different applications to get rid of all gaps. When that was
done, more primer before painting the wings and horizontal stabs with Tamiya
Pure White from a rattle can. These areas were then masked off and the landing gear struts were painted
red using Gunze Gloss Red. It took several coats and made quite an overspray
mess.
hen realized that this aircraft only had two
windows on each side near the rear. So I installed the front three windows on
each side and then filled them so I could sand things flush. This would have been
a lot easier to do before installing the wings and landing gear. Just goes to
show that one needs to pay attention to things like this early on. It also took
three different applications to get rid of all gaps. When that was
done, more primer before painting the wings and horizontal stabs with Tamiya
Pure White from a rattle can. These areas were then masked off and the landing gear struts were painted
red using Gunze Gloss Red. It took several coats and made quite an overspray
mess.
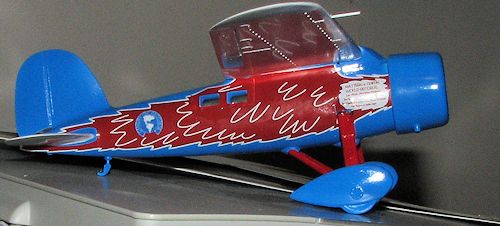
When dry, the struts were masked and the fuselage resprayed with Tamiya white primer. Then I used Tamiya Sky Blue for the rest of the fuselage. Fixing all the paint glitches took a while and did not turn out as cleanly as I'd have liked. Were I to do this scheme again, I would paint the struts separately and not install them until after the fuselage decals were completed.
Speaking of decals, the Red Pegasus decals are very
nicely done and rather impervious to setting solutions. The only type that
seemed to work, and not all that well, was Champ. I also discovered that the
markings are a bit too
 large for
the AMT kit, which is a shame as that is the kit for which they are designed. I
installed the largest fuselage decal first and pushed it as far forward as I
could. I had to cut the decal to fit around the main gear leg, which is why I
suggest not installing this leg until after the markings are on. When I went to
put in the window section, it was pretty far off and will necessitate using some
of that spare decal that is provided. I had thought of putting on the window
decal first on the other side, but then I'd not be able to get the large marking
to properly fit. The eagle head is also too large and barely fits by curving the
forward part of the beak around on the cowling while leaving some of the rear
hanging over the back of the cowling. The rest of the decaling went along
with the expected results thanks to their resistance to setting solutions. When
all was said and done, the model was decaled, though it took several weeks to
get it on.
large for
the AMT kit, which is a shame as that is the kit for which they are designed. I
installed the largest fuselage decal first and pushed it as far forward as I
could. I had to cut the decal to fit around the main gear leg, which is why I
suggest not installing this leg until after the markings are on. When I went to
put in the window section, it was pretty far off and will necessitate using some
of that spare decal that is provided. I had thought of putting on the window
decal first on the other side, but then I'd not be able to get the large marking
to properly fit. The eagle head is also too large and barely fits by curving the
forward part of the beak around on the cowling while leaving some of the rear
hanging over the back of the cowling. The rest of the decaling went along
with the expected results thanks to their resistance to setting solutions. When
all was said and done, the model was decaled, though it took several weeks to
get it on.
| FINAL CONSTRUCTION |
 Once the decals were in place, I used red paint to
take care of the areas of broken or split decal and around the window frames in
the back. The model was then given a coat of gloss clear to seal in the decals.
I figured the plane would have been shiny clean for its long trip. Masking was
removed from the canopy and the rest of the cabin windows were installed using
clear paint. I then removed the masking from the engine and installed the prop
after painting it aluminum. The last step was painting the main wheels and the
kit was done.
Once the decals were in place, I used red paint to
take care of the areas of broken or split decal and around the window frames in
the back. The model was then given a coat of gloss clear to seal in the decals.
I figured the plane would have been shiny clean for its long trip. Masking was
removed from the canopy and the rest of the cabin windows were installed using
clear paint. I then removed the masking from the engine and installed the prop
after painting it aluminum. The last step was painting the main wheels and the
kit was done.
| CONCLUSIONS |
 Looking at the completed model, I'm glad I did this
one. It is very much a '3 footer', thanks to the issues with the decals. I hope
my suggestions are taken to heart by anyone else attempting this scheme. From
what I can gather, these decals were not sized for this kit. While the wing
markings fit OK and the tailplane ones did as well after some trimming, the ones
for the fuselage are too large and need to be 'shrunk down' a bit. Same for the
ones that go on the wheel spats. I made no attempt to get the inner 'claws' on
these spats and would suggest they be attached before attaching the struts.
Looking at the completed model, I'm glad I did this
one. It is very much a '3 footer', thanks to the issues with the decals. I hope
my suggestions are taken to heart by anyone else attempting this scheme. From
what I can gather, these decals were not sized for this kit. While the wing
markings fit OK and the tailplane ones did as well after some trimming, the ones
for the fuselage are too large and need to be 'shrunk down' a bit. Same for the
ones that go on the wheel spats. I made no attempt to get the inner 'claws' on
these spats and would suggest they be attached before attaching the struts.
While the rather old ESCI/AMT kit isn't bad, it is very much a subject that would stand a more modern molding, though I doubt that will happen soon.
| REFERENCES |
http://en.wikipedia.org/wiki/Lockheed_Vega
November 2013
Thanks to me for the preview kit and Red Pegasus for the decals.
If you would like your product reviewed fairly and fairly quickly, please contact the editor or see other details in the Note to Contributors.