
| KIT #: | 80231 |
| PRICE: | $9.99 MSRP |
| DECALS: | One option |
| REVIEWER: | Scott Van Aken |
| NOTES: |
| HISTORY |
The aircraft were built by Moravan Aviation, founded in 1934 by Tomas Bata in the Czech Republic.
As a follow-on and replacement for the successful Zlin Trener series of tandem aerobatic trainers, Morovan developed a new family of light aircraft, featuring a side-by-side layout and comprising a two seat trainer, the Zlín Z 42 and a four seat trainer/tourer aircraft, the Zlín Z 43. The Z 42 first flew on 17 October 1967, achieving airworthiness certification on 7 September 1970.[2]
 The aircraft fuselage center section is of welded steel tube,
covered with sheet metal and fiberglass panels. The tailcone is of monocoque
construction. The empennage is of sheet metal, and incorporates an all-flying
tail. The two-spar wings are of all-metal construction. The tricycle landing
gear is fixed, with a steerable nose wheel. Designed for aerobatics instruction,
it was certified to +6.0 and -4.0 limit maneuvering load factors, and was
equipped with full inverted fuel and oil systems permitting extended inverted
flight. The Z 42 is powered by a Walter inverted six-cylinder engine rated at
134 kW (180 hp).
The aircraft fuselage center section is of welded steel tube,
covered with sheet metal and fiberglass panels. The tailcone is of monocoque
construction. The empennage is of sheet metal, and incorporates an all-flying
tail. The two-spar wings are of all-metal construction. The tricycle landing
gear is fixed, with a steerable nose wheel. Designed for aerobatics instruction,
it was certified to +6.0 and -4.0 limit maneuvering load factors, and was
equipped with full inverted fuel and oil systems permitting extended inverted
flight. The Z 42 is powered by a Walter inverted six-cylinder engine rated at
134 kW (180 hp).
The revised Zlín Z 42M flew in November 1972, with a revised tail taken from the Z 43, and a Constant speed propeller replacing the variable pitch propeller (where the propeller pitch is controlled by the pilot) of the original Z 42. When early Z 42s were refitted with the new propeller, they were redesignated Z 42 MU.
| THE KIT |
I have to say that I found it unusual and a pleasant surprise to see Hobby Boss or anyone producing a model of a light aircraft. Civil aviation of this type is rarely kitted and we can only hope that this is a portent of things to come.
Typical of its least expensive kits, there are not all that
many parts and most of the airframe is molded into just a few pieces. The wings
and lower fusealge is one piece with the upper fuselage and fin/rudder being the
other. The most surprising thing is that these two pieces are molded in clear
plastic. Aside from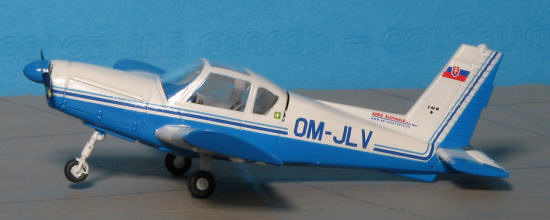 the formation lights on the wing and fin tips, there are no
clear areas. The cabin clear bits are a separate molding.
the formation lights on the wing and fin tips, there are no
clear areas. The cabin clear bits are a separate molding.
All the rest of the bits are molded in their standard plastic and are on a separate sprue. In total, there are only 13 parts. There are control sticks and an instrument panel to fit into the interior. The gear are molded with the wheels and there is a separate spinner for the prop, which will make it easier to paint.
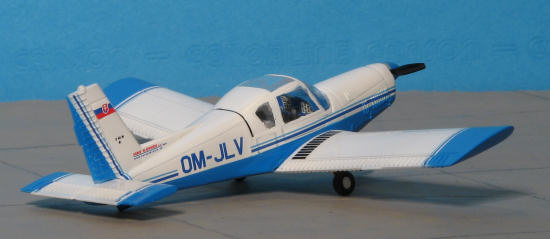
Now just because this is a simple kit to build, doesn't mean that it will be simple to paint. All of the large blue areas on the wing tips, stab tips and the fuselage will have to be painted. The stripes and registration are on a nicely printed decal sheet. This sheet also includes the instrument panel decal and wing walk areas. The lone option is for a Slovakian aircraft. The well drawn instructions provide clear steps and paint in the Gunze paint range. For those without access to Gunze paints, the Sky Blue that is needed crosses over to Tamiya X-14 and Humbrol #48. I should also note that the instructions mention nothing about weight. You will need to cram as much as you can into the nose to keep this one from tail sitting.
| CONSTRUCTION |
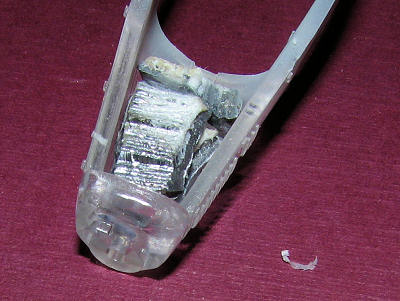 In
this case, the first thing is to add weight to the nose. I put as much as I
thought I needed into this one, and it turned out to not be enough. You'll need
to fill every space you can find that is forward of the wheels. You cannot go
much past the windscreen, however, without the weight being visible from the
inside as there is no firewall. Next, the interior was painted with medium grey
and had dark grey areas brushed on the seats.
In
this case, the first thing is to add weight to the nose. I put as much as I
thought I needed into this one, and it turned out to not be enough. You'll need
to fill every space you can find that is forward of the wheels. You cannot go
much past the windscreen, however, without the weight being visible from the
inside as there is no firewall. Next, the interior was painted with medium grey
and had dark grey areas brushed on the seats.
 The instrument
panel section was painted Sky Blue using Tamiya X-14 paint thinned with lacquer
thinner. I also painted the prop spinner at this time. The part was dry to the
touch within a very short period of time. Well under an hour. There is a decal
for the instruments and that was applied. I found that the paints I used for the
interior (an enamel), didn't like to stick very well to the kit plastic. Same
for the inside of the fuselage where it was sprayed. It tended to come off in
chunks. A repaint was done and the interior glued into place.
The instrument
panel section was painted Sky Blue using Tamiya X-14 paint thinned with lacquer
thinner. I also painted the prop spinner at this time. The part was dry to the
touch within a very short period of time. Well under an hour. There is a decal
for the instruments and that was applied. I found that the paints I used for the
interior (an enamel), didn't like to stick very well to the kit plastic. Same
for the inside of the fuselage where it was sprayed. It tended to come off in
chunks. A repaint was done and the interior glued into place.
Once that was installed, I glued the fuselage halves together. The fit is about like all these inexpensive Hobby Boss kits in that the seam lines need filler and sanding. The tail plane was trapped between the upper and lower fuselage. You cannot attach this later as it won't fit. At this time, the instrument panel needs to be attached. Then the upper clear part was glued in place. To be honest, I see no reason to do the majority of this kit in clear plastic. There are no clear sections on either fuselage half or the wings to deal with (unless I missed something. I'd have preferred standard styrene.
Now that the airframe was together, it was time for paint. I masked off the cabin windows and headed for the spray booth.
| COLORS & MARKINGS |
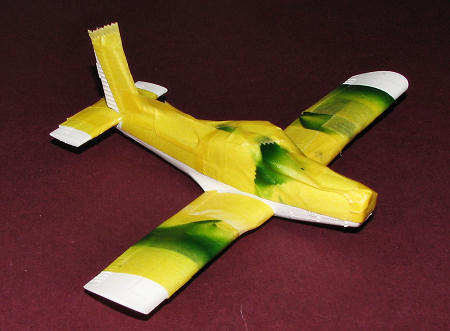 These
seem simple. The airframe was painted in Boyd's Gloss white. This took a few
days to fully dry and once that was done, I masked off the bits that were not to
be painted blue. Now I have to tell you that this aircraft has a lot of
corrugated sections. Basically all the flight control surfaces are like this as
is the right side of the n
These
seem simple. The airframe was painted in Boyd's Gloss white. This took a few
days to fully dry and once that was done, I masked off the bits that were not to
be painted blue. Now I have to tell you that this aircraft has a lot of
corrugated sections. Basically all the flight control surfaces are like this as
is the right side of the n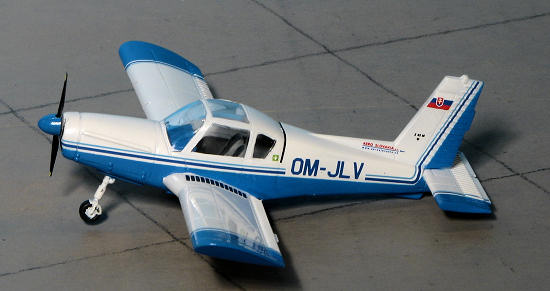 ose,
which has louvers. This means that there will
be areas where the paint will get under the masking. It just can't
be helped. Once masked the Tamiya X-14 was sprayed on. This is not the same
shade as is shown on the box art or the painting instructions, yet the IPMS
Stockholm web site crosses this shade with the Gunze provided in the
instructions. Regardless, it looks quite nice and actually matches one of the
lighter shades on the pin striping.
ose,
which has louvers. This means that there will
be areas where the paint will get under the masking. It just can't
be helped. Once masked the Tamiya X-14 was sprayed on. This is not the same
shade as is shown on the box art or the painting instructions, yet the IPMS
Stockholm web site crosses this shade with the Gunze provided in the
instructions. Regardless, it looks quite nice and actually matches one of the
lighter shades on the pin striping.
With the airframe painted, the masking was removed and as much of the bleed through was taken care of using a sharp scalpel to carefully scrape the blue where needed. Not perfect, but it does work. I then glued on the landing gear. I quickly noticed that the nose gear is far too long or the main wheels are too short. Now it is supposed to sit nose high, but not this far, I think. Nothing to really do about it at this point so I applied the decals. These fit well and reacted well to setting solutions.
| FINAL CONSTRUCTION |
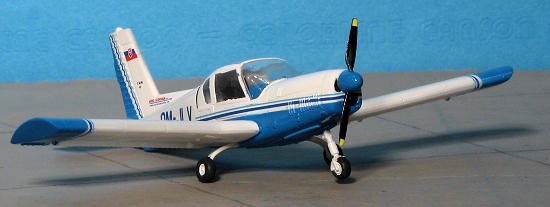
 Not much to
tell for the final bits. I removed the masking, glued the prop to the spinner,
then cut off a bit of the back of the prop shaft as it was hitting on the nose
weight. This had the unusual effect of not only holding the prop in place, but
allowing it to spin rather freely as well.
Not much to
tell for the final bits. I removed the masking, glued the prop to the spinner,
then cut off a bit of the back of the prop shaft as it was hitting on the nose
weight. This had the unusual effect of not only holding the prop in place, but
allowing it to spin rather freely as well.
| CONCLUSIONS |
Overall, I'm pleased with how well the kit turned out. That is, aside from the nose sitting so high. Cutting the gear was considered, but even then, it would not have cured the tail-sitting so I left it as it was. Considering how many of the planes were/are used as basic trainers in various military forces, I'm surprised that there wasn't more than one markings option. Still, it is a nice kit and one can only hope that this will allow more civil light aircraft to be kitted.
| REFERENCES |
http://en.wikipedia.org/wiki/Zl%C3%ADn_Z_42
July 2010
Thanks to Squadron Products for the review kit. Get yours at your local shop or have them order it for you.
If you would like your product reviewed fairly and quickly, please contact me or see other details in the Note to Contributors.