Academy 1/72 F-84E/G
|
KIT # |
1617 |
|
PRICE: |
$14.00 |
|
DECALS: |
Three aircraft |
|
REVIEWER: |
|
|
NOTES: |
|
BACKGROUND |
Please take a look at the preview for a peek at what's in the box and a short history.
|
CONSTRUCTION |
Academy's F-84 kit is a myriad of subassemblies and optional panels. First thing I did was to decide on the version I wanted to build. In this case, it is the F-84E. This meant that all the 'G only' parts were removed and placed in the ever-growing pile of spare parts (one of these days I'm going to have to sort that mess).
Having bought this kit second hand,
the previous owner had removed a number of parts from the sprues for test
fitting and general playing around. So I glued the tip tanks, bomb halves and
the wings together (after opening the holes for the under
 wing rockets). At this
time, I also glued in the E model wing insert and fuselage panels. I also glued
the tail cone parts for the E together. The tailpipe assembly was glued together
as was the nose wheel well. Just to add to things, the tail pipe assembly, nose
well and speed brake well were glued into place in one or the other fuselage
half.
wing rockets). At this
time, I also glued in the E model wing insert and fuselage panels. I also glued
the tail cone parts for the E together. The tailpipe assembly was glued together
as was the nose wheel well. Just to add to things, the tail pipe assembly, nose
well and speed brake well were glued into place in one or the other fuselage
half.
While that dried, my attention was turned to the cockpit. The seat is four parts so gluing commenced on that bit. The control stick, instrument panel and forward bulkhead were glued to the cockpit tub. The detailing on the cockpit really is very good for a 1/72 kit. It is something that Hasegawa should look into. Decals are nice, but I like the 3-D of raised details. Besides, by putting decals over the raised detail you get the best of both worlds (Academy does not supply instrument decals). With all the proper bits together, those that should be painted interior green were so treated. Then some serious teeny brush work was done on the interior followed by a wash and a dry-brush. The cockpit was then glued into the fuselage half.
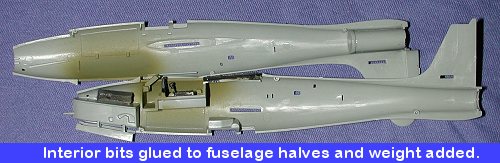 The fuselage was
nearly ready to glue together, but first, a weight had to be added. I placed a
rather large lead chunk atop the intake/nose well and squirted in a dollop of
super glue to hold it in place. Then the fuselage was ready to go together. Fit
was fairly good, though I found that the upper fin part didn't fit as flush as
I'd have liked. While adding the usual filler to the joins, I noted a couple of
sink marks just aft of the canopy where some alignment pins were located and
these were filled. The E model tail cone and the intake were glued on the
fuselage at this time as was the vent section aft of the speed brake well. Be
very careful when gluing the nose or tail section as it is quite easy to get it
misaligned (this is experience talking). As I mentioned earlier, I found the tip
of the fin on the right side was too thick or something so either sand the heck
out of it or fair in the step with putty. You will also find it touchy to sand
near the nose gear doors as they are a bit fragile. I'd have liked them separate
to tell you the truth, as it makes it easier to paint them if they need to be a
different color from the airframe.
The fuselage was
nearly ready to glue together, but first, a weight had to be added. I placed a
rather large lead chunk atop the intake/nose well and squirted in a dollop of
super glue to hold it in place. Then the fuselage was ready to go together. Fit
was fairly good, though I found that the upper fin part didn't fit as flush as
I'd have liked. While adding the usual filler to the joins, I noted a couple of
sink marks just aft of the canopy where some alignment pins were located and
these were filled. The E model tail cone and the intake were glued on the
fuselage at this time as was the vent section aft of the speed brake well. Be
very careful when gluing the nose or tail section as it is quite easy to get it
misaligned (this is experience talking). As I mentioned earlier, I found the tip
of the fin on the right side was too thick or something so either sand the heck
out of it or fair in the step with putty. You will also find it touchy to sand
near the nose gear doors as they are a bit fragile. I'd have liked them separate
to tell you the truth, as it makes it easier to paint them if they need to be a
different color from the airframe.
 With the fuselage sorta done,
the wings were attached. These fit quite well and no filler was needed, which
for me, is a surprise indeed. Since I was doing a Korean War E, the refueling
probes on the tip tanks had to go. Then any gouges and seams were filled and
sanded smooth. At this time, the bomb racks were glued on. Since I wasn't going
to do a scheme that required the tailplanes to be left off until the end, these
were glue on. Again, no fit problems at all. The two fuel dump tubes were then
glued in place.
With the fuselage sorta done,
the wings were attached. These fit quite well and no filler was needed, which
for me, is a surprise indeed. Since I was doing a Korean War E, the refueling
probes on the tip tanks had to go. Then any gouges and seams were filled and
sanded smooth. At this time, the bomb racks were glued on. Since I wasn't going
to do a scheme that required the tailplanes to be left off until the end, these
were glue on. Again, no fit problems at all. The two fuel dump tubes were then
glued in place.
Moving to the front, the gun sight and seat were installed in the cockpit. The canopy and windscreen were then masked. The canopy for this version was reinforced like the G. This means that it has to be painted a white or ivory color and it makes masking interesting, to say the least! With the clear bits masked, the section inside the canopy was attached. It didn't want to stay glued so I glued it to the section right behind the pilot. The canopy and windscreen were then glued in place. While the airframe went to the paint shop, I assembled the bombs and rockets. The rockets are a bit fiddly and the fins are really too thick. The two fin sections slot into each other so be careful during construction.
|
PAINT |
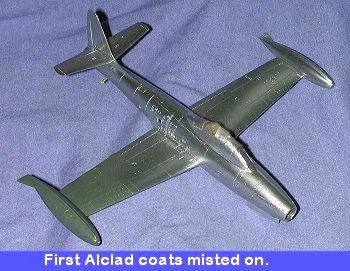 Step one was to paint the canopy section. I used flat white for this task. After
it dried, I carefully masked it off and painted the entire airframe with gloss
Extracolor RLM 82 Dark Green. I used this color just because it was gloss and I had it
ready, no other reason. When that had cured for a few days, several coats of Alclad II aluminum were misted on. Alclad cannot be sprayed in a thick coat or
it will eat into the underlying paint and cause all sorts of mayhem. Thin coats
work quite well. Eventually there were 4-5 thin coats applied before it was
completely covered. I also painted the gear doors, wheels and landing gear at
this time.
Step one was to paint the canopy section. I used flat white for this task. After
it dried, I carefully masked it off and painted the entire airframe with gloss
Extracolor RLM 82 Dark Green. I used this color just because it was gloss and I had it
ready, no other reason. When that had cured for a few days, several coats of Alclad II aluminum were misted on. Alclad cannot be sprayed in a thick coat or
it will eat into the underlying paint and cause all sorts of mayhem. Thin coats
work quite well. Eventually there were 4-5 thin coats applied before it was
completely covered. I also painted the gear doors, wheels and landing gear at
this time.
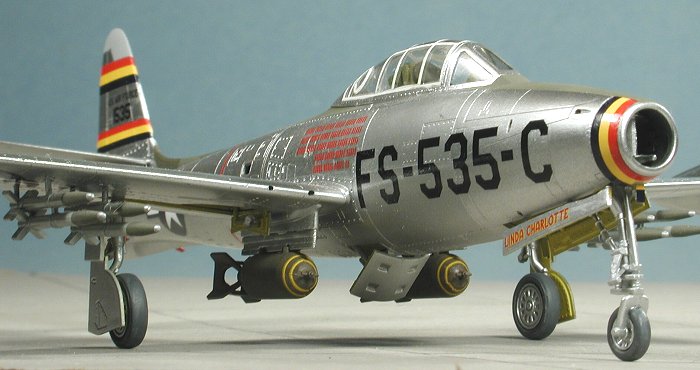
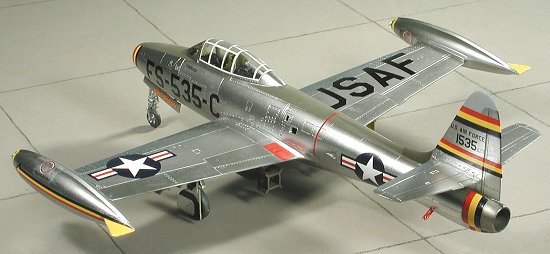
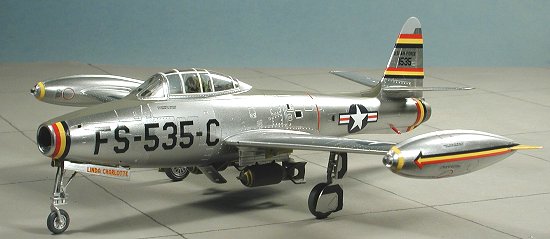
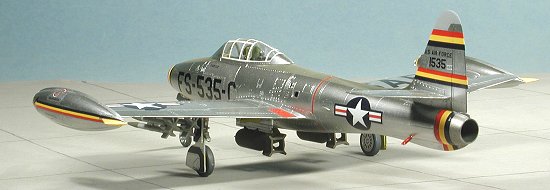
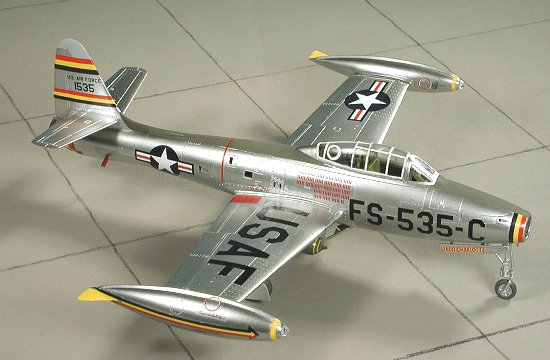
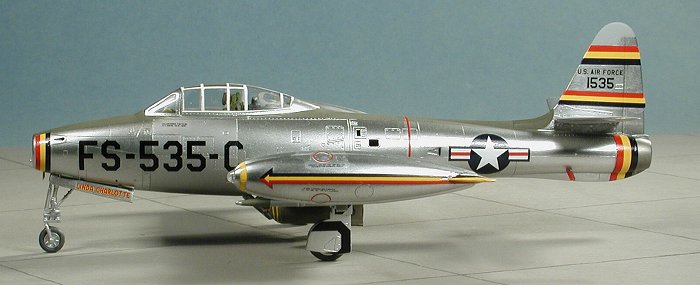
Once this was on, I masked off a few areas on the airframe and sprayed them darkened aluminum for contrast. If you look at photos of Korean war vintage Thunderjets, they almost look as if they have a coat of dull aluminum paint on them. It depends on the lighting as to whether you can see different shades of aluminum. Since this is a model, artistic license can be used. With the Aluminum all done, areas were masked off for other colors. Light grey for the fin tip, burnt iron for the tail cone and olive drab for the anti-glare sections on the upper fuselage.
The kit was then taken back to the workbench. Here the wheel wells were brush painted with yellow zinc chromate primer. Landing gear and wheels were then installed. Fit was very good and quite tight, which is nice. Afterward, it was time to see about some decals.
|
DECALS |
While the kit decals are really very nice, I've always preferred to use aftermarket ones as you get a wider choice of subjects. For this kit, I chose Aeromaster 72-169 that has a very colorful scheme for the 49th FBW wing commander's aircraft at Tageu in 1953. This particular F-84E had colorful stripes and a pretty hefty mission score on it. Though the sheet was dated March of 1999, the only kit listed was the Heller F-84G. This meant that I could expect possible fit problems with the decals unless the Academy and Heller kits are the same.
 When doing semi-complicated schemes like this, I always start with what seems to
be the most difficult decal. That way, if it is botched beyond all repair, I can
remove it and do another scheme. For this kit that was the tip tank decals.
There are 6 of them for each tank. Two for the finlets, one at the very front,
one top, one bottom and one side. From applying these decals I learned several
lessons. First off, if you can paint something on instead of using a decal then
do it. The finlet decals were too large, the nose of the tank decals were too
large and there was no earthly way I could get the upper and lower tank decals
to fit. A well-prepared modeler will paint all these areas. They are a solid
color and relatively easy to mask. The only tank decals I could get to fit
reasonably well were the side arrows and, according to the diagram, they are too
short. The only other decals I had problems with were the lower aft stripes that
wouldn't conform and the nose ring one which needed a bit of trimming once
applied as it was too long.
When doing semi-complicated schemes like this, I always start with what seems to
be the most difficult decal. That way, if it is botched beyond all repair, I can
remove it and do another scheme. For this kit that was the tip tank decals.
There are 6 of them for each tank. Two for the finlets, one at the very front,
one top, one bottom and one side. From applying these decals I learned several
lessons. First off, if you can paint something on instead of using a decal then
do it. The finlet decals were too large, the nose of the tank decals were too
large and there was no earthly way I could get the upper and lower tank decals
to fit. A well-prepared modeler will paint all these areas. They are a solid
color and relatively easy to mask. The only tank decals I could get to fit
reasonably well were the side arrows and, according to the diagram, they are too
short. The only other decals I had problems with were the lower aft stripes that
wouldn't conform and the nose ring one which needed a bit of trimming once
applied as it was too long.
The others went on well and succumbed to the setting solution I used on them. In fact, where specific fit wasn't an issue, they fit extremely well and the film nearly disappeared against the metallic paint. I did use a few of the kit decals and they worked fairly well, though not as well as the Cartograf-printed Aeromaster ones. What I found was that all of the red and yellow in the stencil decals was off register with the white background behind it. For that reason, I only used a few of them. I also found that they didn't disappear into the background as well as the Aeromaster ones. Unfortunately, Aeromaster chose not to offer common stencils with either of their 1/72 F-84E/G sheets.
|
WHAT? ME WORRY? |
Putting on the decals took me about a week. I wasn't in a hurry and wanted to be sure that one section was fully on there before going to another one. With all the decals applied, it was time to return to some construction. I had to be very careful handling the model as I didn't want to scratch the unprotected decals. That is the trouble with metallics. A clear overcoat just dulls the finish. Great if you want an aluminum paint look.
 At this time, the main gear doors were applied after painting
the interior of them zinc chromate yellow. Then the speed brake and actuating
arms. I used the E version without the myriad holes as I had no reference to
show that this plane had the later G speed brake. Unfortunately for me, I had
managed to glue in the speed brake well a bit off center, resulting in an
equally off center speed brake. Then the tip tank nose clear
bits were added, followed by the bombs. The rockets took a bit longer to get
ready to install as they needed several shades of paint on them prior to gluing
in place. I then installed the landing lights and gave a few areas some touch up
painting. Then the model was photographed. The final step was to glue in the
rockets. A word of warning on these. The holes you will open up will be a bit
larger than the mounting lugs for the rockets. That means that you'll have to be
very very careful mounting the rockets to keep the mounts from disappearing
completely into the wing. On the next Academy F-84, I'll not use the rockets.
Besides the hole situation, they are just not accurate looking rockets. If you
look at the Tamiya 1/48 F-51D review, you'll see what
these rockets should look like. The Academy ones get conical way too soon.
At this time, the main gear doors were applied after painting
the interior of them zinc chromate yellow. Then the speed brake and actuating
arms. I used the E version without the myriad holes as I had no reference to
show that this plane had the later G speed brake. Unfortunately for me, I had
managed to glue in the speed brake well a bit off center, resulting in an
equally off center speed brake. Then the tip tank nose clear
bits were added, followed by the bombs. The rockets took a bit longer to get
ready to install as they needed several shades of paint on them prior to gluing
in place. I then installed the landing lights and gave a few areas some touch up
painting. Then the model was photographed. The final step was to glue in the
rockets. A word of warning on these. The holes you will open up will be a bit
larger than the mounting lugs for the rockets. That means that you'll have to be
very very careful mounting the rockets to keep the mounts from disappearing
completely into the wing. On the next Academy F-84, I'll not use the rockets.
Besides the hole situation, they are just not accurate looking rockets. If you
look at the Tamiya 1/48 F-51D review, you'll see what
these rockets should look like. The Academy ones get conical way too soon.
|
CONCLUSIONS |
Despite the self-induced glitches, this is really a super little kit. Overall fit is quite good and it is very accurate (other than the rockets). While I'm sure the Tamiya one isn't as fiddly, being only able to do a G, the Academy kit gives you the extra variant, which is a real bonus. It is a kit that I can recommend.
March 2002
|
REFERENCES |
F-84 Thunderjet Units Over Korea, Warren Thompson, Osprey, 2000
Copyright ModelingMadness.com. All rights reserved. No reproduction in part or in whole without express permission.
Review kit courtesy of my kit collection
If you would like your product reviewed fairly and fairly quickly, please contact the editor or see other details in the Note to Contributors.
Back to Reviews Page 2021