Airfix 1/48 Seafire FR.46/47
Kit Number:7106
Price: $25.00 retail
Decals: Four markings, three for the FR.47 and one for the FR.46
Date of Review: 26 January, 1997
The Seafire FR.46/47 is the ultimate expression of the Spitfire that first saw use in 1937. Comparing the the Spitfire I and the Seafire 47 side by side, you will see that just about the only thing they have in common is the entrance door!. Yet the last model can be just as easily identified as a Spitfire as the first. Both the FR46 and FR 47 were built in small numbers of less than 100 and saw very limited service. The FR.47 did take part in action during the early part of the Korean war, but its limited range and carrying capacity were not what was needed and it was quickly replaced by the more capable Sea Fury.
The Airfix kit is the latest from this company and probably one of the best kits they have ever produced. While not quite equal to Hasegawa and Tamiya (and why is that?; aren't Europeans as capable of producing a quality engineered and molded kit?), in my opinion it is pretty close. I look forward to more kits of this quality. The kit is molded in medium grey with superb engraved panel lines and access hatches. It comes with two separate wings; one for the FR.46 and one that is set up for folding for the FR.47. Other parts peculiar to either variant are in the kit and when you have finished, you have a rather large amount of unused plastic. Optional parts include underwing and fuselage fuel tanks as well as a full array of unguided rockets. I chose to build my kit with none of these to disrupt the graceful and yet brutish lines of these aircraft.
I generally had little trouble with construction, even though several reviews had pointed out major trouble spots, except for the too-small canopy, I ran into very little trouble. The interior is well proportioned and outfitted although oddly enough, the handle of the control column is not drilled out. For complete details on building this kit, see the section at the end of the review.
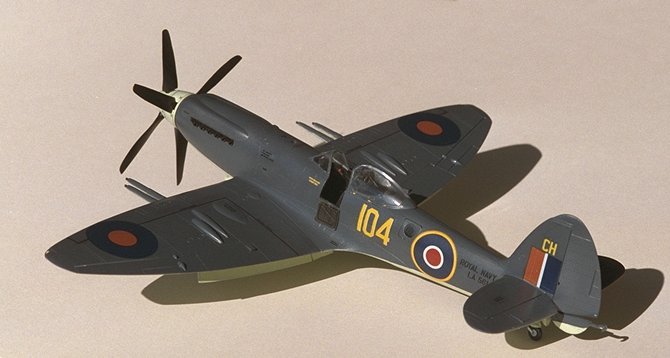
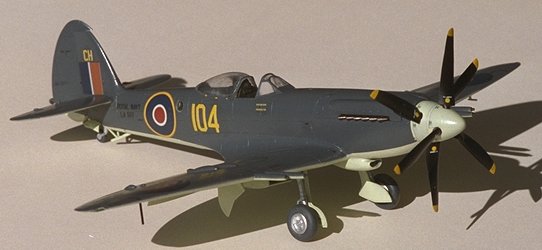
The version I chose was the FR.46; primarily as I was leery of my ability to do justice to the folding wings and also because I wanted the scheme where Dark Sea Grey was the predominant color. I used Gunze paints followed by a gloss coat of Future floor wax. The kit decals were quite good although the yellow was misaligned. For this reason, I resorted to Modeldecal for some replacement roundels. The red decals disappeared once applied. Because of the limited use of these aircraft, I would be quite surprised to see an aftermarket decal sheet for this aircraft. While there will probably be an interior set, the kit one is quite convincing, needing little more than a drilled out control handle and seat belts.
Overall I was quite pleased with the kit. It assembled quite well, has sufficient detail for the average builder, gives you separate flaps and rudder (maybe the next kit will include ALL control surfaces as separate?), and has a good instruction and decal sheet. Frankly the only thing I would change is to put in useable paint references instead of these darned Humbrol paint numbers. Come on Airfix, not everyone lives in Europe!. Highly recommended.
Airfix 7106 1/48 Seafire FR.46/47
2 Jan, '97
This kit is one that I have been wanting to do for quite some time, but just have not gotten around to it. "But wait", you say, "this kit was just released a few weeks ago". That is true, but I have had the Falcon 1/48 Vacuform kit of the FR.47 on my pile for an age, it is just that the extra work for a vac means that they tend to sit on the pile a while longer than other kits. With the arrival of the new Airfix kit, it went almost straight from the store to the in-work pile. I have only been test fitting the pieces, but have already noticed that there will be a few gaps that will have to be filled on the wing tips. The rest of the kit looks very nice indeed (which it should for $20 + retail). You get an entirely separate section of wings for the FR.47 as this mark had folding wings so Airfix provided an entirely new wing, complete with inserts. Since I want to build the FR.46, I will have a spare set of wings!
Also included are rockets, two different types of underwing fuel tanks, a rather comprehensive instruction booklet and a very large decal sheet. Since these Seafires were with few units, there won't be much variety in aftermarket sheets. The parts are sink mark and flash free. In addition, the injector marks that I can see are all going to be hidden when the kit is built. You get a rather complete interior, positionable canopy and entrance door, complete-looking wheel wells and positionable flaps.
I have read a review of this kit in MMP 3.09 and they do not give it very high marks (3 out of 5), however, since they build it without paint or putty, I am sure it will be a great kit when done. I'll let you know how things go.
Jan 4, '97
Hey, it has only been a couple of days since I got the thing. Since then all I have done is to glue the wheel halves together and paint all the interior parts what I hope is a good match for interior green. I have also had an e-mail about the suspect instrument panel. Frankly, it looks more like one from Airfix's 1/48 SpitVb, but the only two cockpit drawings I found were for a Vb and a Seafire XV and it doesn't look like the Seafire instrument panel. I'm lazy so I'll just use the decal over the existing panel. More later.
Jan 11, '97
Thanks to a very observant reader (thanks Caleb) I have repainted the interior black (gotta learn to trust instruction sheets). The interior was then assembled, after painting the armor plate gunmetal. I have been using an Airfix catalogue that lists Humbrol paints in the back to match colors since the instructions only give Humbrol numbers. I used the decal over the instrument panel using Solvaset to make it snuggle down and a few of the instrument decals match spots on the panel! It looks convincing. I also drilled out the hole in the control stick (come on Airfix, it can't be that tough for you to do for us). The interior wall bits were painted various colors and the whole thing dry-brushed. The pieces were set aside. The wings were then assembled sans tip lights. The fit is very good indeed, with putty only used near the tip as I think the gap is too big. There is a spacer that fits near the back of the wing that needs a teeny trim to fit properly and it was installed. The fuselage then had the holes cut out for the camera ports. The square one is a real pain and I did not get the seamless fit I would have liked. The round one was easy. I took a clue from MMP and did not install the underside window at this time. The fuselage haves were then glued together. A really great fit!. When dry, I used backlighting to find the underside window area, opened it up and inserted the window. A good idea and a clean installation.
The next was the installation of the interior. You can do it before gluing the halves together, but it doesn't matter. There was no problem with this at all. On to wing installation. MMP had two warnings in this area. First that you needed to fill the hole in the aft of the wing or you would see it from the cockpit. Not on my Spit. The black paint and the seat block the view well. Secondly that the wing did not fit well and left gaps at the root. Not on the FR.46 I'm building. The root fit is one of the best I have ever seen. Where I ran into trouble was that the aft cockpit frame interfered with the wing and needed sanded down to fit. I highly recommend dry fitting all the wing, fuselage assemblies before putting glue to them to see if there will be problems. I am not getting a super fit at the very rear and will have to add a bit of putty to smooth things out. One other thing is that I am building a clean aircraft with no ordnance or drop tanks so I opened no holes in the wings. So far, so good. More next week as I should have most of the airframe complete.
19 Jan,'97
Getting close to done! The horizontal stabilizers were attached wit no fit problems as was the rudder. The underside intake cowling fit with no problems as well. The same could not be said for the under wing radiators, at least the right side. The radiators themselves fit well, but the housing on the right side must have been warped as it refused to fit into the slots provided. Even after hot water and a bit of bending it refused to fit. I eventually had to clamp the darn thing in place and putty the gaps. And thing were going so well!
Next were the wing navigation lights. These are tricky and took several putty sessions to get a smooth fit. They are also thicker than the wing at this point so you either sand them down to proper thickness and lose all the detail, or live with it. I put the fat part on the underside and am living with it. The launch strop hooks were attached under the wing, the cannon barrels were attached as well (not a very good fit with putty again required). It is difficult to get the four barrels all pointing in the right direction but it can be done. The engine cowl bulges for the Griffon engine were attached and fit very well indeed with no putty required. One does need to trim with care the sprue attachment point to achieve this fine fit. The cockpit rollover bar and petrol cap were attached and the area painted flat black. Final interior bits were attached and the windscreen glued in place. The door was tacked on until after painting. The windscreen and canopy were masked as were the camera ports. The reviews complained about the canopy being too narrow and they are correct. I tacked it on as best I could with Elmer's glue until after painting. The underside and a bunch of other bits were painted Sky using Gunze paint. I have also painted the undercarriage aluminum and am assembling that. I messed up on a piece under wing so will have to repaint that after the upper color goes on. That is the next step in construction.
26 Jan '97
Early this week I finished the kit. I needed to trim the undercarriage a bit to get it to fit, but it was not a real problem. The upper color was painted using Gunze Extra Dark Sea Grey. The aircraft was then sprayed with Future to get ready for the decals. After that the decals were put on. The decals fit very well (and there are lots of them). The yellow was off register so I used a Modeldecal sheet for the fuselage insignia. The decals with red on them disappeared when applied to the kit. I used Solvaset to ensure the decals would snuggle down and this did the trick. When the decals dried, the kit was washed to get rid of excess setting solution and then sprayed with an overall semi-gloss clear coat. The propeller assembly was then glued to the nose and the masking removed from all the clear parts. To get the canopy to sit in a reasonable position, I used a tiny bit of superglue and clamped the canopy down on the fuselage until the glue dried. The good news is that it sits in a realistic position. The bad news is that there are now stress fractures all along the bottom of the canopy!! I'll be looking for a replacement.
Overall I thoroughly enjoyed building this kit. It is probably the best fitting Airfix kit (next to F2H-2), that I have ever built. Airfix should make all their new kits this way. I know that I will be buying more of these and I recommend it to all who like the Spitfire..
Back to Reviews Page 2017