Frog/Novo 1/72 Fairey Gannet AS.1
| KIT # | F 228 |
| PRICE: | $ |
| DECALS: | Two Aircraft |
| REVIEW : | |
| NOTES: |
|
| HISTORY |
Probably one of the most un-lovely aircraft to take to
the skies, the Fairey Gannet had a long service life, mostly thanks to the
adaptability of the airframe and the fact that there was no other aircraft
around to perform its functions. Developed in the late 1940s as a strike
aircraft capable of carrying a variety of bombs, rockets and torpedoes, the only
competitor to the Gannet was the Blackburn Y.B.1. Both were of a similar size
and both were powered by a Double Mamba turboprop. This engine was actually 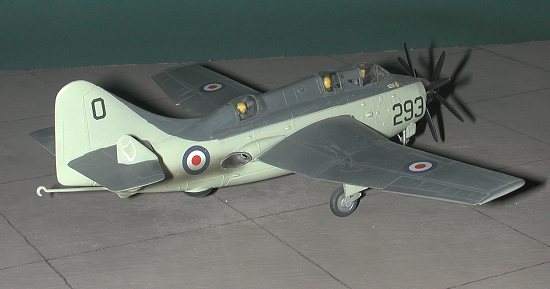 a'two in one', each able to operate independently of each other in case
of failure. It also allowed one of the engines to be shut down to improve range
and loiter time. In addition, the engine was designed to be able to run on a
variety of fuels including kerosene, turbine fuel or naval diesel fuel. By having both propellers in the nose of
the aircraft also made the aircraft a breeze to fly in case of a single engine
failure as there would be no need to trim the aircraft.
a'two in one', each able to operate independently of each other in case
of failure. It also allowed one of the engines to be shut down to improve range
and loiter time. In addition, the engine was designed to be able to run on a
variety of fuels including kerosene, turbine fuel or naval diesel fuel. By having both propellers in the nose of
the aircraft also made the aircraft a breeze to fly in case of a single engine
failure as there would be no need to trim the aircraft.
This rather unique aircraft entered service in 1955 and was continually modified over its life-time. The final Gannet, a much modified AEW.3 was phased out of service in 1978 when the RN phased out its last non VTOL carrier, the Ark Royal. The Gannet was also sold to a number of foreign countries including Germany and Indonesia. These countries had no aircraft carriers, but appreciated the superb ASW platform that was provided by the Gannet. In addition to the ASW and AEW versions mentioned , there were trainers and COD versions developed.
| THE KIT |
This has to be one of the earliest Frog kits ever done. It has all the markings of a late 50's early '60s kit. There are no wheel wells and no interior at all. The heads of the crew members are molded as part of the fuselage halves. Transparencies are very thick and surface detailing is all of the raised panel line variety. Intakes and exhaust areas are very shallow.
There are decals for a British and German version. The unit for the RN Gannet escapes me at the moment, but the decals were quite useable. Instructions are typical of Frog sheets of the time giving drawings for the construction steps and little else. Color information was only given on the box along with decal placement.
Parts were relatively flash-free with large locating holes. Detailing on the bits was adequate, but not at all up to current standards. Of course, they were up to the standards of the time when the kit was designed and initially molded!
| CONSTRUCTION |
 Building
this kit was not a long-term prospect. Fit of the parts was generally good and
not that much filler was needed. The first thing done was to put a bunch of
weight in the nose. This aircraft is a dedicated tail-sitter unless something is
done about it. I have come to the conclusion that I wasn't going to get the
props to rotate, mostly because the spinner was so tight and any attempt at
freeing things up was unsuccessful. Today, I would have installed brass tubing
for a bearing, but this was 15 or so years ago.
Building
this kit was not a long-term prospect. Fit of the parts was generally good and
not that much filler was needed. The first thing done was to put a bunch of
weight in the nose. This aircraft is a dedicated tail-sitter unless something is
done about it. I have come to the conclusion that I wasn't going to get the
props to rotate, mostly because the spinner was so tight and any attempt at
freeing things up was unsuccessful. Today, I would have installed brass tubing
for a bearing, but this was 15 or so years ago.
Once the weight was in the fuselage was glued together. Then the seam was filled and the exhaust was drilled out. IIRC, the tailplane and wings were a single piece and so were glued to the fuselage. Almost no filler was used. Same with the finlets on the tailplanes. That gave me a basically complete airframe. The next step was to do some painting.
| PAINT & DECALS |
All RN
aircraft of the 50s were in Extra Dark Sea Grey (EDSG) and Sky. The EDSG quickly
weathered to a lighter Dark Sea Grey so often that is used. Back in themid-1980's, I was very big into Gunze acrylics. They are still super paints, butI have grown to prefer enamels. Gunze was used for the colors on this
aircraft. First, the model was sprayed Sky and when dry, masked off for the EDSG.
As usual, I needed to do some back and fo rth painting and masking to catch all
the glitches. The prop and spinner was painted black. For the interior, such as
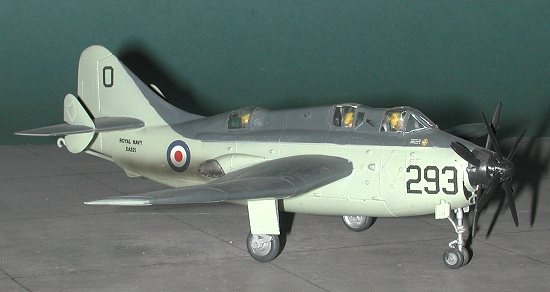
it was, that was painted black and the crew helmets painted yellow.
rth painting and masking to catch all
the glitches. The prop and spinner was painted black. For the interior, such as
it was, that was painted black and the crew helmets painted yellow.
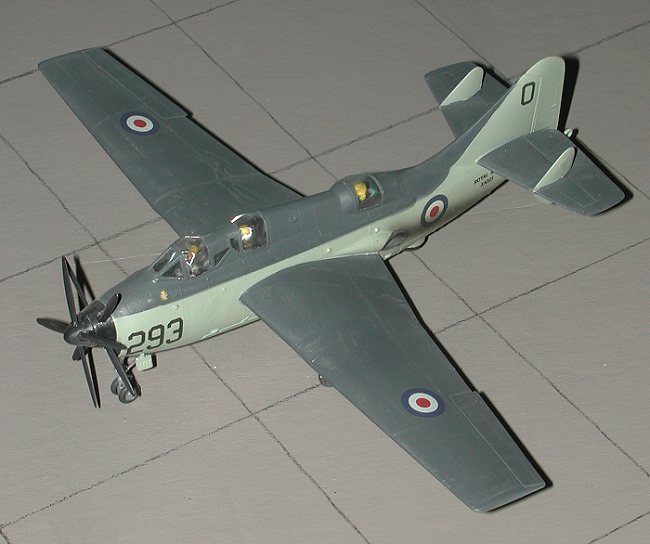
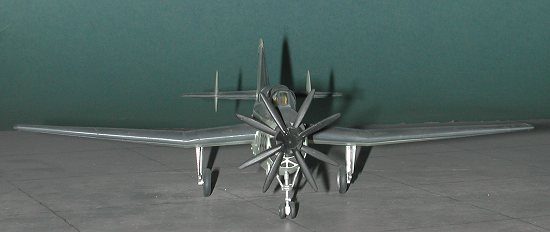
Then it was back to doing some construction. This meant gluing on the transparencies, which required some trimming to fit properly. Then they were masked off and painted EDSG to match the upper colors. The landing gear doors were painted the underside colors and the gear struts were done in aluminum. The landing gear look to be properly spindly as on the real aircraft. These items were just glued into the holes on the underside of the fuselage. As you can see from the image, there were no gear wells! What you probably can't see is that the main gear doors are molded along with the struts.
Then the bottom of threesome was painted flat black using a nice, wide brush.
The decals themselves fit very well with no real problem. Actually the only hassle was the finlet decals. They practically disappeared once they were applied and though you can see them in the images, the light has to be just right.
The last thing done was to do a bit of detail painting for the intake and exhaust as well as to paint the exhaust stain on the aft of the aircraft. I used no clear gloss on this as the paints are semi-glossy already. You can also see that I neglected to do the wrap-around of the upper surface colors. I'll claim ignorance as I was unaware of this phenomena at the time I built the kit.
| CONCLUSIONS |
 It
is hard to know if this kit will interest today's modeler. Certainly the
collector will have one, but the crudity of the kit compared to what is out there
today will not make it a big seller. However, it does have the benefit of being
the only injected Gannet in 1/72. In 1/48 there is the superb Dynavector
multimedia kit.
It
is hard to know if this kit will interest today's modeler. Certainly the
collector will have one, but the crudity of the kit compared to what is out there
today will not make it a big seller. However, it does have the benefit of being
the only injected Gannet in 1/72. In 1/48 there is the superb Dynavector
multimedia kit.
I can really recommend this kit to any who are interested in the type. It would be a good one for the beginner as there are really few parts and it will make a good introduction to using filler as it needs only a bit.
I was contacted by Sten Ekedahl who pointed out a number
of aftermarket goodies for this kit. I'll let him tell you about them. "...it is worth pointing out that Aeroclub makes a very good set of details - landing gear, wheels, gear doors, new engine front, spinner, propellers and
some interior parts - in white metal for this kit which almost brings it up to
"today's standards". If you want to go even further, Airwaves makes a
couple of photo-etched sets, one for the interior, one for the wheel wells and
recently one for the wing folds, and Falcon does some wonderful vac formed
canopies (as does Aeroclub as well) and Model Art has released very good
decals for FAA Gannets. So all in all, with these additions it is possible today
to make a very good and detailed model out of this basic kit. BTW Aeroclub also
makes a very good conversion set for the AEW version with a completely new vacformed fuselage."
Late note: Of course, all this is now made moot by the new Trumpeter kit (2006), and by the Revell offering (2010)
November 2000
Review kit courtesy of me and my wallet!
Copyright ModelingMadness.com. All rights reserved. No reproduction in part or in whole without express permission from the editor.
If you would like your product reviewed fairly and fairly quickly, please contact the editor or see other details in the Note to Contributors.
Back to Reviews Page 2022