Heller 1/72 F-84G Thunderjet
| KIT # | 278 |
| PRICE: | $4.95 |
| DECALS: | See review |
| REVIEW : | |
| NOTES: |
|
| HISTORY |
The USAF's second successful full turbojet fighter was the F-84.Designed by Republic to offer an improvement over the F-80 shooting Star, it was, like many early jets, plagued by inadequate power from its turbojet engine. It was an aircraft that was designed during WWII and as such, was not able to take advantage of aerodynamic information that was grabbed from the Germans after the war. As a result, it was very much a 'normal' aircraft in appearance with straight aerodynamic surfaces. The only clue that it was different was the nosegear and lack of propeller.
The major production of the Thunderjet was in the F-84E and F-84G. The major differences between them were that the F-84G had an uprated engine requiring extra intake door in the fuselage, it had in flight refueling capabilities, and it was capable of carrying nuclear weapons. The F-84E and G did not do well as fighters as was shown during its clashes with the Mig-15 during the Korean war. Where it excelled was as a fighter bomber, similar to what the previous generation P-47was so well known for. Until replaced by fighter bomber F-86s late in the war,the Thunderjet carried most of the air-ground jet attack duties.
So successful was the Thunderjet that it was operated by a large number of NATO and non-NATO countries. The Nationalist Chinese even had a few that were successful in shooting down ChiCom aircraft.
| THE KIT |
Heller was one of the premier model makers in the mid-1980s.Their kits still hold up quite well despite being of an earlier generation. They are very nicely detailed, albeit with raised panel lines. They boast full cockpits as well as multi-piece canopies. Landing gear wells have plumbing in them and it has a positionable speedbrake.
The dark grey plastic is relatively free from flash though this example had a few small bits. Mold separation marks were on some of the insides of gear doors and other locales, but not that difficult to remove from most of them. The clear bits were nice and crisp though a touch thick.
Decals for this kit were forjust one aircraft, and that of the Norwegian Air Force. They were alsovery matte and had yellowed, a problem with many Heller decals. It is best touse aftermarket decals for these older Heller kits. Instructions are adequategiving the usual drawings and exploded diagrams. All paint callouts are inHeller paints, though there is a translation included giving generic names.
| CONSTRUCTION |
Rather than give you a blow by blow, I'll just highlight a few of the areas that need attention. Actually, that limits it to the nose section. I had a less than fun time getting nose weight into this thing. I also had to fiddle with the intake/nosewell section. A bit of trimming did allow it to fit much better.
I also don't know what to tell you about the speedbrake well. It has no detail, but is a devil to fill as there is a nice big seam running through it. Many Thunderjets could be seen with the brake hanging down so it is up to you as to how you will deal with this. I just left my speedbrake barely open! Wing to fuselage join was pretty good, though, like all my kits, filler was needed.
The landing gear is very scale, which means that the nose gear is particularly petite. While it built well, it has broken a number of times over the years. So have the main gear. While there is a flat mating surface, these parts are basically butt joined.
| PAINT & DECALS |
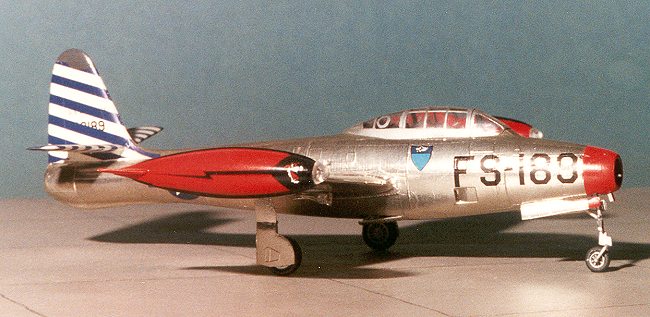
This kit is the one and only time that I have covered an aircraft with Bare Metal Foil. I really wanted to try it. The results are not bad for a first attempt, but are EXTREMELY time consuming.
First thing I did was to paint all those areas not to be covered by BMF. This meant the red nose and gear doors, the red tip tanks and the grey tail tip. The white on the tail is on the decals. The gear doors and bays were painted chromate green. I know now that they should be chromate yellow, but this kit was built in1983; back when I was blithely ignorant of such nuances!!
I readin Fine Scale Modeler, that one was supposed to cut sections of BMF a bit larger than the panel that was to be fitted. Then burnish it down and cut off the excess with a sharp blade. The next piece was to be turned 90 degrees to the first to get panel differentiation. I did this as much as I could and the results speak for themselves.
I had problems in areas thatare sharply curved. If you'll look at the opening image, you can see a few wrinkles around the wing roots, a particularly troubling section. I used a Q-tip/cotton bud to smooth down the foil and in some places, the smooth handle of my Xacto knife. It was a lot of work, but the results are worth it.
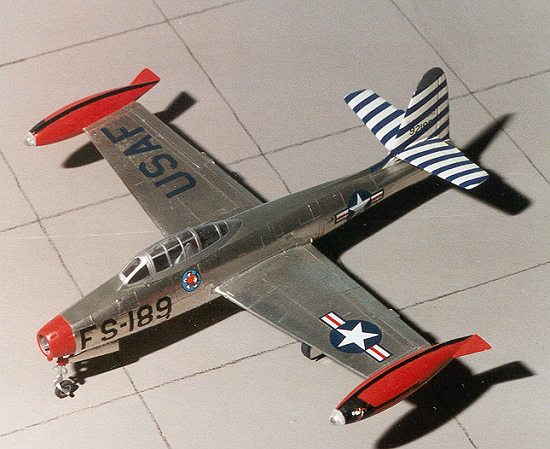
Putting on decals was no problem at all. I used a Microscale sheet for the 23rdFBW that had a very colorful tail in white and blue. The decals were applied using the Microscale decal system. No clear coat was added as it would have dulled the metal foil. The only thing I had to add was the canopy which I painted aluminum after several failed attempts to use the foil on it. This was one of the first times I had used BMF so I wasn't very proficient.
| CONCLUSIONS |
The Heller F-84G was and still is a very nice kit. While not as modern as the Tamiya and Academy kits now available, it is a very good value for the money, especially as it is less than half the price of the more modern kits! Looking at the photos, you can see that the BMF has held up quite well over the last 15 or so years. It is easy to see that the glue holds well and that it a finish that will probably last as long as the kit is around!
Review copy courtesy of me and my wallet!
June 2000
Copyright ModelingMadness.com. All rights reserved. No reproduction in part or in whole without express permission.
If you would like your product reviewed fairly and fairly quickly, please contact the editor or see other details in the Note to Contributors.
Back to Reviews Page 2021