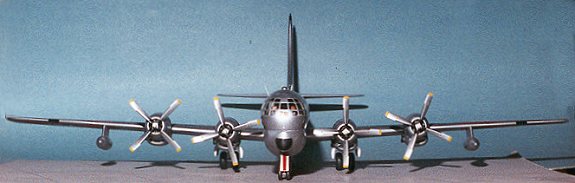
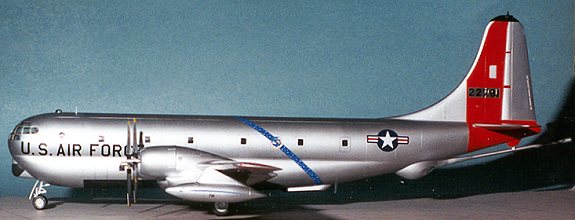
Academy 1/72 KC-97G
| KIT # | 1605 |
| PRICE: | $55.00 |
| DECALS: | See review |
| REVIEW : | |
| NOTES: |
| HISTORY |
To say that Boeing has been in the business of building large, multi-engine aircraft, would be stating the obvious. Starting with the XB-15 of the mid 1930's and continuing today with the latest variant of the 747, Boeing has managed to do well with both the civilian as well as the military market. Probably this is because, in their early years, so many of their military aircraft were used as the basis for successful civil airliners and vice versa.
With the C-97, it was the Model 377 civil versionthat came second with the C-97 being based on the B-29. The later 377 was based on the B-50, whichwas based on the B-29. Anyway, the USAF decided that it needed a long rangetransport aircraft and had Boeing build a number of cargo/passenger C-97s. Italso saw the need for a dedicated tanker aircraft to replace the KB-29s thatwere in service and so had Boeing design a tanker/cargo version, which becamethe KC-97A.
Both the C-97A and KC-97A were relatively shortproduction run aircraft. Improvements in systems and additional designrequirements to allow the KC-97 to carry more fuel resulted in several variantsof the KC-97. Those most built, were the KC-97G version with 592 examples builtin the early 1950s. These were placed into service with SAC for use inrefueling their long range B-50s and escort fighter wings, which were mostlyF-84Fs.
However, a problem arose when the fast jet bomberssuch as the B-47 and B-52s came on line. These aircraft were unable to fly slowenough to properly refuel from the KC-97G. Two things helped improve thesituation. First, they started refueling 'downhill', so that the KC-97G couldfly faster. Secondly, most were modified to KC-97L variants with additional jetengines under the wings to speed up the lumbering KC-97s. Even all these 'fixes'were not enough and required an all-jet tanker. This eventually led to theKC-135, an aircraft that is still in service after 45 years and looks like it isgood for another 30 or so!
| THE KIT |
Academy is nothing if not frugal with its sprues. Many of thesprues are from the B-50 kit, and why not as the KC-97 is based on the B-50.There are also a number of like sprues that are the same as with the 377Stratocruiser and C-97A kit. What is unique to this kit are the flying boombits, the wing fuel tanks and (different from the 377) the fuselage. This alsoincludes the fuselage windows as there are fewer of them on the C-97 versions.An interesting adaptation is that the refueling blister is part of thesurrounding lower fuselage insert that replaces the cargo door of the C-97. Thispart is molded entirely in clear plastic.
All of the parts arecrisply molded, including the B-50 bits. There is no flash and I couldn't seeany sink marks and other mold release pin marks. Those may become evident as thekit is built, but a cursory look at some of the areas where they are most likely(landing gear and alignment pins), showed no evidence of these flaws.
Theinstruction sheet is written in the usual multiple languages with the standardpictorial construction steps and international signs. There is a color chartthat gives just generic colors and not FS colors. There is also a parts diagramthat is numbered to help one find all the parts.
The decal sheet is quite large andvery colorful. It gives markings for two aircraft. The main difference betweenthe two being the markings on the wing tanks and one has a white cabin roof.Both are natural metal with red 'arctic' markings on the wings and tail.Actually, I think that KC-97s were painted an overall aluminum instead of theirbeing natural metal. As with the 377 kit, a lot of vents and intakes are decalsrather than these items being molded into the plastic. Guess it works ok, butsince I haven't actually built any of these kits, I'm not sure how it well itworks. Separate from the instructions is the decal and painting guide for theaircraft. The only thing I can see is that the blue for the SAC banner may be abit too light, but it looks just fine to me. Academy decals are supposed to bepretty good, but again, I have not built a recent Academy kit to be able totell.
Bottom line is that it looks like a great kit. A big onetoo! With the release of this and the C-97, that only leaves the KC-97L, most ofwhich were used by the ANG. I guess that one will come out here in a few monthsafter everyone has had a chance to pick over this kit!
I'd liketo thank a friend in Korea for sending me this kit so that I didn't have to paya fortune for it. Believe it or not, this kit sells for about $20.00 in Korea!
| CONSTRUCTION |
 It should come as no surprise that the first part of the kit tobe assembled is the cockpit. This went together quite well. It is prettycompletely detailed with pilot, co-pilot, engineer, and navigator stations. Theinstructions suggest using Dark Gull Grey for the interior and while I thinkthat black was probably the color of choice for aircraft of this era, I wentahead and painted it FS 36231 anyway. Once that was done, the various parts werepainted other colors. For instance, the control columns, pilot/copilot seatframes and instrument panel was painted flat black. The pilot/copilot seatcushions were painted orange and the harnesses sail color with silver buckles.The instrument panel decals were put on and though out of register (thewhite part needs trimmed), they fit well and reacted well to Champ settingsolution.
Turning to the fuselage halves, the various windowswere cemented in place. Then the nose gear was glued into the nose wheel well.This is supposed to be painted silver prior to installation, but since the wholeplane is basically silver, I glued this assembly into the right fuselage halfwithout painting it. It'll get painted when the rest of the kit is painted!
Thenext piece installed is the cockpit itself. The instructions show a lot ofweight is needed. I began by putting in some big fishing weights. Then I tapedtogether the fuselage, wings, tailplanes and rudder. These are the maincomponents. I needed more weight. A LOT more weight. After stuffing what seemedlike 10 pounds of weight in the nose, that whole mess was smothered in superglueand left to dry. It should be enough (I hope).
While awaiting theweights to dry, I assembled the fin, tailplanes, wings, wing tanks, wheels andflaps. When those were dry, they were cleaned up. Everything needs some filler.It is a requirement of my kits that they do so! These components needed verylittle, mostly where they were cut from the sprues with my handy Xuron cutters.
Myattention turned to the flaps. They are not designed to be displayed in thelowered position. They also don't fit the back of the wing worth a hoot. Infact, the fit is really bad. Why these were not molded as part of the wingitself is beyond me as it required a lot of filler and fussing to get smoothedout. These flaps are part of the trailing edge of the wing. When lowered a smallsection of the rear of the wing goes with the flap. This is the only place theyfit. The leading edge of the underside of the flap in many places doesn't touchthe trailing edge of the underside of the wing. Filling this gap is useless asthe first flex will break the filler. You can either leave it alone and acceptthe gap or fill it with sprue. I chose to leave it alone.
Whilethe filler was drying, the tailplanes were glued in place. The fit is perfect.No gaps, no filler, just a light swipe of sandpaper to remove any glue marks.They are keyed so it is impossible to get them in the wrong side. Next, theengine nacelles. The main body of them are a three piece assembly with a singleupper piece and the lower section in two pieces. These are designed for left andright sides. Even though they won't properly fit in the wrong place, I etched asmall 'L' in the left wing pieces on the inside where they won't show when gluedon. I did the same with the wing tanks which are also handed.
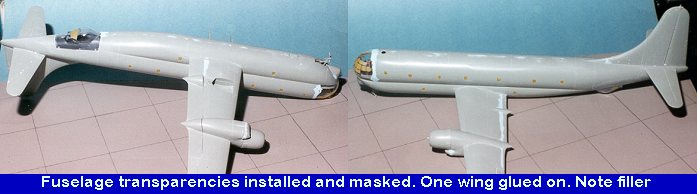
Meanwhile, back atthe fuselage. All the filling was done, though there was still no boom operatorsarea or cockpit glass installed just in case I needed to add more weight!! Atthis time, I masked off the small windows. Once the wings are on, it will bedifficult to get to them. I them glued the outer engine nacelle to the twowings. The fit was quite good and no filler was needed. The instructions haveyou attach the wings and then later attach the nacelles. I thought I may have touse filler on the nacelles so cut my losses by doing the outboard ones first.This way, I could still get to the wing/fuselage join if filler was neededthere.
I then bravely glued the left wing onto thefuselage. The fit is quite good and no filler was needed. Good thing too, as the'double bubble' design of the fuselage would have made it very difficult to getinto the area with sandpaper! I then thought twice about adding the right winguntil I saw how well the inner nacelle fit on the left one.
Meanwhile, back at the fuselage, the clear boomoperator's position had the windows masked and it was glued onto the fuselage.The fit was very good, though I did put filler around the edges to ensure thatany gaps not visible because of the clear plastic, were properly filled. Thatfiller was eventually sanded down. Then I went to the front of the kit andinstalled the canopy section. This didn't fit as well as the previous piece, butstill didn't fit too poorly. It ended up being a touch too wide at the sides andnot tall enough in the center. This was despite it being clamped to try toeliminate some of the overhang. A couple of rounds of filler took care of itthough.
Then the boom was carefully test fit and the boom receptacleon the lower fuselage was glued in place. Next the other wing was glued inplace. This one didn't fit as well as the previous one giving me a few gaps thatneeded filling. Once the wings were firmly in place, the additional enginenacelles were glued on. If you learn nothing else from this review you shouldlearn that (a) the wings should be glued on without the nacelles to ease anyfiller repairs that need done and (b) the engine nacelles need to be completelybuilt sans prop before gluing on the wings. It just makes doing the filler workthat much easier. I also glued on the radome at this time. I had forgotten aboutit and also forgot to drill out the mounting holes for it when I glued thefuselage halves together. DOH! Fortunately, it isn't a big deal and glues onquite well without the mounting holes.
The next step was to glueon the main landing gear. One needs to take care to be sure that all the bitsand pieces are glued on straight. There is a front piece that gave me sometrouble as there is no real positive glue spot for it. Take your time and youshould have no problems. Once the gear was solid and dry, it was off to thepaint shop.
| PAINT & DECALS |
The first thing you realize when starting to paint a kit of thissize is that it is going to take a LOT of paint. In fact, I fully plan on itgoing through most of a full bottle. The first step for me was to give theaircraft a full, but light coat of gloss white. This is for two reasons. Thefirst is that there are lots of areas of gloss red to go on and it needs a whiteundercoat. Secondly, I'll be using a Metallizer for the rest of the aircraft andit requires a smooth surface as well. The gloss paint will also fill in a numberof small scratches and imperfections that just jump out at you when usingmetallics.
I used Testors Model Master paints for all the exterior colorson this kit. Before applying any of the outside colors, the transparencies weresprayed with the interior color. Then the gloss white. It took a number ofsessions to get this color on. The first parts I sprayed white were the tail andwing tips. That way, I could get the Insignia Red painted onto those areas. Oncethe red parts were painted and dry, they were masked off to prevent anyoverspray from contaminating them. Then the kit was resprayed with gloss whiteafter the red areas were masked off. I put a rather heavy coat on the area abovethe cockpit and when it was dry, it was masked off.
 Then the engines were plugged with tissue and the entireaircraft was painted with Testors Aluminum Metallizer. All of this painting andmasking took the better part of 3 weeks to do. When doing large aircraft, oneneeds to allot much time for not only construction, but for painting as well!
While I was painting the aircraft, I was informed that I'd begetting the latest Airways Graphics decal sheet for the C/KC-97. Because ofthat, I stopped paint work on the airframe and concentrated on the smaller bitslike wheels, gear doors and the like. One rather disappointing discovery wasthat there are two very large ejector pin holes on the outer side of the nosewheels. In addition, the wheels look to be too skinny for the KC-97. I looked ata True Details aftermarket set, but those didn't appear to be much better so Ifilled in the holes and carried on.
At this time, the main geardoors were added to the landing gear. I discovered that I had forgotten to glueon the smaller doors behind the main gear when I installed the main gear.Getting them to fit after the fact was just impossible, even after removing themounting lugs. My only choice was to cut the part of the door that fits downbehind the strut and glue the upper section. It isn't very neat, but it didwork. The main gear doors had to be glued with superglue as the retraction strutwants to push the doors away from the gear well!
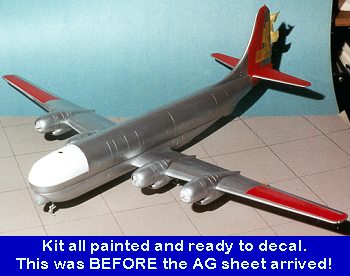
I then repaintedthe gear area and the rest of the airframe where I had missed some spots withthe Metallizer on the first pass. When that was completely dry, I removed themasking from the Arctic Red marks. Then I sprayed the airframe with Future clearacrylic. This dulled the paint to make it look like aluminum paint and not baremetal. It also glossed up the flat Arctic Red parts so that decals could beapplied.
It was at this time that I received the long awaited
 I could see that I would have to do a bitof repainting. So it was 'mask-o-rama' for a while and then back to the paintshop to take care of the differences. Yes, it was a bit of extra work, but thedecals are really worth it. Most of the additions were painting various areasmatte black as well as some more aluminum paint on areas I had painted toothinly.
Once the kit was finally painted (and I'm sure I'll findglitches) it was time for the decals. I made a conscious decision to use mostlythe kit decals and just use the specific decals from the Airway Graphics sheet.The reason is that I am planning to build another one of these kits and I wantedto do that one right from the beginning, making all the suggested changes thatwere not done with this kit.
The kit decals actually are quitenice, though not up to the standards of the AG sheet. For instance, the SAC bandis not only too light a blue and too wide, but there is no way in the world itwill ever fit. It needs to have a double curve in it to conform to the fuselage!Other problems with the kit decals are the wing insignia are too large (I usedthem anyway), the leading edge antenna (the black decals) are too large in all dimensions,and I'm not sure if the underfuselage red stripe is supposed to be used at all!
Decalingan aircraft of this size, even with the minimal ones given, took the better partof a week. The wing walk decals themselves were a long and laborious process toput on. One small glitch with the AG decals. They give you some silverrectangles to use as background for the tail number on red tailed aircraft. Thetwo examples given were too small for the serial on the KC-97G. I had to makethose from Bare Metal Foil. The result is quite pleasing and only took a fewminutes to make.
| CONSTRUCTION |
Once the decals were on the plane was resprayed with a cleargloss to seal them in. Then I went to work on the props. They had already beenpainted silver, so I started applying the yellow tip decals. These are actuallysmaller than the prop tips, so I had to paint them on. Then I tried handpainting the black areas. Man, what a mess. In fact, I got so frustrated that Ilet the kit sit for a few days while I moped about it. The only thing to do wasto start over again. I gave each prop a liberal coating of Strip-a-Kit to removethe paint. It actually took two to remove it all. Then each prop was sprayedgloss light grey. Then aluminum Metallizer. The undercoat gives the Metallizersomething to 'bite' into so that you can mask it without removing the paint. Thetips were masked and painted yellow. Then the prop was masked so that I couldpaint the black areas.
 As the kit now had the decals sealed, I took the masking off thetransparencies and the underfuselage lights. These came off very easily and leftvery little residue. What was there was quickly removed with another piece oftape. Then the tip lights were installed as were the underwing tanks. I usedwhite glue for the tanks to keep any superglue from reacting with the decals.The astrodome was glued in place with non-fogging superglue.
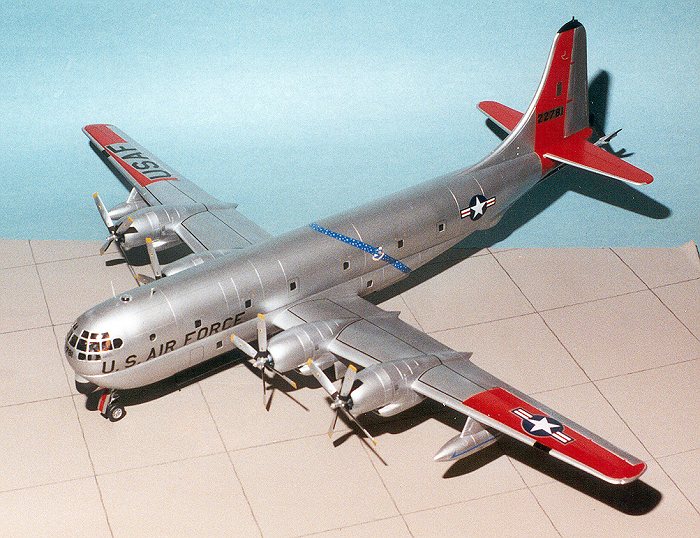
Nextthe engine intakes were blackened using a Rapidograph pen. Then the fuselage antennas were glued on. There are two on the top and four on the bottom. Naturally I knocked off a few of them and had to reglue them. The lower ADF sense antennas were made from stretched sprue. Finally, the props were glued on using white glue and the kit was photographed before I broke off anything else!
| CONCLUSIONS |
It certainly ranks right up there as one of the biggest kits Ihave built. It really is impressive and is sure to draw comments, though not many people at my club said anything about it when I brought it in. I can only assume that they are illiterate hillbillies that don't know greatness and effort when they see it! :o)
Despite the size of the beast and the time it took to build, I definitely plan on doing another one here in the future. Because it is such a huge beast , I cannot recommend it to beginners and those with small worktables!!
Late Note. Thanks to all who reminded me that the elevators should have been painted aluminum!
August 2000
Copyright ModelingMadness.com. All rights reserved.
Review copy courtesy of me and my wallet!
If you would like your product reviewed fairly and fairly quickly, please contact the editor or see other details in the Note to Contributors.
Back to Reviews Page 2020