| KIT #: | 72037 |
| PRICE: | $15.98 MSRP |
| DECALS: | Four options |
| REVIEWER: | Scott Van Aken |
| NOTES: | Short run with vac canopy, metal gear, resin wheels |
| HISTORY |
Arguably the best Russian fighter of the Great Patriotic War, the Yak-9U (U for improved) was initially based on the VK-105PF-2 engine. Fluid capacities were increased and the chin radiator disappeared to be replaced by ones in the wing leading edge, much like the Yak-3. It is difficult to tall the difference between the early Yak-9U and the later Yak-9M as the changes were evolutionary and added on the production line.
As much as this new variant was an improvement over earlier types, it still was not that big a performance leap. This changed with the VK-107A engine that was installed in later Yak-9U aircraft. This engine provided a considerable power improvement, but was not very reliable. In fact, the engine was prone to catching fire after as few as 25-30 hours of operation and of the 10 Yak-9Ds fitted with this engine for operational trials, eight of them had catastrophic engine failures. Many went to the gulags over this.
 Despite the problems, production fighters rolled off the assembly lines with these engines in a hope that fixes could be quickly found. Nevertheless, these planes were sent to the front where pilots and mechanics found out the problems with the engine. This did not build confidence in the type and special teams with captured German planes were sent to various units to show the superiority of the aircraft. By the time late 1944 arrived, the aircraft were doing quite well and were praised by both pilots and mechanics alike. The aircraft was as good or better than the P-51D in all fight aspects, with the exception of high altitude performance, where the Mustang was superior.
Eventually the engine problems were fixed and the aircraft went on to serve well in the VVS and in the air forces of other nations.
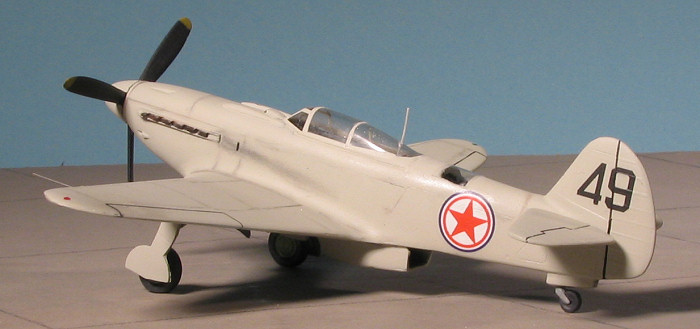
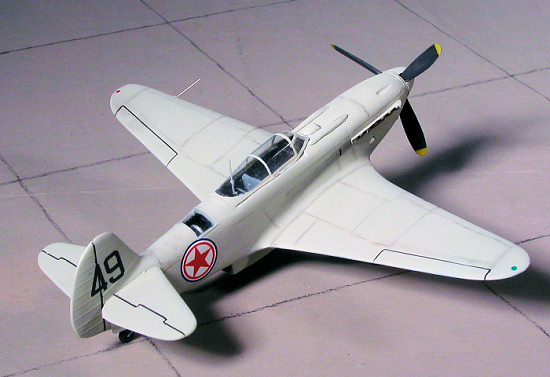
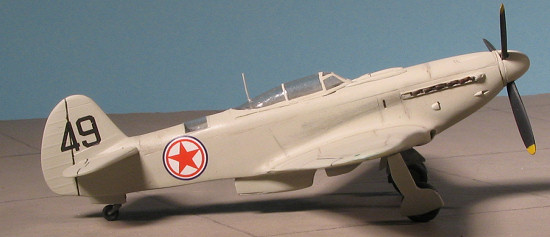
To be a bit simplistic on things, the Yak-9P was basically the same as the Yak-9U, but was of all-metal construction instead of mostly wood. Early Yak-9Ps did have some parts of the aircraft in wood, but eventually metal took over, resulting in a lighter and more sturdy airframe. This reduced weight also meant greater performance. Much of the reason for going to metal is that the wooden planes were not designed to last very long. Now that the war was over, a more long-lasting and better built airplane with higher quality control was needed. That, in the Yak-9 family, was the Yak-9P. It was also the end of the Yak-9 line as turbojets were the coming thing. A number of Yak-9P aircraft were also exported and some found their way to North Korea where they were briefly used in the opening phases of the Korean War.
| THE KIT |
High Planes is an Australian company that produces a variety of short run kits in all scales. These are very much what one expected of short run injected kits a few years back and I'm sure this is one of their earlier molds. These kits are truly not for the 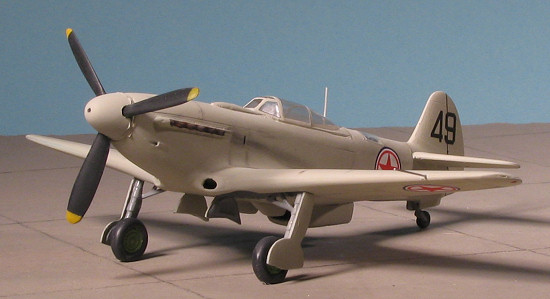 beginner as most who have no experience with kits of this type will probably turn away in horror at what he sees when opening the box. Those of us who are more seasoned pretty well know what to expect.
High Planes must have a deal with light blue plastic as every one of their kits I've seen is molded in this material. The sprue attachments are large, the parts generally have flash of a certain amount and the inside surfaces of most parts is rather rough. Some of the larger kits have huge mold runs, but this one does not. Once you get beyond the flash, you'll find that the kit has finely done engraved panel lines, some of which may well go away under filler and filing.
The cockpit is quite basic with little more than an instrument panel and seat. No control stick and no sidewall detail. A radio compartment is supplied for behind the seat and so that you'll see something through the clear bits. Gear wells are admirably deep and devoid of detail (which may be prototypical, I don't know). Main gear and retraction struts are in cast metal and a fine job of casting it is with no mold misalignment that I could see. The wheels are resin and also quite well molded. There is a single vacuformed canopy that includes the clear bit that goes on the upper fuselage. This is for the installation of a DF loop (which you have to make).
 Instructions are a single folded sheet of paper. One side has an exploded view of the kit and construction notes. These notes include how to make some of the smaller parts. I find it good that the instructions tell you to trim the canopy first and then work on getting it to fit the fuselage. It is always best to get that done right first. There is no information on painting the various interior bits, but they are probably either black or light grey. The other side of the instructions has four superbly drawn profiles for the markings that are included. They include Yak-9Ps from Poland, Hungary and North Korea. These have the clear DF loop panel. The other is a Yak-9U from the Soviet Air Force. The only colors these things seem to have been painted in are either an overall light grey or Dark Green over Light Blue. The decal sheet is very nicely printed, quite matte, and with somewhat large clear carriers around each marking.
| CONSTRUCTION |
Once again, my desire for something a bit different overcomes my aversion to a lot of work. First thing to do with this kit is to clean up the parts as well as one can. Lots of sanding and trimming to be done as the amount of excess plastic is great, though 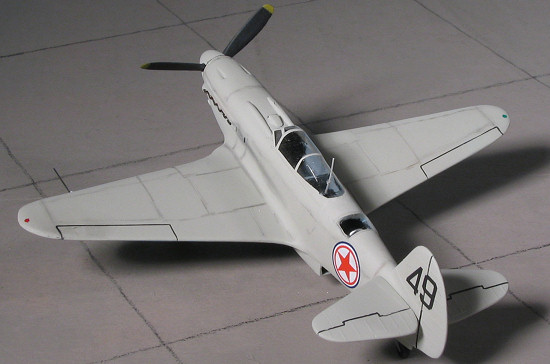 relatively easy to remove. I started with any cementing by gluing the fuselage halves together. This is because what little interior is provided, is atop the wing or can be inserted from underneath. This was done with the radio bit and the instrument panel. Both had to be trimmed as they were too wide to fit properly. I then went through one of several applications of filler on this one.
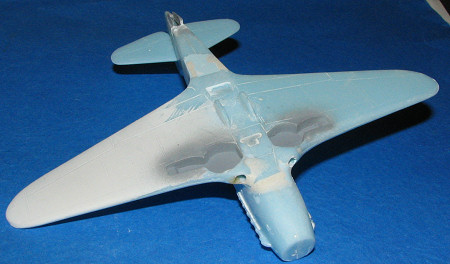
Meanwhile, I glued the wings together. Fit is not what one would expect from Hasegawa and again, filler was needed. It also seemed to me that the wing was too thick and this was shown to be somewhat true when it was glued to the fuselage. But let me back up a bit. Once the wing was together and cleaned up, I glued on the seat and seat back. This seat back was too wide for the interior and needed some trimming to fit. All the interior bits were painted dark grey with the 'cushion' part of the seat back done in a dark brown. I then glued the wing into place. I had to fuss with it a lot to get it to where I thought it was properly aligned. The forward intakes were nothing like the ovals that they should have been, thanks to the dodgy molding. What I did was to mix up some A-poxie Sculpt epoxy filler and proceed to put it around the wing/fuselage join and to fill in the leading edge intakes. Then there followed a week of filler, sanding, more filler, sanding and so on to get the wing to smoothly match the fuselage. I then drilled out the epoxy where the intakes were to go. Not perfect, but a lot better.
 During this I attach
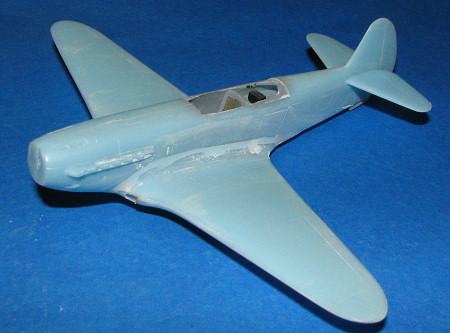 ed the tail planes. After clean-up they fit quite well. The lower radiator intake needed some sort of block to prevent see through. This was done with a piece of card and then painted. There was also a huge hole in the back of the lower wing section. I'm really not sure just why that was there as the instructions don't say much about it. I fit a section of card and, since the wing was too thick, more filler, sanding, filler, sanding and so on until it was relatively smooth. You can see all the filler work needed in the accompanying photos. Of course, this basically obliterated the engraved detail around there.
Next step was to install the canopy. I made sure I had enough stuff painted in the cockpit so it wouldn't look too naked. Actually, lots of black works well for this. Then I cut out the canopy. I was surprised with it actually sorta fit. I trimmed off too much at the back and had to fill that in with a piece of styrene strip. I also found that there were gaps under the front quarter windows. I affixed the canopy with regular Elmer's glue to prevent fogging. It holds fairly well, but cannot take any really rough handling. It was masked prior to being attached. I then glued on the gun fairings and the carb intake. The intake is way too far aft. I stupidly used the exploded view for a reference instead of the nicely done camo/markings drawings. Be warned! I also drilled out the gun ports and small cheek intakes.
 Now since I really wanted to do a postwar Yak-9P, I really had no choice other than to cut open a section of fuselage for the DF loop antenna and its cover. I found an antenna in the spares box and glued it to a styrene post from an old sprue. The post was painted black along with the fuselage cavity. I then cut out the cover and tried to get it to fit using white glue. For some reason, this didn't work at all so I used super glue. Not the smartest move I've made as it fogged terribly. I sanded everything down flush but was unable to get this clear bit to look good at all. You can see how horrible it is in the image. No choice but to remove it and go to plan B.
| COLORS & MARKINGS |
Before heading for plan B, I decided to paint it. The instructions suggested 36440 Light Gull Grey so I grabbed some Testors Model Master Enamel and began spraying. I like monochrome finishes as they are so easy to paint. I also painted the outer gear doors at this time. When dry, the wheel wells and inner doors were painted Neutral Grey, also using Model Master enamels.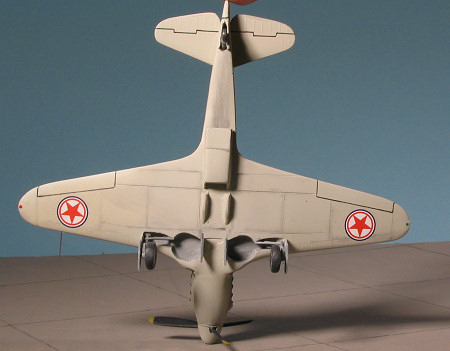
At this time, I cleaned up the landing gear bits. These are cast metal and are just superbly done. A world apart from the styrene bits. I had to make the axles less chunky to fit into the resin wheels and ended up shortening them a bit as well. The resin wheels are also a superb casting with almost no mold seam. I painted the wheels using one of those square bottles of Testors enamel that looked about the right shade of green. Then the tires were painted using Floquil Weathered Black as was the tail wheel.
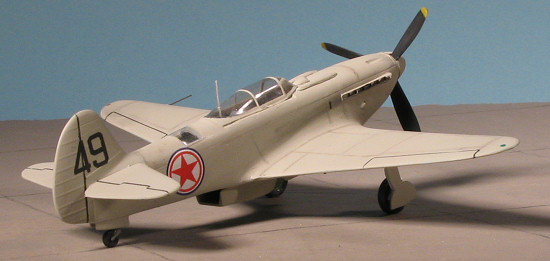
I had to drill out gear placement holes in the wheel wells and then cemented the gear and the retraction struts in place. These latter parts didn't seem to want to fit perfectly, but it is good enough as this model will never see a show. I drilled the tail wheel mount as well and glued that in place. With landing gear on, I returned to the paint area and sprayed the spots where decals would be applied. I thought seriously about the Polish option, but wanted to do a North Korean Yak-9P; an aircraft l I've seriously been wanting to do for 25 years!
The decals are quite simple and consist of roundels under the wings and on the fuselage side. The aircraft number goes on the tail. The decals are quite thin and I did have a tad bit of tearing, so be advised. Other than that, they are in register and quite opaque. I used Solvaset on them with no ill effects. When the decals dried, clear matte was sprayed over them.
| FINAL CONSTRUCTION |
Well naturally, I attached the wheels and the gear doors. The wheels stuck well enough to the axles to allow me to position the flap spots on them then touch the axle with a bit of super glue to keep them there. The main gear doors just stuck on the gear legs where ever I could find a spot.
 The prop was cleaned up and painted. The spinner took a lot of fussing to get it to fit the prop. I also had to sand the back of the prop to get things flat enough to fit the backing plate. This was then butt glued to the nose of the kit. I drilled a hole through the back of the canopy and inserted a piece of stretched sprue for the radio mast. A small piece of stainless steel tubing was cut for the pitot tube. I still had no real good idea on what to do about that cover for the loop antenna, so I fell back on what was cheap and had worked in the past. I cut a small section of clear, gloss tape and put it over the hole, trimming it to where things were even around the edges. It worked beautifully and while it won't last for decades, Other kits on which I've done this have had the tape last many years before coming up. One could tack it down with white glue, I suppose, but this works.
The plane looked really boring in one shade so I did some pastel panel line work on it just to break up all that grey. Some touch up painting was doe and exhaust was added. That was it.
| CONCLUSIONS |
 This was not a simple build. A lot of effort went into getting the bits to fit, and were I to do this aircraft again, I'd get a Heller Yak-3 to act as a donor kit for wings and interior and other bits. It would cut a considerable amount off the build time.
This particular High Planes kit is very much like old time short run in the amount of flash and dodgy fit. However, one does not go into these kits because they want an easy build, but because they want the subject. And so it is with this one.
You will put in way more time than you'd think from the parts in the kit, and the end result for most of us will be a nice model; not great, but nice. Because of all the cutting, filling and other work one needs, it really is only for experienced modelers.
April 2006
#1410 in a series
Copyright ModelingMadness.com. All rights reserved.
If you would like your product reviewed fairly and fairly quickly, please contact the editor or see other details in the Note to Contributors.