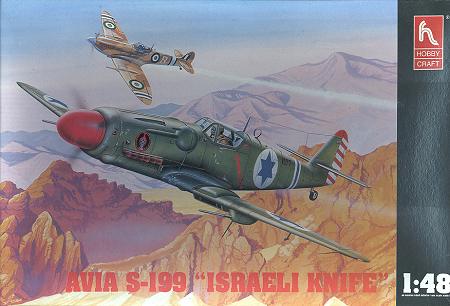
Hobbycraft 1/48 Avia S.199 'Israeli Avia'
|
KIT # |
1540 |
|
PRICE: |
MSRP $14.95 |
|
DECALS: |
4 Israeli AF aircraft: # 107,110, 120 & 1904 |
|
REVIEW: |
|
HISTORY |
The second to last incarnation of the Bf-109, the S.199 came about as a result of running out of DB.605 engines that powered the 109G versions that the Czechs were building after WW II. However, there were lots of Jumo 211 engines that were used to power bombers. After the appropriate modifications were made, the Avia S.199 was born.
Built in both single and two seat versions, the 'Mule' as it was known in Czech service, began operations with the Czech AF. Disliked by nearly all who flew it, it had a tendency to swing a great deal on takeoff, thanks to the large prop used with it. It was also underpowered compared to the DB powered 109. Not a fun aircraft, especially when combined with the 109s narrow undercarriage.
When the Israeli state was being formed in 1947-48, there was a real need for aircraft. The Israelis bought anything they could and 50 early S.199s were made available to the fledgling air force. Operated with some success, the 'Knife' as it was known in Israeli service, performed well for the Israeli and mercenary pilots that flew the aircraft. As soon as better aircraft, such as Spitfires and Mustangs became available, the 'Knife' was quickly retired.
There are at least two S.199s extant; one in the Czech Republic and one in Israel. All the Israeli aircraft had a pretty close to stock 109G interior and used a Galland hood, whereas the Czech 199s were modified with 'blown' slide back hoods and had modifications to the interior as production of the 199 improved the aircraft. The last 199 left Czech service in the mid-1950s.
|
THE KIT |
The S-199 kit is pretty much the same as all the other Hobbycraft late 109s. There is a common sprue for wings, landing gear and interior, and a separate new one for the S-199 specific bits like the fuselage, prop and cowling. The clear bits are for the 109G-14/K-4 as is proper for the Israeli 199. This particular kit was purchased at a swap meet for a pittance, mainly because the kit was already started with the wings and a few other small assemblies already put together. Unfortunately, the wings didn't have the wheel bulges attached and that caused a bit of fiddling around when that part of the construction came about. This kit also has the Hawkeye Designs Bf-109F/G resin cockpit installed to replace the kit version.
|
CONSTRUCTION |
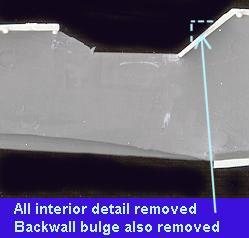 First step was to prepare the fuselage halves as per the Hawkeye Designs instructions. This consists mostly of removing the Hobbycraft sidewall detail and rear shelf in preparation for the new interior. Don't forget to remove the 'hump' on the back wall.
(Note: Since finishing this kit, I have received a number of e-mails telling
me that this bulge was left on the Israeli aircraft. It is up to you to decide
to keep it or not. Neither of the Czech museum examples has this bulge and that
is what I went by when doing this model.)
First step was to prepare the fuselage halves as per the Hawkeye Designs instructions. This consists mostly of removing the Hobbycraft sidewall detail and rear shelf in preparation for the new interior. Don't forget to remove the 'hump' on the back wall.
(Note: Since finishing this kit, I have received a number of e-mails telling
me that this bulge was left on the Israeli aircraft. It is up to you to decide
to keep it or not. Neither of the Czech museum examples has this bulge and that
is what I went by when doing this model.)
 The next step is to prepare the resin interior bits. Carefully saw away the large carrier from the interior parts with a razor saw. Make especially sure that the walls of the side pieces are nice and smooth. What I did was to use a large, curved X-acto blade to scrape away not only the resin sidewalls, but the fuselage sidewalls. The instructions for the interior set mention that the kit sidewalls need to be no thicker than .015 inches. That is pretty thin, fortunately, I have a caliper and was able to get the walls that thin. Next the side walls were temporarily attached with white glue to check fit. Then the front was also attached to check forward fit.
Some carving of the front of the cockpit opening is required to get the instrument panel to fit well. This also means that there will be precious little for the canopy to glue on to, so be advised of possible problems here.
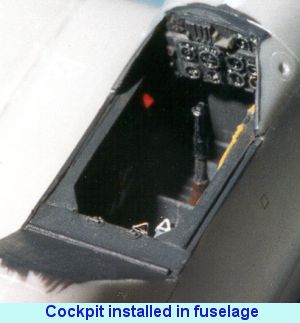
Once all the cutting and hacking was done, it was time to build up the resin interior. All the bits were cut out and sanded as required. The chain in between the trim wheels is going to be very fragile if sanded down properly so beware. First thing I did was attach all the bits on the floor piece. This consists of the control stick, the rudder pedals and a box down on the left side of the seat. Next is the left side panel. This gets the throttle and the trim wheels. This part is probably the most tricky. You have to attach one trim wheel, then the chain, then the outer trim wheel. The chain acts as the mount for the outer trim wheel so be very careful when attaching this bit. Since the S.199 didn't have the engine mounted cannon, the back of the breech housing was simply sawn away and smoothed.
 Next was painting the interior. It got a coat of RLM 66, though you may want to use a lighter color, as photos I have seen of restored aircraft show it to be much lighter. Of course, that could be due to the exposure as well. Then the bits were detailed. I used the new book Avia S.199 and CS.199 in Detail by Korán and Ovcácík as a primary reference. Once all the bits and pieces were painted and drybrushed, I inserted a small bit of clear plastic rod in the right panel near the top. All 109s had this clear bit in the fuel line so the pilot could see if the fuel was flowing to the engine. That little piece took about 1/2 hour to get installed as I had to cut a lot of them. They just kept 'zing' ing off into the carpet!! Final bits added to the cockpit were some etched brass seat belts left over from a Cooper Details set.

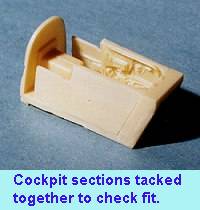
Then the four sections of the cockpit were glued together. Meanwhile the fuselage was glued together and all the seams were cleaned up. I found by dryfitting, that the resin cockpit made the wing/fuselage join a very tight and secure one by slightly bulging out the fuselage. Very good news indeed. The instrument panel area needed a bit more carving to get a good fit and then the instrument panel was glued in place. Next the complete interior was dryfitted. Some more trimming was needed at the rear of the cockpit before all fit well. Then the resin interior was fit into place and held there (hopefully) with lots of superglue.
Now that the interior was installed, it was time to hook up the wings. These fit very well and were glued in place. Typically for me, filler was needed at both wing roots and at the rear of the fuselage join. The front looked pretty good so I left it alone. Once that was done, the tailplanes were attached.
 I was going to try some aftermarket exhaust for this kit, but was unable to find them so the kit ones were installed. Don't forget to leave the mold line on the stacks as these items were cast and the mold line is normal. Next the supercharger intake was assembled and installed as was the top to the engine area. This item is just a tad smaller than the surrounding area, but doesn't look too bad. The sides were blended into the surrounding nose area. In actuality, the upper engine cowling is a very poor fit and photos of S.199s show huge gaps around them.
After that was done, I installed the landing gear struts. Since the aircraft is to be painted RLM 02 the same as the gear legs, I figured why not. It was then that I discovered another good reason to not buy started kits. This one had no main landing gear struts in it. Fortunately, I had some from another swap meet special that I had robbed parts from for the Falcon G-12. Good thing that landing gear struts didn't change! There has to be a message here about being very careful to check any kits one buys that have been started!!
Once the gear were installed, several exterior bits were added on prior to painting. This included the underwing 20mm cannon (which fit very well), the direction finder loop antenna, and the windscreen. The kit windscreen is really very poorly done, being mainly a sort of thick shape with no real definition. I had an extra canopy from a Hasegawa 109G that, though a bit big, was successfully glued in place. There was a real need to use filler to smooth things out and the resulting sanding removed the little intake on the left side. Fortunately, a good spares box revealed some spare intakes from a Fujimi kit that fit the bill. Finally the gun bulges, pitot tube, and underwing counterweights were glued in place and with the masking of windscreen and canopy, it was time to hit the paint booth.
|
PAINT & DECALS |
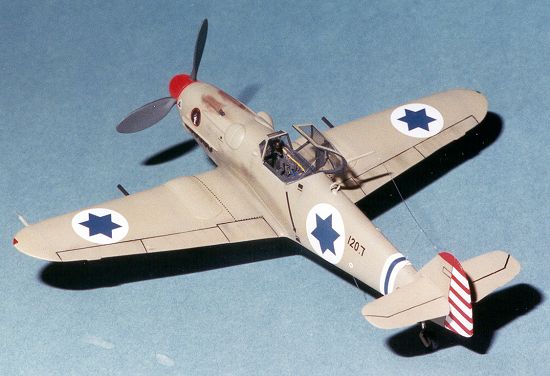
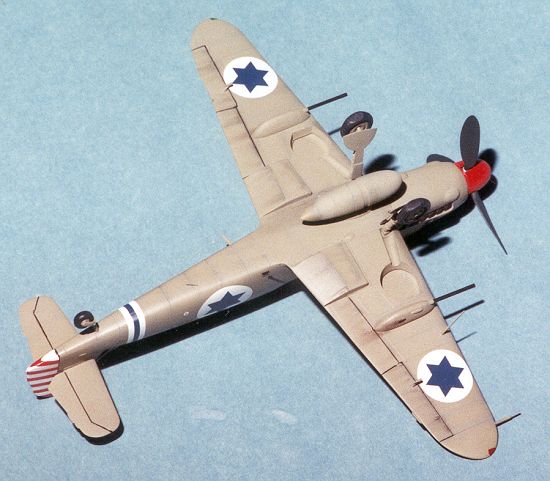
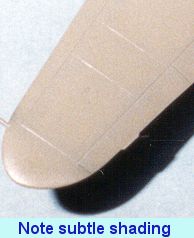 This aircraft has the kind of paint scheme that many like. It is basically one color covers all. First the windscreen and canopy were painted RLM 66 dark grey and then the entire aircraft; gear, wheel wells and all were painted RLM 02 green-grey using Aeromaster warbird colors. Once that had dried, I used some RLM 82 dark green and sprayed all the panel lines with it. The result was a bit of a mess, however this is only temporary. After that had dried, the airframe was again sprayed with RLM 02 to a point where the lines were just barely visible under the second coat. I have found this to be a relatively effective method of giving some accentuation to the panel lines without all the work of individually shading each panel area or using other equally time-consuming shading methods. In addition, this seems to work especially well with single-color paint schemes and is not as garish as other methods can be.
Once the painting was done, the airframe was given several coats of Future in order to provide a smooth surface for the decals. I had wanted to use the Aeromaster sheet for this aircraft, but was unable to find one so, with some trepidation, used the Hobbycraft sheet. For the most part, the sheet is quite good. There was some smearing on a couple of decals, but I used them anyway. They went down well and reacted favorably to Champ setting solution. Actually some reacted too well. The red in the rudder stripes actually bled under the onslaught of the Champ.
Having decaled the beast and wiped away excess setting solution, the airframe was then sprayed with an acrylic flat made of Future and Tamiya Flat Base. Some final assembly was then done by attaching the cowl guns, gear doors, wheels (at the last minute I decided to replace the kit ones with True Details resin versions), and antenna mast. Then out came the pastels for a bit of dirtying up. The airframe was then given yet another misting of matte clear to seal the pastels.
The final construction was the removal of the masking from the clear bits, the installation of the gun sight (part of the Hawkeye Designs interior set), and the installation of the radio antenna. This was done with the ever-popular stretched sprue. Finally the prop and hub were installed. The hub had been painted red and the prop RLM 70 black-green. Some trimming of the attachment point was needed to get it to fit and in the end, the prop had to be superglued to the nose as it was so loose a fit as to droop!
|
CONCLUSIONS |
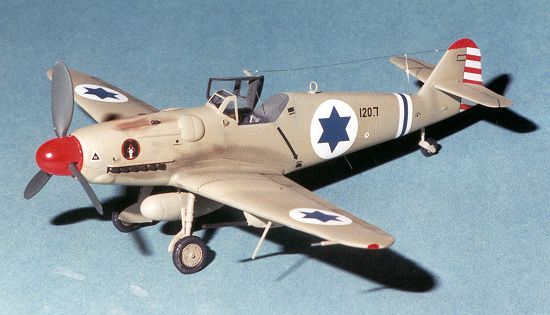
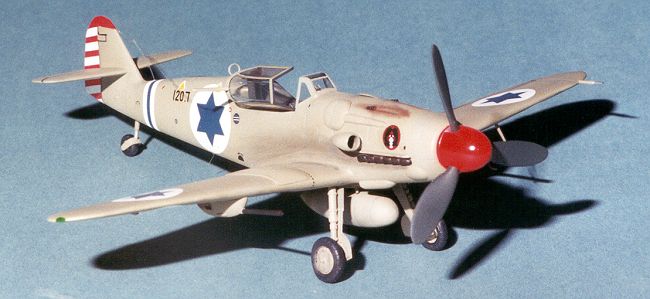
The end result is a very nice Avia S.199. Even though this kit was released about 5 years ago, it is a pretty good one. The biggest improvement over earlier Hobbycraft kits is a useable decal sheet. Areas that most modelers might want to consider using replacement parts are the wheels and canopy, which, in my opinion, are not that well done. The stock interior is really quite good, but I wanted to use the Hawkeye Designs one.
Overall a really fine kit and best of all, it isn't a zillion dollars. I can recommend this kit to all but the newest modeler.
Copyright ModelingMadness.com. All rights reserved.
Review copy courtesy of me and my wallet.
|
REFERENCES |
Avia S.199 and CS.199 in Detail by Korán and Ovcácík, WWP, 1999 $20.00
Back to Reviews Page 2016