Glencoe 1/72 Sycamore
Kit Number: 4001
Price: @$10.00
Decals: Several versions: All RAF in green/brown or yellow camoflage
Date of Review: 7 May, 1998
Review and Photos by: Scott Van Aken
The Bristol Sycamore was Britain's first successful indigenous helicopter. It was also Bristol's only successful helicopter design. Designed in the late 1940's it was in squadron service in the early fifties, supplanting the Westland Dragonfly and itself supplanted by the Wessex. A light helo by today's standards, it was capable of lifting but five passengers. It was also used with success as a SAR helo.
Glencoe's kit of the Sycamore is another kit molded in the 50's/60's. I am not sure of the origin of this particular kit, but suffice it to say, it was the days of rivets. Those on this kit are remarkably subdued compared to early Monogram or Revell issues but are still probably way over scale. When you open the box, you don't see that many parts, and several of them (the wheels and tail rotor in particular) are rather toy-like with little detail. One of the initial questions I asked myself when dry fitting this kit was where to put the weight. Helicopters are notorious for being tail sitters, and the required room for weight is minimal due to the need for lower fuselage windows. The Sycamore is no exception. I finally crammed a load just under the cabin floor and right behind the aft bulkhead. In fact, I overdid it a bit; this kit won't tail sit even if you place it on a wall!
Anyway, typically, kits begin with an interior. You get the basics; floor, back bulkhead, seats, instrument panel and control stick. Not much there, but since the transparencies are a bit thick and distorted, there is little you can see. It helps that the interior is painted black!
The most fiddly portions of the kit are the main gear and the main rotor. The main gear has no concrete attachment points, only indentations on the fuselage as to where they go. Once assembled, they are quite sturdy, but you need to take care as you go. The main rotor is another thing. It is really quite well detailed, but the attachment points of the blades to the rotor head are almost scale in thickness and offer little in the way of real support. In fact, during construction, I broke the attachment pegs on two of them and ended up replacing them with short bits of paper clip. It is now a rather secure assembly that will have to find another place to break!
Along with the rotor blade problem, the attachment of the whole assembly to the helicopter is rather iffy. the biggest problem is that there is no lower support for the shaft. This means that the rotor head is free to sit right on the fuselage top. There is no recourse other than to pick how you want the blades to sit and glue it permanently. The small horizontal stabilizer might also cause you problems. Mine broke during handling and it also has a small mating surface so was replaced with a bit of paper clip as well. The transparencies gave no problems although they are quite thick, and the openings needed a bit of clean-up prior to gluing.
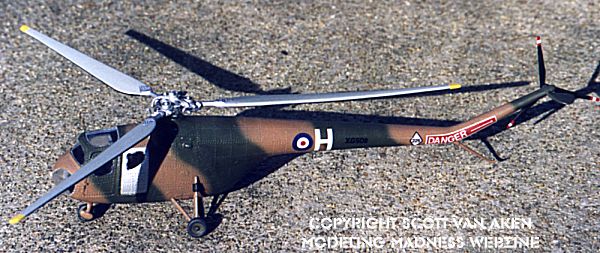
The kit decals were super and allowed for several versions. I chose a camouflaged aircraft from 225 squadron with bare metal rear doors. Gunze RAF green and brown were used on the fuselage while the top of the main rotor was painted in Gunze medium sea grey. The underside of the main rotor and tail rotor are black.
A very basic kit that anyone can build, but the builder does need to beware of the fragility of many of the parts prior to construction. The end result is an interesting helicopter that few have probably heard of.
Back to Reviews Page 2017