| KIT #: | 04350 |
| PRICE: | $14.00 from NA Hobbies at the Nationals |
| DECALS: | Four options |
| REVIEWER: | Scott Van Aken |
| NOTES: |
| HISTORY |
The Hunter F.6 was the next in the
line of improvements for the Hawker Hunter. Still retaining its pure
fighter capabilities, several F.6s were outfitted for Sidewinder missiles
on the outer wing pylons.
 Basically a bit more powerful engine was
incorporated into the F.6 and this included an extended outer wing leading
edge, providing a 'sawtooth' planform. This leading edge was the result of
control problems at high altitude, high airspeed and under high g-loading
that were discovered with previous aircraft.
Basically a bit more powerful engine was
incorporated into the F.6 and this included an extended outer wing leading
edge, providing a 'sawtooth' planform. This leading edge was the result of
control problems at high altitude, high airspeed and under high g-loading
that were discovered with previous aircraft.
By 1958, all RAF day fighter squadrons had been issued the Hunter F.6, earlier versions either being sold off or sent back to Hawker for upgrading (something that was done to a lot of Hunter airframes). Thanks to its capabilities and performance, the Hunter F.6 was a real hit on the export market with dozens of countries buying them for their air forces and several undertaking license production. The vast majority of extant F.6 airframes were rebuilt to FGA.9 standards.
| THE KIT |
For a look at what's in the box, please visit the preview. I'll add that this is a very nicely detailed kit, offering nice external detailing that is well done, though not quite as crisply produced as one gets with Hasegawa kits in this scale. The amount of detailing in the cockpit and wheel wells rivals any one else's efforts in 1/72 and makes this a most desirable kit from many points.
| CONSTRUCTION |
After looking over the rather
extensive instructions, you can see that there are a number of areas for
inserts and there are a few subassemblies to do. I worked on the
subassembly method with the instructions to help guide me along in terms of
what part numbers to use when needed. Basically, there was the seat,
cockpit, wings, tail cone, and drop tanks that could be
 assembled at this
time. The kit comes with the smaller tanks (100 gallons, I believe) and
provides two of them. They are split top and bottom and have separate fins.
An easy enough build.
assembled at this
time. The kit comes with the smaller tanks (100 gallons, I believe) and
provides two of them. They are split top and bottom and have separate fins.
An easy enough build.
The wings are a bit more complex. There are holes already opened in the bottom of the wing for the pylons. These holes are half circular and are not the same direction as I guess the pylons are handed, though they don't look it. Flaps are separate as are the outer wing leading edge and the wing tip. As was pointed out in a review I read, the leading edge and wing tip parts are larger than the wing itself. By about 1/32 inch or perhaps a bit larger. I used a coarse sanding stick to sand the upper surface down after lining up the lower portion. Normally one does this kind of work on the bottom, but I couldn't get it to work that way. There are also some relatively large gaps that will have to be filled once it is sanded down. All this took about 5-10 minutes a wing once the glue had dried on the inserts.
The other subassemblies were the seat, which is made up of four parts; two sides, a cushion insert, and a top section with pull handles. And the cockpit tub, which needed the control stick and the instrument panel installed. I used the decals provided for these items and while they did not match the instrument, they did work very well, snuggling down with the use of Microsol, one of the weakest setting solutions on the market. In this scale, it is quite convincing. I should point out that the interior and seat frame were first painted matte black with a bit of dry brushing on the seat. This would have worked well for the raised detail on the consoles and such had I not used the decals.
 With the interior done, it was a
simple matter to put it in the fuselage halves and close these halves up. I
then attached the lower gun section and the tail cone. The tail cone is a
bit larger than the surrounding area, but a good sanding took care of that.
The gun section needed a touch of filler in the corners. I then filled as
much of the nose as I could with weight. Instructions say 5 grams and I'm
sure I got in at least that much. The nose cap was then glued in place.
Make sure the small intake goes to the top. Some sanding on the fuselage
and minimal filler were used (though it turns out I could have used a bit
more!).
With the interior done, it was a
simple matter to put it in the fuselage halves and close these halves up. I
then attached the lower gun section and the tail cone. The tail cone is a
bit larger than the surrounding area, but a good sanding took care of that.
The gun section needed a touch of filler in the corners. I then filled as
much of the nose as I could with weight. Instructions say 5 grams and I'm
sure I got in at least that much. The nose cap was then glued in place.
Make sure the small intake goes to the top. Some sanding on the fuselage
and minimal filler were used (though it turns out I could have used a bit
more!).
With the fuselage complete, the wings were put on after spraying the insides with aluminum. These fit into the fuselage in such a manner that no filler was needed at all. Just a quick sanding to remove any glue that oozed out. Tail planes also fit with minimal fuss. One does need to fill in the semi-circular area on the flaps that are for the longer tanks and both of my flaps had sink areas that needed a good surface fill as well.
I then finished painting the ejector seat and glued it in place. Then I attached the clear gun sight and installed the canopy. This is a bit of a tight fit and needs little glue. I masked the windscreen and the canopy and tacked the canopy in place in preparation for painting.
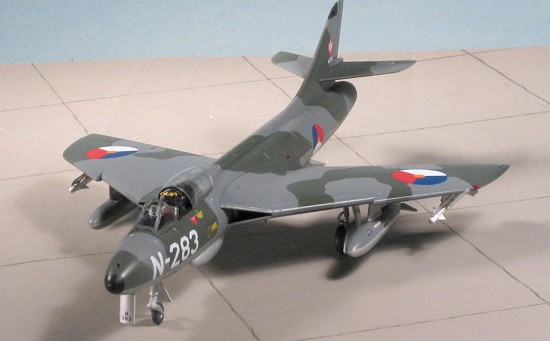
| COLORS & MARKINGS |
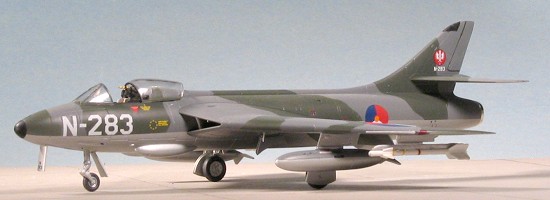
 A majority of Hunters were in Dark
Green/Dark Sea Grey over Aluminum, though later FGA.9s often had the
underside painted a light grey. F.6s, however, did not get this treatment.
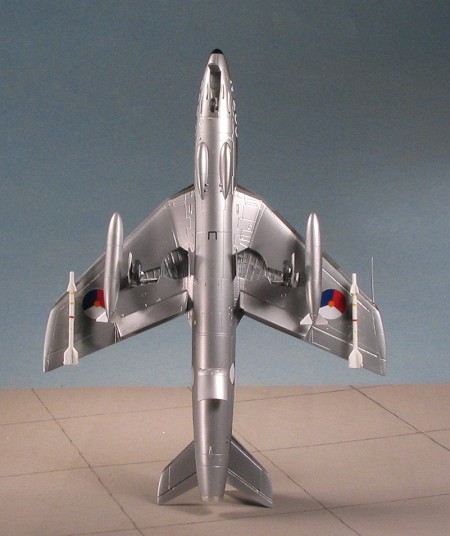
I first sprayed the entire airframe with Testors ADC Grey. When that had
fully cured, the lower section, including wheel wells, was painted Alclad
Aluminum. This also was sprayed on both sides of the gear doors and the
landing gear, and the speed brake.
A majority of Hunters were in Dark
Green/Dark Sea Grey over Aluminum, though later FGA.9s often had the
underside painted a light grey. F.6s, however, did not get this treatment.
I first sprayed the entire airframe with Testors ADC Grey. When that had
fully cured, the lower section, including wheel wells, was painted Alclad
Aluminum. This also was sprayed on both sides of the gear doors and the
landing gear, and the speed brake.
The Aluminum was fully masked off and the upper surface painted with a lightened Dark Sea Grey. This shade often faded rather quickly. With that dry, I spent more quality time masking and then painted the Dark Green. These planes were painted with masks and so the overspray was barely noticeable. In 1/72 trying to free-hand this pattern would only look very odd, therefore the masks. Heck, in 1/48 you'd have to spray an extremely tight pattern to free-hand it.
 With the colors on the airframe the
(scale) tons of masking tape were removed and a gloss clear coat applied. I
used Testors Metallizer Sealer (as I got quite a bit quite cheap). It takes
about 2-3 times the amount of sealer to get the same level of gloss as what
one gets with Future The sealer is very thin and it took five coats to cut
down most of the matte.
With the colors on the airframe the
(scale) tons of masking tape were removed and a gloss clear coat applied. I
used Testors Metallizer Sealer (as I got quite a bit quite cheap). It takes
about 2-3 times the amount of sealer to get the same level of gloss as what
one gets with Future The sealer is very thin and it took five coats to cut
down most of the matte.
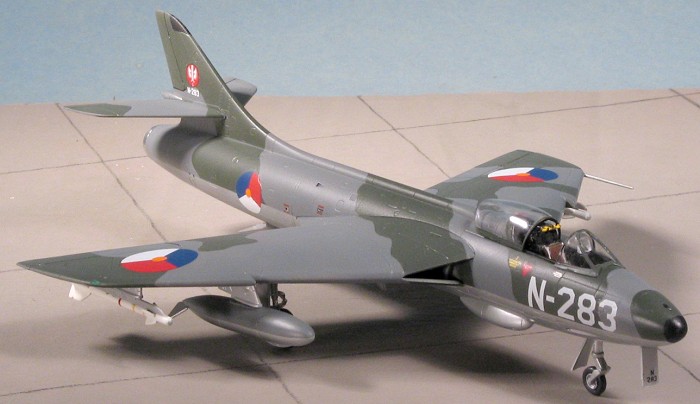
Once that was dry (as in a couple of hours), I returned to the work bench to apply the decals. I had a non-yellowed ESCI sheet (a real collector's item) and so wanted to do the Indian AF option. The serial was wrong for an F.6 but I have lots of letter/number decals in the right font for replacing that. I started with the wing roundels and was heartbroken when I noticed that ESCI only undercoated about half the decal with white. The result was that the saffron outer ring was two distinct shades as the underside colors bled through.
I removed the decal with much dismay and decided on the Dutch AF version using the kit decals. These decals went on very well and were quite opaque. I read a review that complained about transparency of the markings, but sure didn't see anything like that with mine. Again, I used Microsol to ensure they snuggled down and it worked just fine.
| FINAL CONSTRUCTION |
 With the big decals on and dry, I
went to put on what seemed like hundreds of parts. Basically, this meant
the landing gear, speed brake, flaps, gear doors, pitot tube, drop tanks,
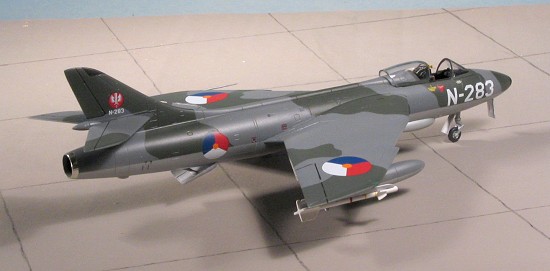
and missiles. You'll note that I somehow got the fins on one drop tank to
be not properly balanced!
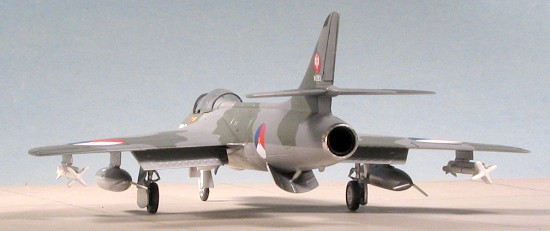
There are a lot of these parts and the gear doors have to be cut apart to
fit. I took my time and things fit into place very well. There are separate
oleo scissors on the main struts and after using Chrome Bare Metal foil, I
attached these scissors. The fit is only fair on these as the attachment
area is small. There are also actuating struts for the main gear and inner
gear doors. The main gear actuating struts are just a teeny bit too long (or
I mounted them wrong). Nose gear has a separate fork piece and the nose
wheel is trapped between these two parts. There is a seam, but it isn't
that bad at all. Fit of the nose gear is quite positive and the gear doors
are glued to the lips of the gear well. Meanwhile, I glued on the wing
pylons and since I was doing the Dutch Hunter, I had Sidewinders and rails
to fill the otherwise empty outer pylons. I should mention that on the
Hunter, it was pretty well normal to have the flaps and speed brake dropped
slightly. The only option in the kit for the speed brake is fully deployed
or fully closed. It would normally drop about 5 degrees and so be slightly
open. Flaps would also drop about 10 - 15 degrees.
With the big decals on and dry, I
went to put on what seemed like hundreds of parts. Basically, this meant
the landing gear, speed brake, flaps, gear doors, pitot tube, drop tanks,
and missiles. You'll note that I somehow got the fins on one drop tank to
be not properly balanced!
There are a lot of these parts and the gear doors have to be cut apart to
fit. I took my time and things fit into place very well. There are separate
oleo scissors on the main struts and after using Chrome Bare Metal foil, I
attached these scissors. The fit is only fair on these as the attachment
area is small. There are also actuating struts for the main gear and inner
gear doors. The main gear actuating struts are just a teeny bit too long (or
I mounted them wrong). Nose gear has a separate fork piece and the nose
wheel is trapped between these two parts. There is a seam, but it isn't
that bad at all. Fit of the nose gear is quite positive and the gear doors
are glued to the lips of the gear well. Meanwhile, I glued on the wing
pylons and since I was doing the Dutch Hunter, I had Sidewinders and rails
to fill the otherwise empty outer pylons. I should mention that on the
Hunter, it was pretty well normal to have the flaps and speed brake dropped
slightly. The only option in the kit for the speed brake is fully deployed
or fully closed. It would normally drop about 5 degrees and so be slightly
open. Flaps would also drop about 10 - 15 degrees.
Once all the bits were on and the decals applied, the kit was given an overall coat of matte clear to seal things in. Then the masking was removed from the canopy and windscreen and some touch-up painting was done. With the rear of the canopy overlapping the forward part of the spine, you'll definitely have to so a bit of painting to cover that all up. The last thing I did was to wrap some Bare Metal Foil around the exhaust area as that was often bright metal. I also found that the canopy just snaps into place, fitting so well that no glue is needed.
| CONCLUSIONS |
To say that I'm pleased with the end result would be a bit of an understatement. This is really a fine kit that builds into an even better model. While I wouldn't toss away my Airfix Hunter kits, the reality is that they have been superseded by this new one from Revell AG. I don't think it is too much of a stretch to say that this is only the first of several Revell Hunters that I'll be building. It is that nice.
Kit courtesy of me for you.
August 2005
#1373 in a series
Copyright ModelingMadness.com. All rights reserved. No reproduction in part or in whole without express permission from the editor.
If you would like your product reviewed fairly and fairly quickly, please contact the editor or see other details in the Note to Contributors.