Airfix 1/48 Seafire F.XVII
| KIT #: | A06102 |
| PRICE: | 26.99 SRP |
| DECALS: | Three Options |
| REVIEWER: | Scott Van Aken |
| NOTES: | New tool kit |
| HISTORY |
 The Seafire F Mk XVII was essentially a modified Mk XV; the most important change was the reinforced main undercarriage which used longer oleos and a lower rebound ratio. This went some way towards taming the deck behaviour of the Mk XV, reduced the propensity of the propeller tips "pecking" the deck during an arrested landing, and the softer oleos stopped the aircraft from occasionally bouncing over the arrestor wires and into the crash barrier. Most production XVIIs had the cut down rear fuselage and teardrop canopy (the windscreen was modified to a rounded section, with narrow quarter windows, rather than the flat windscreen used on Spitfires) and an extra 33 gallon fuel tank fitted in the rear fuselage. In addition the wings were reinforced, with a stronger main spar necessitated by the new undercarriage, and they were able to carry heavier under wing loads than previous Seafire variants. 232 of this variant were built by Westland (212) and Cunliffe-Owen(20).
| THE KIT |
This one is just like every other new Airfix kit that has been released in the last couple of years. The kit has crisp, engraved detail that may be a bit much for some, but looks fine to me. The grey plastic sprues have medium size sprue gates. Again these may be a bit large for some, but they do pretty well ensure that pieces won't fall off the sprues during shipment. The clear bits are separately bagged and it comes with a large and colorful decal sheet.
 You might look at what's in the box and think "that's a lot of parts for a simple plane like the Seafire", and you'd be right. This is because Airfix has incorporated a lot of options in with this kit and those options take up space. The biggest one is that you have separate assemblies for both folded and straight wings. I hate having to piece together wing sections when I don't want the folded option and with this kit I don't have to. Other optional bits are separate canopies for the open and closed position, different types of drop tank, different wheels and within that, you can choose a set that is 'flattened' or not. You can build it with gear up if you wish and there are different bits for that. You can also build it with the flaps down. It may be that this would be uncommon as I recall that lowered flaps cause quick overheating engines due to radiator blocking. But it is provided if you wish. The ailerons and separate and so is the rudder. The elevators are one piece covering both sides and separate from the horizontal stabs. Again, check photos as I'm thinking perhaps the controls may have been spring loaded into the neutral position. I should mention that the kit has both compressed and extended struts in case you wish to do a 'coming in for landing' build.
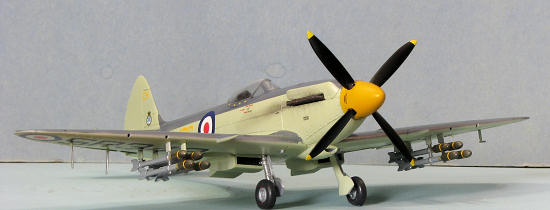
If that is not enough for you, a most complete and nicely detailed cockpit is provided. Instrument panel is raised details and while I'd like to have seen a face decal along the lines of Tamiya and Hasegawa, one is not provided. What is provided is a three piece pilot if you wish to hide much of that detail. Of course, the side door can be posed open. There is detail inside the folded wings so 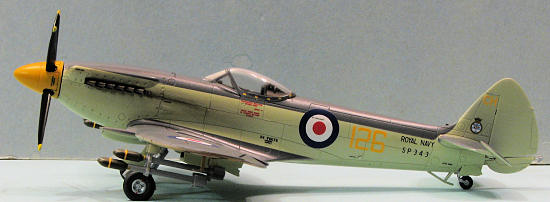 no bare blanking plate for you. The only external weapons are a set of paired rockets.
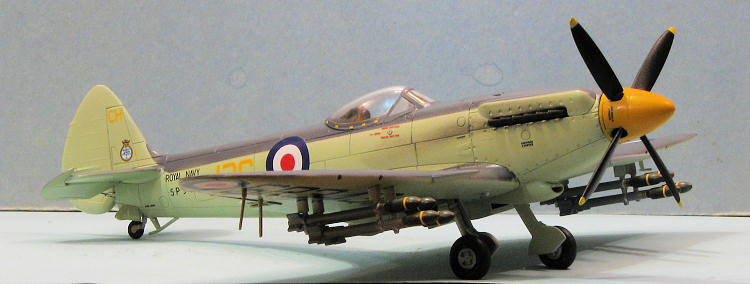
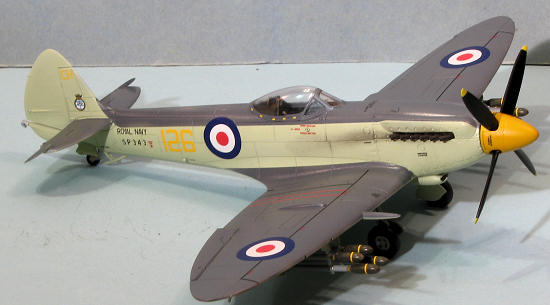
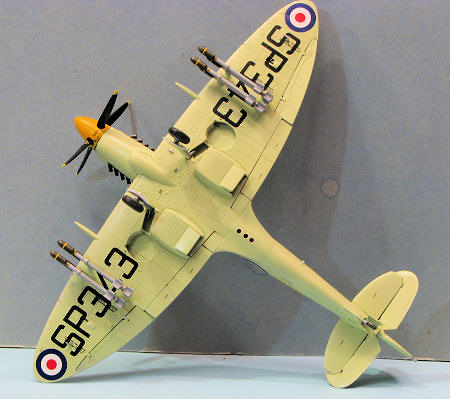
The large and colorful decal sheet provides markings for three planes. Two are in Extra Dark Sea Grey over Beige Green (which has to be mixed). These are from 800 NAS in 1947 (box art) and the other with a higher fuselage demarcation line, is from 1832 NAS RNVR in 1950. This latter plane has the later roundels. In Extra Dark Sea Grey/Dark Slate Grey over Beige Green, with yellow bits on the wings and elevators, is an aircraft from the Air Warfare School, also in 1947. The Extra Dark Sea Grey soon faded to just Dark Sea Grey after a few months of exposure. The decal sheet is superbly printed by Cartograf so is as good as any aftermarket sheet. It also includes full data markings and a wing walk decal. Instructions are well done with easy to understand construction drawings, but still with only Humbrol paint numbers for most of the build, some colors need to be mixed.
| CONSTRUCTION |
Being pretty standard with this one, I started by assembling the interior, doing enough parts that would be the same shade as I could before painting. Now it seems that these aircraft were interior green up to a point and everything above it was black. This meant masking the side wall sections as well as the rest of the interior bits. Airfix provides a pretty nicely done interior, but it could use some belts so I used an Eduard colored harness set to install the Q type harness. This requires cutting a slot in the back of the seat to thread through the harness.
 As mentioned, you can build the plane three different ways. I am not really fond of folded wings, though that is a big draw in this kit, and I didn't want to put it on a stand in landing position so I chose to leave the door closed. I also leave off the prop and spinner until the very end so closed up the fuselage halves at this time.
Next are the wings. I installed the ID lights after painting them red, green and orange. I also opened up the holes for the rockets. I decided not to use either of the drop tanks provided. The upper sections were attached. I also glued in the ailerons and the flaps. None of the photos I could find of this plane on the ground showed the flaps deployed, so all were glued up. I think this may be due to the flaps blocking airflow through the radiators so it was important for pilots to retract them once the aircraft had touched down. At this time, I also installed the upper engine bulges, but left off the exhaust until the end. There is a lower cowling piece that gets installed and this was glued in when I attached the wings. I have to say that all these parts fit very well, requiring little filler.
In the back, the horizontal stabs and the elevators were glued in place. I put the elevators slightly down as many photos of the plane showed this to be the norm. There is a small plug that fits behind the elevators. This was a really tight fit and required considerable liquid cement to help it slide into place. The rudder and lower section was glued in place. I was left with a gap 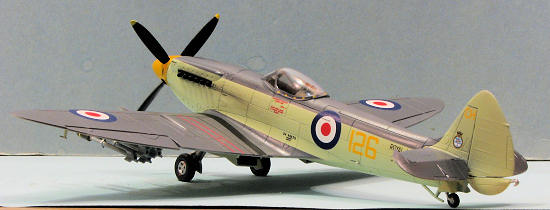 between the upper and lower piece that I could not figure how to remove. Perhaps it is supposed to be there.
I then assembled the radiators, gluing them and the carb intake into place. The tail wheel doors were attached as was the tail wheel anti-fouling brace. The kit gives you two canopies. One for open cockpit and one for closed. I wanted to use the open canopy, but split it while removing it from the sprue! I did manage to get the closed canopy free without splitting it, but did end up with a chunk taken out of it. The plastic seems to be quite brittle so you have been warned. I masked the windscreen and cemented it in place. I then went to install the bullet proof section inside, but couldn't get it to fit as I'd stupidly attached the windscreen already and didn't want to break loose the glue. The canopy section was masked and installed. Time for paint.
| COLORS & MARKINGS |
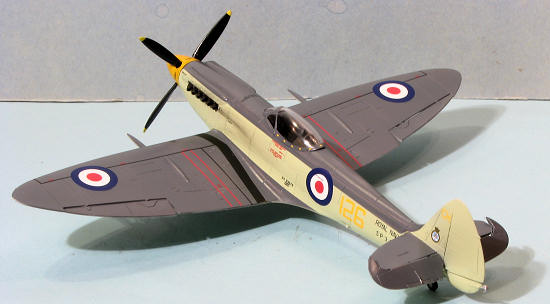
 I've always liked the EDSG/Sky schemes where the upper demarcation line is high up. The one scheme that fit this was the 1852 Sq RNVR aircraft. Nothing really fancy in the way of markings with but a yellow spinner to add some color. I used Humbrol #90 for the Sky and a bottle of old Aeromaster Extra Dark Sea Grey acrylic for the upper color. The Aeromaster paint has been pre-lightened so really looks more like Dark Sea Grey, which is fine as the EDSG faded very quickly once it was painted on. I also painted gear doors and gear legs and the spinner while I was at it. There was a lot of masking done for the paint scheme and while it looks very good, it seems that I didn't do the upper EDSG high enough or the wing/fuselage demarcation line low enough. Nothing major but that one or two millimeter difference is obvious when you compare it with the markings placement guide. When done, the airframe was given a coat of Future to provide a glossy base for the decals.
Back at the bench, the tail wheel was installed as were the landing gear and cannon fairings (which I had forgotten to put on and this required a short return to the paint shop). With the model on its gear, I then spent the next three or so days attaching decals. The Airfix decals are really quite good. They stick well, but will benefit from setting solutions. I used Mr. Mark Softer and the decals snuggled right down. Don't forget to poke holes for the shell ejector chutes.
| FINAL ASSEMBLY |
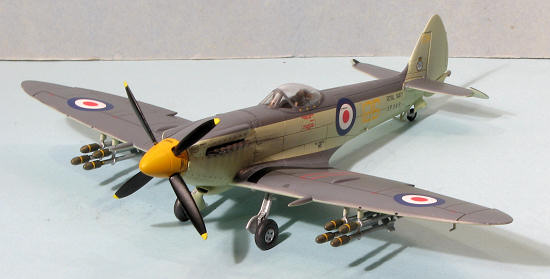
While doing the decals, I worked on the rockets. These are a PITA to clean up, but a sanding brace like that sold by Flexi-file does a great job of things. Airfix offers two painting options, each with different colored heads and bodies. One is OD with a Light Ghost Grey body while the other is Bright Red with an Aluminum body. Now I have to admit that a bright red warhead isn't something I've seen too often (I thought they'd be overall Bronze Green), so I went with the less brilliant shade. After decals and detail painting, they look pretty nice. 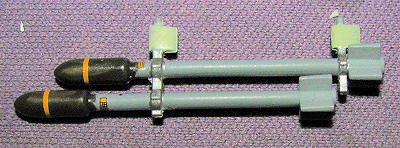 I also took the opportunity to paint and assemble the main wheels. Then the small 'non-slip' markings were applied and the wheels glue in place after I'd attached the oleo scissors. The gear doors were glued in place as were the under wing antennas.
I then assembled the prop. It doesn't fit together as one would think. The shanks on the prop are too short for the cradles on the spinner backing plate (assuming they are supposed to fit on them). I also found the prop shaft had to be scraped down a bit to fit through the prop. Adding decals to the rockets was a bit tedious and I'll admit now that I did not put the markings on each of the fins as I thought that was a bit over the top. As I'd missed my planned completion deadline (what else is new), I drilled out the exhaust. I'm sure that Ultracast and/or Pavla will be doing resin replacements in the very near future.
The model was given a coat of semi-gloss to seal in all my mistakes and allow any decal silvering to become quite apparent. I then did minimal exhaust staining. The airframe was left untarnished because: a) it was the sq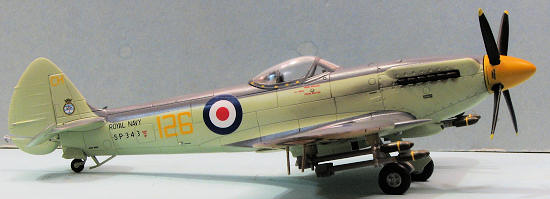 uadron commander's plane and always kept clean; b) The reserves always kept their planes in pristine condition; c) it was fresh from the paint shop; d) the builder generally doesn't weather airplanes.
Once that was done, the last bits were glued in place, the masking removed and the kit was now a bonafide model.
Last minute update. Much to my chagrin, I discovered when compiling the images for this article, that I'd put the prop on backwards! Definitely a Homer moment. Fortunately, I don't use a lot of glue, so was able to pop off the prop, open the spinner, pull out the shaft and reverse the blades. I also had to paint over the prop logos on each blade. The assembly was re-unified and pushed onto the nose. I see now that it droops a tad so I'll need to glue it in place.
| CONCLUSIONS |
 Despite my lethargic building pace, this is a kit that many can build in a relatively short amount of time. I found the general fit to be very good and while some may fuss about the size of the engraved detailing, most will not and find it quite acceptable. The general engineering is quite good and offering all those options in terms of the finished product is a real plus. Is it pricey? 25 years ago it would be considered borderline (I recall fussing about paying a whole $20 for Hasegawa's first 1/48 Phantom II kit when it first came out), but in today's price structure it is pretty much a good deal. I know you will like it (well most of you will), and can highly recommend it. I'm looking forward to the Mk.XV and other variants that are sure to be issued.
| REFERENCES |
September 2011
Copyright ModelingMadness.com. All rights reserved. No reproduction in any form without express permission from the editor.
If you would like your product reviewed fairly and fairly quickly, please contact the editor or see other details in the