| KIT #: | 5051 |
| PRICE: | $46.50 SRP |
| DECALS: | Six options |
| REVIEWER: | Scott Van Aken |
| NOTES: | New tool kit |
| HISTORY |
The Sea Vixen did not take part in any true wars during its career with the Fleet Air Arm though it took part in many operations. In 1961, President Abdul Karim Kassem of Iraq threatened to annex the neighbouring oil-rich state of Kuwait. In response to Kuwait's appeal for external help, the United Kingdom dispatched a number of ships to the region, including two fleet carriers. Sea Vixens aboard the fleet carriers flew patrols in the region, and Kassem's aggressive actions wilted in the face of the strong naval presence, thus averting a Gulf War over Kuwait.
In January 1964, trouble flared in the East African state of Tanganyika after the 1st and 2nd Tanganyika Rifles mutinied against the British officers and NCOs who, despite Tanganyika being independent, still commanded the regiment. The mutineers also seized the British High Commissioner and the airport at the capital Dar-es-Salaam. The UK responded by sending the light fleet carrier HMS Centaur, accompanied by 45 Commando, Royal Marines. The Sea Vixens, flying off Centaur, performed a number of 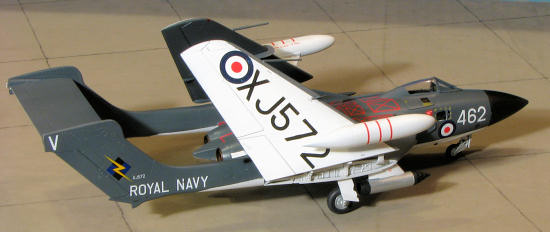 duties including the providing of cover for the Royal Marines who were landed in Tanganyika by helicopters. The operation "to restore Tanganyika to stability" ended in success. That same year, Sea Vixens of HMS Centaur saw service once again in the Persian Gulf, including the launch of air-strikes against rebel forces, this time supporting British forces fighting against locals disgruntled by the loss of tolls in the Radfan. Later in 1964, HMS Centaur's 892 Squadron Sea Vixens stationed off Indonesia, helped to prevent an escalation of President Sukarno's Indonesia–Malaysia confrontation.
Sea Vixens saw further service during the 1960s, performing duties on Beira Patrol, a Royal Navy operation designed to prevent oil reaching landlocked Rhodesia via the then Portuguese colony of Mozambique. The Sea Vixen also saw service in the Far East. In 1967, once again in the Persian Gulf, Sea Vixens helped cover the withdrawal from Aden. There were a number of Royal Navy warships involved, including the carriers HMS Albion,Bulwark and Eagle (carrying the Sea Vixens) and the LPD (Landing Platform Dock) HMS Fearless.
The Sea Vixen also took to the skies in the aerobatic role, performing in two Royal Navy display teams: "Simon's Sircus" (sic) and "Fred's Five".
A small number of Sea Vixens were sent to FR Aviation at Tarrant Rushton airfield for conversion to D.3 drone standard, with some undergoing testing at RAF Llanbedr before the drone programme was abandoned. Among them was XP924, now G-CVIX, the only Sea Vixen to remain in flying condition, which has now been returned to 899 NAS colours. Owned and operated by De Havilland Aviation, G-CVIX can be viewed at their hangar at Bournemouth Airport in Dorset, southern England, or at air shows around the UK. Many other Sea Vixens remain in good condition but do not fly.
| THE KIT |
This new kit from Cyber-hobby portrays the original FAW.1 version. The type was later modified to FAW.2 which had the tail booms extending forward of the wing's leading edge. These booms held additional fuel and to many, changed the look of the aircraft. This is not, of course, the first Sea Vixen done in 1/72 with Frog doing one many years ago and somewhat more recently, XtraKit doing a version that was tooled by MPM and High Planes did a short run version. There were possibly oth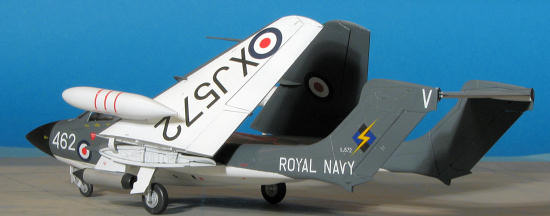 ers who reboxed these, but I do not recall any other new tool kits.
Though I may be repeating what is below in the PR info, the first thing that caught my eye were the tail booms. I had originally thought that they had forgotten to include one of the boom halves, but it seems that Cyber-hobby has used their slide mold technology to make these a single piece. Very clever. Both the pilot and navigator positions are well appointed for the scale with reasonably well done bang seats. This will need weight in the separate nose cone though the instructions are moot as to how much. There is also a two piece windscreen/canopy to see what little is visible in the cockpits.
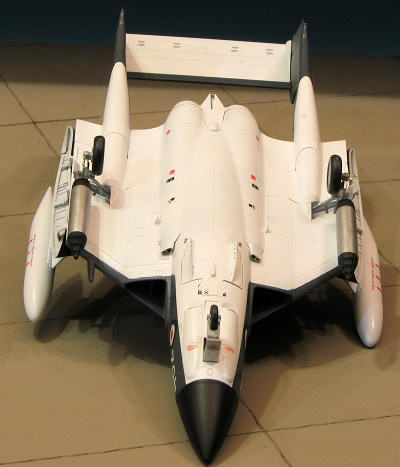
Nicely long intake trunking is provided and the 'grille' that is so typical on many British jets is a separate piece, which is quite refreshing. Other neat options are for folding wings, deployed speed break and deployed flaps. Ailerons and rudders are separate pieces as well, adding to the 115 part count. The only things to dangle under the wings are fuel tanks and rocket pods.
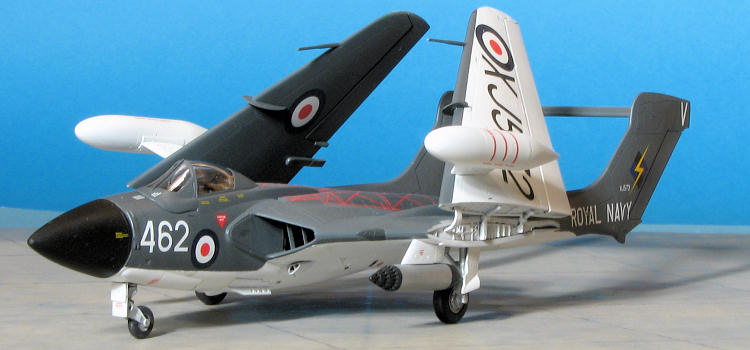
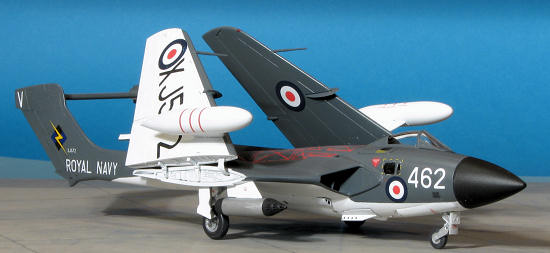
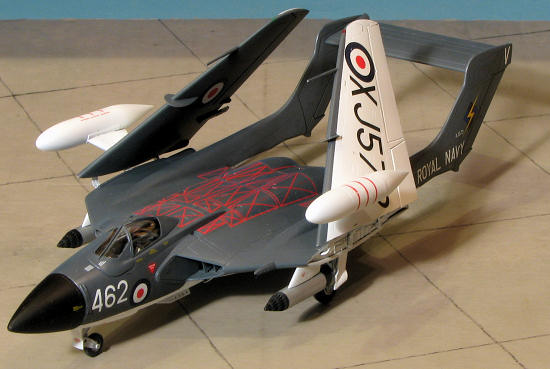
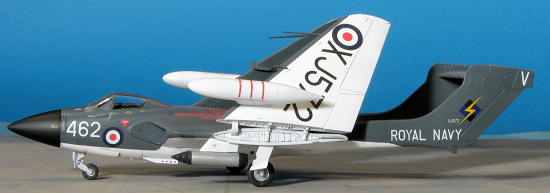
The FAW.1 flew with six units during its life and Cyber-hobby has included markings for five of them. This includes 766, 890, 892, 893 and 899 Squadrons with two different markings for 890. All were extra dark sea grey over white, though most will want to use just dark sea grey for the upper color as the EDSG faded quickly when exposed to ultraviolet light. Thanks to Modeldecals, you can find serial number/letters in the proper font to match what the kit provides so you can build any FAW.1 for which you have a photo. The two decal sheets include all of the myriad of data stencils carried on this aircraft. When your editor built the Frog Sea Vixen many, many years ago, cutting red stripe decal was the most tedious part of the build. Now you do not have to.
| CONSTRUCTION |
Back in the mid 1980s, one of the 'holy grail' kits was the Frog Sea Vixen. People were getting major money for them at swap meets and the various 'used kit' dealers. I know that I snagged one and was thrilled to get and build it. Until now, that was still pretty much it for an injected plastic kit of this quite large British naval aircraft.
Now I have a chance to build the FAW.1 version (the Frog was an FAW.2), and it was not long before I was snipping parts. The first thing one needs to decide is whether to built it with the wings folded or not. There are quite a few parts usable on one option or the other so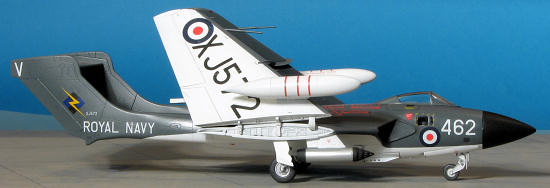 it is a decision that needs to be made early. I decided to do this one with the wings folded as I rarely build naval aircraft in that configuration.
So, scouring the instructions, I looked for subassemblies. There are a lot of them. I built up the cockpit bits minus seats, assembled the rocket pods, glued the fuel tanks and attached bits to the boom/fin assembly. A number of these parts are molded with slide mold technology so all one has to do on the booms and wing tanks, for instance, is sand off the mold seam.
I then drilled holes for the pylons and glued the outer wing sections. These have a piece at the join to represent a wing rib. If doing wings down, there is a hefty spar that fits in there. I also attached the ailerons and part of the flap to the wing and the rudders to the fin.
Back at the lower fuselage, the nose gear well and main gear wells were glued in place. There are also inner intake sections to be glued to the forward fuselage. Though few of us will have trouble, Cyber-hobby has numbered the wheel wells and these intake sections with the same number. Seems like a standard Dragon Inc glitch. I also glued the intake halves after painting them and the interior and inside of the exhaust with Floquil's Weathered Black. Straight flat black just looked too stark.
By the way, I had to visit several Internet sites to get colors as other than the cockpit interior, there is no color information for struts, gear wells and such. In fact, I was going to paint the intake interiors in white until I found photos that show it to be black. I then took the opportunity to pre-paint a number of items using white. This included the inner gear wells, gear doors and gear legs. Again, I was bitten by the lack of color information as it seems the gear legs and wheels were aluminum. 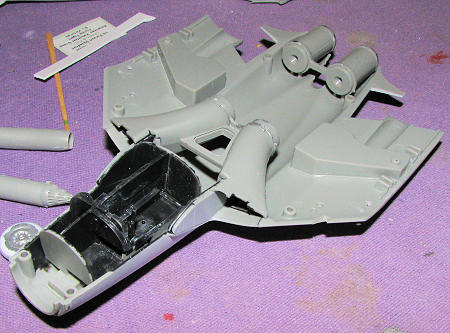
The speedbrake has two small fences to be attached. These are handed so be careful not to get them on the wrong side or they will not fully fit. There is no speedbrake well so if positioning it lowered, a gaping hole will present itself. This item also has two lowered positions, Cyber-hobby providing different actuating strut lengths for this. Please also note when it comes to the main gear doors, that the inner ones are normally closed. Fit here is pretty good, though they are a teeny bit undersized. I found this to be true as well for the aft nose gear door.
Fitting the intakes and cockpit to the lower fuselage showed that the fit here is excellent. In fact, one could probably install them without need of cement. There are a pair of intakes to fit on the underside. These are handed so pay careful attention to installing these. I also painted the inside of the exhaust and compressor blades. Then the exhaust was glued to the blade assembly. Be sure that the bit with the ridge goes aft or you will never get the tail piece to fit. Once that was done, the navigator's small window was glued in place and the fuselage halves joined.
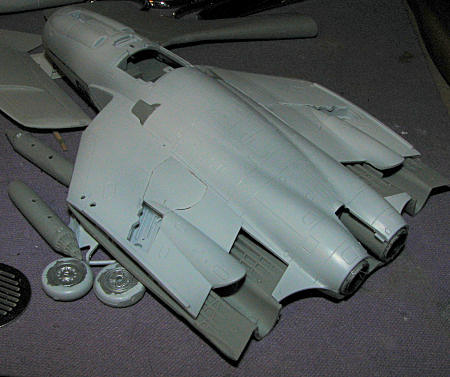 Now, I thought I would install the intake grilles after the halves were together. It will not work. I know as I thought I would test fit one before the glue dried on the halves. Good thing, too as I was able to pry the halves open and install these grilles. I also snapped the outer wing ribs into place. It would have been easier if I had done this during the joining of the fuselage halves, but it will eventually snap into place. Then the seams were attended to along with the usual sanding. One thing that I do not like about this kit is that there is nothing for the speed brake well or tail hook well. I think something should be in there as I have been around few naval aircraft that leave that open. One thing about the speed brake is that to fit it in the up position, one will need to do some carving on either the fuselage or the brake assembly. The area under the hinge is too thick and will not allow the speed brake to fit flush. I plan on building this kit with both of these items retracted.
I then glued on the tail booms. The fit is actually very good. Not perfect, but the best I have seen of a boom aircraft in a long time. I also glued in the inner flap section. There are small nubs on the underside of the wing that have to be removed before these will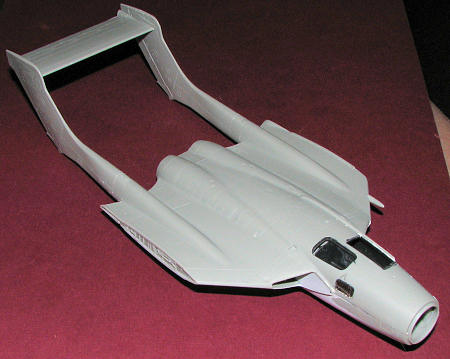 fit all the way down (or is that up). When adjusting the tail booms, I put the horizontal stab in place. I did not glue it and used it to help keep things properly aligned. I also installed the stub where the refueling probe would go. I did have to use a bit of sanding and super glue to take care of a few issues with the boom join.
Moving on, I installed the wing fold hinges on each outer wing. It is important to adjust these by test fitting before the glue has set. I found that the curved piece in the front was a bit too short to meet the small notch in the lower rib area. Next step was to mask the clear bits and install the seats. As a note, I found it quite difficult to install the bang seats after the fuselage had been closed up, so a wise modeler will do this when building up the cockpit. The upper navigator's hatch also only fits well when one inserts the outboard section first. I very much liked how the windscreen and canopy had small nubs on the bottom that fit into dimples on the upper fuselage. Made for a very positive attachment. Not great for those who want to super detail the pilot's cockpit and have the canopy open, but great for the rest of us.
| COLORS & MARKINGS |
 Any color you want as long as it is Extra Dark Sea Grey (EDSG)over white. Much masking is needed once the white has been placed down. For this I used Floquil White lacquer that is designed for lexan RC car bodies. It requires several coats to give good coverage as having this sort of paint too thick will result is spider webs as the paint dries while on the way to the model. The EDSG was from the Agama line of acrylics. This I thinned a bit too much as it also required several coats to give good coverage. It is also a matte paint so will need to be glossed up prior to decal applications. Just about all FAW.1 aircraft had a black radome so that and bits of the rocket pods were painted this shade using Testors Model Master enamels.
| FINAL CONSTRUCTION |
Once the airframe was painted and gloss coated with Future, it was time to add a few more bits prior to decals. The main gear legs were cemented in place. Note that the oleo scissors face forward. These are rather loose in the holes. The wing pylons were also attached. These are shown backwards from the way they fit. If you assemble them as shown in the instructions, they will not hang straight down.
 The nose gear and all the gear doors were then glued in place. The tail hook assembly was also constructed and will be installed after that kit is decaled.
Then it was on to the decals. I was fortunate to have the Xtradecal sheet that was produced for the MPM short run kits (X72077), and on it is a set of FAW.1 markings not included in the kit decals. But before that, I put on all of the data and warning markings as well as the insignia from the Cyber-hobby kit. Those who are somewhat familiar with the Sea Vixen know that this means a lot of decals. On the fuselage I started with the red warning decals as those would be the most involved. I was pleasantly surprised to find out that Cyber-hobby made these without any clear in between the lines where there was no writing. Means you have to be very careful sliding the large ones from the backing paper, but also reduced silvering to a minimum. I used Microsol to help them settle down. Naturally, with zillions of data decals, just putting these on the airframe took days.
Once all the data decals were on, I applied the unique markings from the Xtradecal sheet. The serials and codes are mostly single digits so one does have to be quite careful to get them properly aligned. I did discover that I should have put the under wing roundels more to the tip of the wing as the large under wing serials give little wiggle room. I also found that the blue in the tail badge is far too dark and it pretty well blends in with the black. I chose 893 Squadron during their 1963/64 cruise aboard HMS Victorious as it was a unit not covered on the Cyber-hobby sheet. After putting on the rest of the decals, I went about patching up overspray areas with a bit of brush painting.
 Next, the tail hook assembly and the wings were glued in place. The joins for the wings are not the sturdiest in the world and I used some super glue to allow the wings to dry in the proper position. The horizontal stab was also glued in place at this time. As the mounting posts for the fuel tanks are a bit shallow, I drilled them out rather than sand back the pins. I also discovered than a nose cone full of weight was not enough to prevent tail sitting, so I put 150% more weight than I had just forward of the cockpit, and that was enough. It came out to being around a half ounce of weight. I use wheel weights that come in either 1/4 or 1/2 ounce segments and cut them as needed with some side cutters. Once that was dry, a bit more touch up painting and then a coat of clear paint. The finish on these planes was glossy when freshly painted, but the gloss wore off rather quickly with use so a semi-matte is prehaps more appropriate. As a note to those wondering, when it came to the pitots, I found images of them anywhere from all grey to just the tips bare metal to most of the probe bare metal so there are plenty of options. The last thing I did was to remove the masking and that was pretty much it.
Now let me comment on a couple of items provided in the kit, but not installed. First is a pod of some sort that is shown as being attached under the right wing tip. Not only do the instructions neglect to have you drill a hole for this, but none of the images in the Warpaint book showed this elusive item. Secondly, the instructions also neglect to mention anywhere about drilling holes for the jury struts, which one would normally use with the plane parked and the wings folded. Their color (red) is also not mentioned. Fortunately, there are sufficient photos of this plane with with folded wings and no jury struts to justify leaving them off. An alternative for those of us who did not drill holes, would be to cut away the insertion pins and tack them in place with white glue. However, you will need a photo reference as the instructions are somewhat vague on placement.
| CONCLUSIONS |
 Despite the instruction omissions, this is a very nice kit. I am sure it is fatally flawed somewhere according to some expert, but to me and most everyone else, it looks great. It has a lot of options that would be rarely seen on the real thing unless undergoing a lot of maintenance, but it is nice to have these available to us. I particularly liked the option to have folding wings, something that Cyber-hobby/Dragon seem to be doing with all their new mold nautical aircraft. The kit builds well, fits well and makes for a most impressive model when one is done.
| REFERENCES |
http://en.wikipedia.org/wiki/Sea_Vixen December 2011
Thanks to www.hannants.co.uk for the decal sheet. If you would like your product reviewed fairly and fairly quickly, please contact
the editor or see other details in the Note toContributors.