Classic Airframes 1/48 Vampire FB.5
| KIT #: | 470 |
| PRICE: | $49.95 MSRP |
| DECALS: | Three options |
| REVIEWER: | Scott Van Aken |
| NOTES: | Limited run multi-media kit with resin parts |
| HISTORY |
Considered by many to be Great Britain's second successful jet aircraft, the Vampire was developed at about the same time as Gloster's Meteor. However, it varied from the Meteor in a number of ways. First, it was built mostly of wood composites, something that deHavilland was quite good at having built thousands of Mosquitos. Secondly, it was powered by just one engine, unlike the Meteor's two. 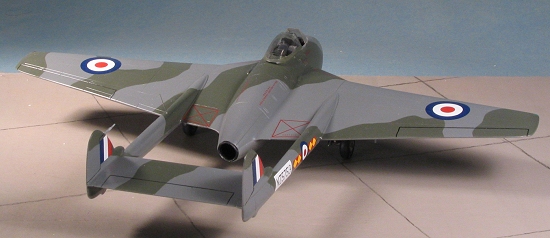 For that reason, the Vampire was a much smaller aircraft and able to get about the same performance from its single engine. Much of this was due to the need to carry less fuel, though the Vampire still ended up using drop tanks for the range of early jets was pathetic compared to its piston-powered pals.
Fortunately for the British, they chose to use the much more simply designed and less temperamental centrifugal flow engines so the incidents of engine failure were considerably less than if they'd developed an axial flow engine. The down side of centrifugal flow engines is that they are rather large in circumference and any aircraft using them will provide a greater frontal area to air flow as a result. DeHavilland got around some of this by putting the engine behind the pilot and drawing in air from wing root intakes. The result was a rather sprightly little jet that was perfect for point defense and short range missions. Though too late to see any war use, they were widely exported and many continued in military service well into the late 1970s and early 1980s. As with most British aircraft, the design was improved and stretched to perform other tasks. Most notably were the Vampire two seat versions that were used as trainers and as night fighters. Most of the Commonwealth nations used Vampires for some period of time. Despite their wooden construction, several Vampires are still flying in the US, their owners appreciating the ease of maintenance and relatively low operating costs.
| THE KIT |
I'll direct you toTom Cleaver's preview of this one to see what comes in the box.
| CONSTRUCTION |
 As with just about all kits with resin parts, I started this one by sawing off the resin blocks from most of the parts. Things like wheels and side walls I left on the blocks to make it easier to paint. One thing that folks cannot fault C.A. with is the detail on the resin. It is top quality stuff and does not suffer from any of the problems one finds with lesser resin. No broken bits, no air bubbles, no mis-formed parts and no warping. Once those bits were cleaned up, they were set aside until needed.
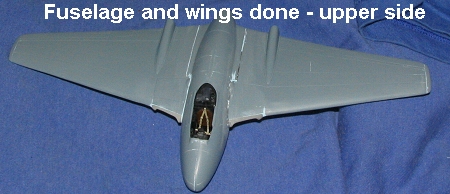
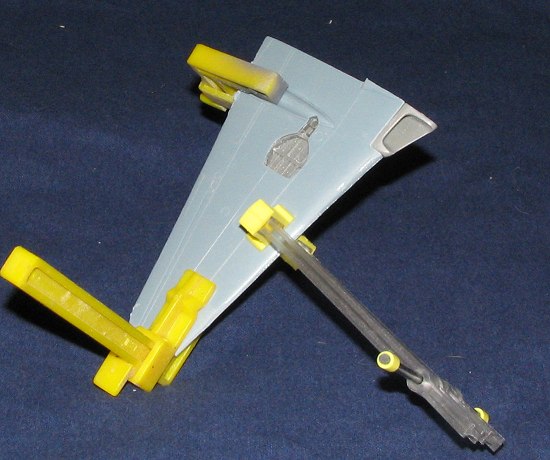 That wasn't for long as the first parts I tackled were the wings. First step was to glue the wheel wells into place. They are not keyed, but you do have to look carefully at the instructions to be sure that you have them in the right side. Check the way the area around the gear leg slot is done. I then started to glue the upper wing to the lower, after removing any ejector towers. Both of my wings were bowed so that meant that I had to clamp them in place while the cement dried. I did not have to sand at the top of the wells on this kit as there is room once the resin pour block is removed. I then installed the intakes. I used accelerator on the super glue to make sure that the intakes dried in the proper position. Then it was simply a matter of some filler to get things smoothed out.
Once the wings had dried, I sanded all the seams and applied what filler was needed. I also glued on the wing tips. The kit provides short and long tips; the shorter ones being used for this boxing. The fit was fairly good, though it seemed to me they were a tad short in length. I did have to use filler to smooth things out and was able to sand the adjoining areas to take care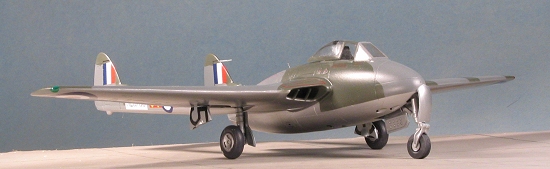 of the length deal. At this time, I test fitted the wings to the fuselage halves to make sure that they would fit well. A bit of sanding was needed on one of the inner intake sections and there will be the usual gaps to fill.
While this was going on, I glued together the tail booms and the drop tanks. The fit of the tank halves was not that great and it seemed to me that the detail did not match up from one half to another. It could well be that these parts are supposed to be done in specific pairs and I did not match up the right pairs. It is something you need to consider before cementing. I didn't and had to do some filling that may not have been necessary. In the end, I decided not to use them.
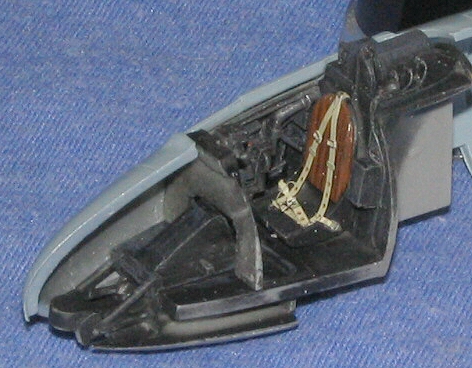 Turning to the cockpit, I glued the cockpit to the nose well/lower nose piece. I also had to glue the cross brace in the cockpit floor as it was quite loose and I didn't want to have it break. I then glued in the control stick and the seat. Test fitting this assembly into the fuselage showed a good fit. I then painted the interior and sidewalls matte black. When it was dry, I gave it a rather thick 'dry brushing' of Floquil's weathered black in order to break up all that black. This was followed by a more normal dry brushing with aluminum. I then added a bit of detail painting with yellow and red while painting the seat back with leather. The seat looks quite bare without belts, so after some inquiries about what kind of harness was used (thanks, Tom), I used a nice, pre-painted Eduard Sutton harness. I'm really not sure exactly how the thing fits and what some of the other bits on the set are for as I could not find the instructions for the set! However, the end result looks convincing enough.
 I then installed the side panels and glued the interior into the nose. I stuck a couple of weights behind the instrument panel in hopes that they'd be enough to prevent tail sitting. They probably won't! I then glued the fuselage halves together. I forgot to put in the exhaust section so after gently prying the aft fuselage (the nose section had been super glued), I wedged the exhaust in place. Yet another brain fart nearly ruins another model!
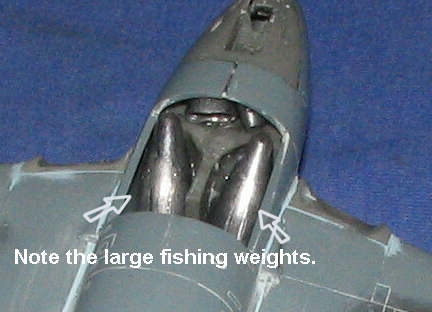 It turns out that I ended up with a rather large gap behind the lower nose section. Worried that it may be too large, I test fit the lower fuselage section and was relieved to find that there would not be a problem. I will not install this piece until after the wings and tail sections are in place. I may need to add more weight and having access to the interior will be important. (It turned out that I did have to add an additional weight )
 After the usual filler and sanding, it was time to do the most important part of the build, attaching the wings and tail section. I started with the left wing. I glued it in place and pressed it into place for a good fit. I also clamped the section at the root to help keep any filler or filing down to a minimum as the wing was a bit taller than the root. Once that was dry, I applied filler to the gaps. The largest was around the intake. This could have been due to too much sanding on my part. Then the other wing was glued in place. It was obvious that it would not be totally parallel with the other wing so I let it dry with a bit of a gap at the top and filled that gap with super glue. I hit it with accelerator to speed drying and applied the super glue in steps so that I could build up that area. Then it was also given an application of filler. To sand the wing/fuselage joins, I used some 220 grit sandpaper; a bit of overkill, but thanks to the thick plastic, It wasn't a problem and any panel lines lost were easily rescribed.
 Once that was to where it only needed a bit of additional filler (I usually seem to go through at least three applications of the stuff on limited run kits), I turned my attention to the tail section. It is probably no surprise to you that aircraft with tail booms are generally a bit more difficult to build and the Vampire, with its booms being so thin, is a bit more of a challenge than something like a P-38 in this area. Fortunately, Classic Airframes has done a pretty good job in this area. The booms are properly canted upward so that the tail plane is above the jet exhaust, something that Hobbycraft missed.
I first glued the two booms and the horizontal stab together. After they were nearly dry, I glued the booms to the holes at the back of the wings. Test fitting the booms earlier, I saw that I'd have to open up these holes a bit more than they were. I also sanded the backs of them to try to make as good a mating surface as I could. When I glued the booms in place, I was able to do a bit of tweaking with the still pliable tail planes to get it all to line up. Then I let it dry. Once dry, I applied the usual amount of filler. I was quite relieved to not have the nightmare that I was expecting with this. While it does require sanding and filler to get a good join, it isn't that bad at all. Much to my dismay. I noted that I allowed the left boom to dry at a bit of an angle so the fin tilts in a bit. It is always something with my builds!
While the filler was drying, I glued in the main and nose landing gear. This was to be sure that I had enough weight. It turned out that I didn't so I added another weight and that was enough. The lower fuselage cover was then glued in place. Fit is actually pretty good, though the rear section did give me a bit of a step that needed filled. I have to admit right here that I'd 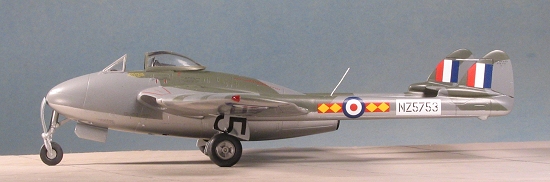 rather not have installed the main gear at this time as it will make applying the under wing serial decals more difficult. Normally, I tack the gear doors closed, apply the decals, cut the decals and then put in the gear. But I was more concerned about tail sitting than making it easy to do the decals.
The next bits attached were the little elevator balances. I drilled the holes out a bit more to provide a better seat. Then I glued on the windscreen. This was a bit narrow at the front, leaving small gaps in the forward corners. I had to trim away the fuselage sides a bit to get a good fit, and even then, I noticed that the windscreen rakes back a bit. This was enough to keep me from doing a closed canopy model. The canopy itself is thick and seems to have a minor flat area where it meets the windscreen. I guess that is normal, but the thickness of the canopy distorts its actual shape. I used white glue to fill the gaps around the windscreen, then masked it and the canopy. I also installed the small 'grilles' over the intake. This wasn't the mess that I'd feared and when comparing the finished product with photos of Vampire intakes, it seemed to be pretty close. The upper parts of these grilles do not reach the forward edge of the intake so what is given, while seeming too short, is actually about right. I filled the interior with tissue and headed for the paint shop.
| COLORS & MARKINGS |
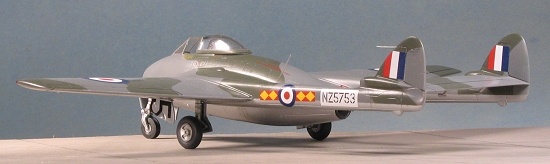
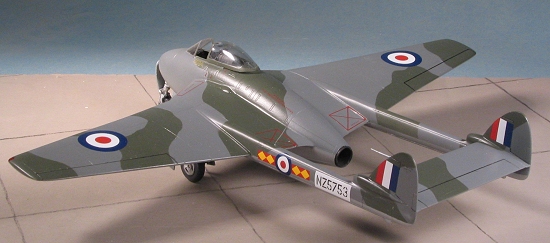
For some reason, all through construction, I thought the RNZAF aircraft was in overall high speed silver. This isn't the case as it has a silver underside and then standard Dark Sea Grey/Dark Green upper surfaces. I started by spraying the underside with Alclad II aluminum. It was then that I noticed a lot of little scratches from all the sanding and I was glad this was to be a camouflaged plane! When it had dried, I masked off the aluminum parts and sprayed the upper surface with 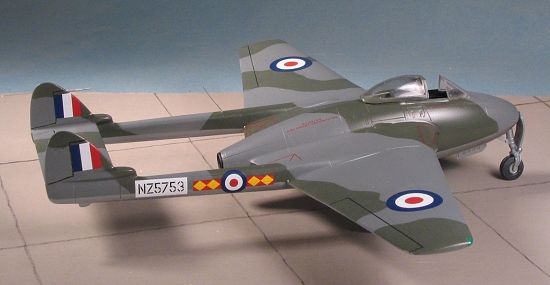 lightened Dark Sea Grey enamel from the Model Master line. That was then masked when dry and the rest of the airframe painted Dark Green, also using a Model Master enamel. I later sprayed the entire upper surface with clear gloss acrylic (Future) in preparation for the decals.
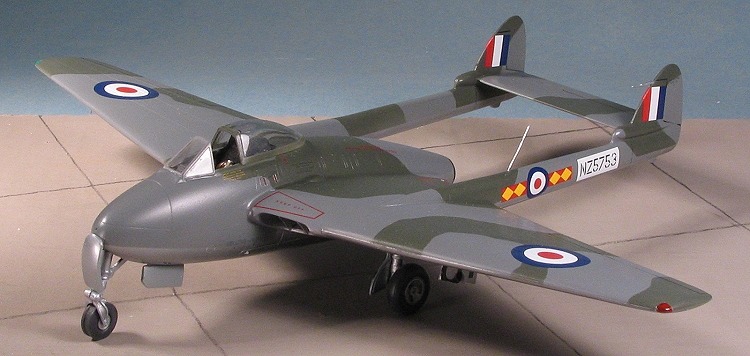
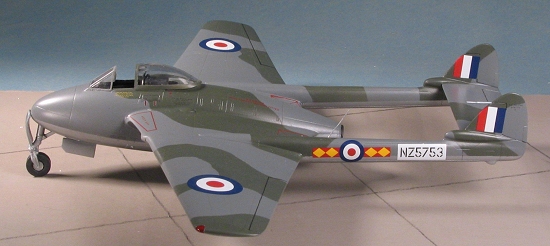
Since I had no aftermarket decals in this scale for this aircraft, I decided to use what came in the kit. Of the three options, I went for the Royal New Zealand AF version, because I liked the unit markings. Since this is a 1953 scheme prior to the use of the fern or the kiwi in the roundel, the insignia are just like what was on all Commonwealth aircraft up to that time. I started by applying all the stencils. There is a rather complete stencil suite provided and while it may well be that these planes didn't have them, I wanted to use them anyway.
When those had dried, I applied the insignia. It may be just me, but I found that the tail stripes were not as tall as shown in the instructions and so there are gaps at the top and bottom in comparison to those. I also thought that the boom roundels were a bit big when compared to the drawing. Unique markings are not all that extensive. The unit markings that go on either side 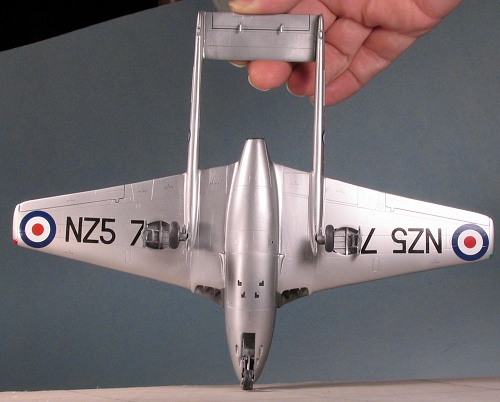 of the boom roundels are tied together by clear film and when placed over the roundel seemed too close together. Simply cutting the clear 'bridge' between them allowed me to properly place them. I also put on the serial in its white surround. After these were all on, when comparing the boom markings to what is shown in the instructions still leaves the impression that these markings are too large.
The under wing serials also caused a bit of head scratching. As you recall, I normally put the gear in the wells, apply the decals and then cut them after they have dried. This option was not available because I already glued in the main gear. What I did was to apply those markings that would go on the wing proper first. I then taped together the two gear doors and applied the last two number of the serial. When those dried, I cut off the bit of serial that stuck proud of the gear doors and attached them to the outside of the wheel well. It worked fairly well though not a perfect fit. I used the Superscale decal solvents on these and it worked perfectly. Once the decals were cleaned of all excess glues and solvents, I then sprayed it with a 50/50 mix of my 'flat future' with regular Future to get a semi-gloss finish.
| FINAL CONSTRUCTION |
With all the paint and decals on, it was time to add what little was left. Starting at the back, I contemplated replacing the pitot tube with stainless tubing, but wanting to finish this kit OOB, I drilled a notch in the fin and glued the kit part in place. It really is a tad too large. Next, I had the landing gear to deal with. First step was to glue the wheels in place. I had already drilled out the main wheels and sanded back the axles to nubs so t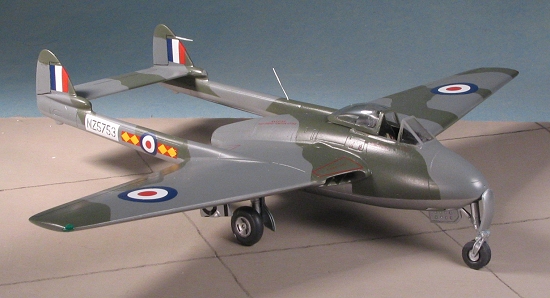 hey'd fit. These were cemented with superglue. Then the nose wheel. To be frank, it is a tad too large and had I not been a bit too enthusiastic about sanding the sprue gate area, I would have had to sand a section down anyway to fit where the forks meet. The other half of the nose gear fork is not a really great fit an were it not that the nose gear door covers that up a bit, it would have taken a bit of effort to get rid of the seam. I'm not really sure I got the front gear door on in the right place or not. It would have been helpful to have a diagram to assist.
Back at the main gear, I butt glued the outer doors in place and slid in the door retraction struts. Be careful not to get these on the wrong side. The inner doors were simply glued to the struts. The nose gear doors were glued in place and I checked to see if it sat on the nose gear. Barely, as pressing down on the rear more than about a half inch caused tail sitting!
I then glued in the armor plating behind the seat. Not sure if these were actually installed or not, but the kit provided it. What else was provided by the kit that I did not use were the drop tanks. Sorry folks, but to me, 90% of all aircraft carrying these things look better without them and the Vampire is one of them. I tacked the canopy in place with white glue. I then drilled out a hole in the left boom and inserted section of wire for the radio antenna. Then I painted the wing tip lights and was done.
| CONCLUSIONS |
I decided to build this kit as I'd read several reviews that were conflicting. I've done a lot of limited run kits and have found C.A. kits to be challenging at times, but never really horrible builds. This one had its areas that needed some work, but really, nothing beyond the skills of those who have done a few of these kits. I also found that straight from the box, you can have a very nice Vampire.
 When comparing this one with the Hobbycraft kit, it became apparent that the Hobbycraft kit was really off in a number of important areas. The HC kit has really skinny booms, tail fins that are way too small, a rear fuselage that doesn't protrude anywhere near far enough from behind the wings, wings that are way too broad at the root, and intakes that don't really come close to prototypical. This wasn't the case with the CA kit from what I could see. The CA kit has a vastly superior interior and wheel wells as well as properly shaped nose gear doors. Really, the only advantage that Hobbycraft has is that it is a simpler build and can be bought for less money.
I wasn't going to editorialize, but thought it might not be a bad idea. I know that there are folks out there who have pointed out errors in this kit's intakes, fuselage length and canopy. OK, fine. I don't doubt their research and findings. However, I think that by looking at minutiae, the big picture is missed. We have a good 1/48 Vampire and the promise of more to come. The vast majority of builders do not care that the intakes openings are a bit too deep or the fuselage a bit short. If they want to fix that, they can as I'm sure the aftermarket folks are working on that right now. I can think of a LOT of other kits that cost a hell of a lot more than this one that have major faults. Still they are being bought and built and the modelers who have them are happy with the results. Same goes with this one. Even knowing the glitches and the amount of additional work required, will I build another? Darn straight! It builds into a fine representation of a Vampire and I know that you'll be pleased with the results as I am. I'm looking forward to the trainer, the FB.9 and the night fighters. This is a kit that I can recommend if you have the skills to do these types of kits.
March 2005
#1355 in a series
Copyright ModelingMadness.com. All rights reserved.
If you would like your product reviewed fairly and fairly quickly, please contact the editor or see other details in the Note to Contributors.