| KIT: | Matchbox 1/72 F-86A Sabre |
| KIT #: | PK 32 |
| PRICE: | $2.98 when new way back when |
| DECALS: | Two options |
| REVIEWER: | Scott Van Aken |
| NOTES: |
| HISTORY |
 The first really world-class
jet fighter developed by the US was the F-86 Sabre. Now I know a lot of
folks will comment that the F-80 was the first good US jet fighter, and
while that is true, it was really not that much better than what the
British or even the Germans had developed. In fact, in terms of overall
performance, the Me-262 was just as good if not better in many performance
categories. It was the development of swept wings that made the F-86 such a
capable aircraft.
The first really world-class
jet fighter developed by the US was the F-86 Sabre. Now I know a lot of
folks will comment that the F-80 was the first good US jet fighter, and
while that is true, it was really not that much better than what the
British or even the Germans had developed. In fact, in terms of overall
performance, the Me-262 was just as good if not better in many performance
categories. It was the development of swept wings that made the F-86 such a
capable aircraft.
Needless to say, the type went on to be quite successful, both with US and foreign air forces with some of the later variants hanging on until the 1980s in foreign air forces before finally being retired from service. Even today it is not unusual to see an F-86 at various air shows as jet war birds are becoming more and more common.
| THE KIT |
Matchbox kits were
basically designed to be consumers of kid's pocket money at the green
grocer or other store where the proprietor had a small selection of model
kits. They were available in regular hobby shops as well, but in the late
1960s and early 1970s, it was just as likely that you'd find these in all
sorts of places. As a result, the folks at matchbox molded them in a
variety of colors with the least e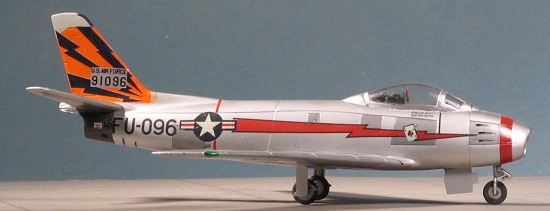 xpensive
in two shades and the more expensive ones in up to four different colors.
Not that it mattered to the more serious builder, but it was something that
helped to sell the kit to youngsters.
xpensive
in two shades and the more expensive ones in up to four different colors.
Not that it mattered to the more serious builder, but it was something that
helped to sell the kit to youngsters.
Not only that, but the kit is simple in terms of detailing and quite easy to construct. This is especially true of the least expensive kits. Matchbox has been accused of hiring a trench-man for its panel lines as they are quite large. However, this fits in just fine with the nature of the kits. According to my build log (yes, I keep a log) this particular kit was built back in 1994; probably because I wanted an A model Sabre and Matchbox are still the only folks who do one. The kit offers no options aside from the ability to build the speed brakes open or closed and to do the same for the landing gear. At least, I don't recall any drop tanks or I'd have included them as Sabres were rarely seen without them. One decal sheet was included with markings for a Korean war aircraft and an Arizona ANG plane with a large snake on the side of the fuselage. Decals were a bit thick, but otherwise not bad.
| CONSTRUCTION |
It
is difficult to go into any real detail when building kits like this. I did
zilch to it in terms of adding extra bits to it though it really does
scream for something in the cockpit. The cockpit consists of a tub and a
generic seat along with an instrument panel. There is a radio to fit behind
the seat just so things look a bit busy back there. All was painted black
with the seat in 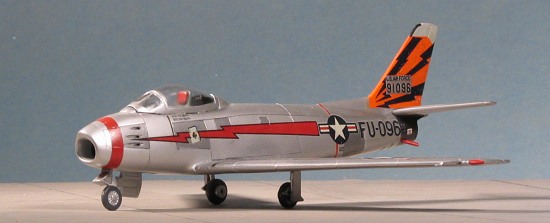 dark grey with a red headrest. The instruments were filled
with white paint and the whole thing drybrushed. Little can be seen through
the thick canopy anyway.
dark grey with a red headrest. The instruments were filled
with white paint and the whole thing drybrushed. Little can be seen through
the thick canopy anyway.
I added some weight to the nose, stuck in the exhaust section, and glued the fuselage halves together. The nose section, which looks more like the one on an F-86 than that provided by Hasegawa but is a bit flat, glued on with no problems. I first glued a piece of card to the back of the intake to prevent see-through. The wings are an upper and lower half and fit into slots on the lower fuselage. The underside of the flaps, ailerons and wing tips are molded with the upper wing. The wheel wells have no detail at all, but are enclosed. I did have to use filler for most of the join areas. The fit is OK for kids, but I just couldn't handle the gaps so filled and sanded. The thick canopy fits OK, but really isn't exactly like an A canopy, though it tries. For one thing, the very aft part of the canopy is molded with the fuselage, the front just isn't the right shape with the V windscreen that the A model had. I masked it and then glued the speed brakes in the closed position. No F-86 kit on the marked properly represents the way these items look when open right from the box. Not sure why this is always missed, but it is. The tailplanes were glued in and it was time to paint.
| COLORS & MARKINGS |
At
this time of my life, I was using Testors Metallizer paints for my metallic
finishes. This paint has the plus in that it is easy to apply. The minus is
that it rubs off on your hands easily and is not easy to mask. But first, I
had some solid colors to use.
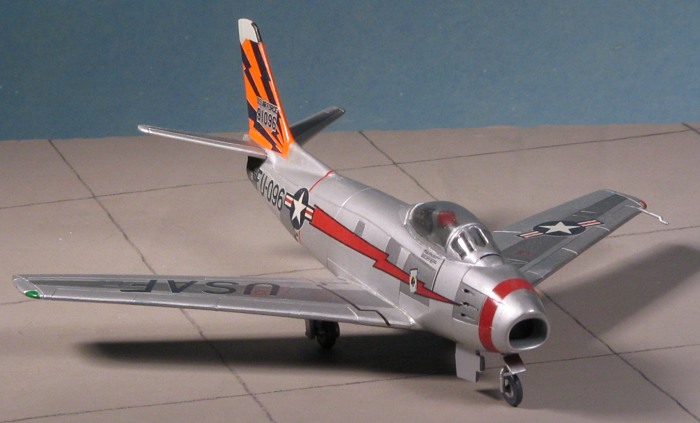
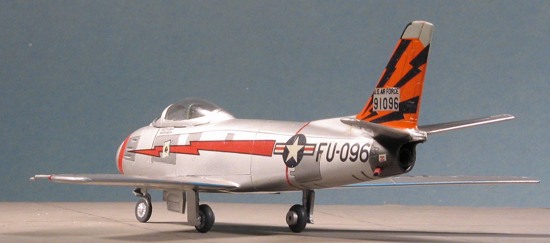
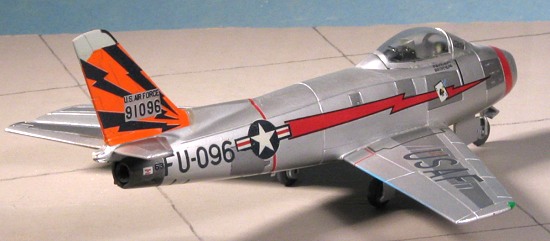 The nose and the fin were painted white.
After they dried, the nose got some insignia red while the fin got some
Gunze orange acrylic. They were then masked off. For the metallics, I
painted the entire aircraft with Aluminum, then gave it a clear coat. Next
I used a darker metallic to paint in the various areas masked off so that
there wouldn't be a solid color. Finally the exhaust was painted in Burnt
Iron. I went back and painted the back of the intake flat black and the
fuel dump tube with red.
The nose and the fin were painted white.
After they dried, the nose got some insignia red while the fin got some
Gunze orange acrylic. They were then masked off. For the metallics, I
painted the entire aircraft with Aluminum, then gave it a clear coat. Next
I used a darker metallic to paint in the various areas masked off so that
there wouldn't be a solid color. Finally the exhaust was painted in Burnt
Iron. I went back and painted the back of the intake flat black and the
fuel dump tube with red.
For decals I used what was on Modeldecal sheet # 22 which had markings for the 116 FIS, Washington ANG on it. These are really nice markings with black lightning bolts on an orange tail and a long red one on the fuselage. Add to it the red nose band and you have a nice scheme. The Modeldecal decals went on with minimal fuss. These decals are a tad thicker than decals today and are also not quite as crisply done when it comes to detail bits as can be done today. Still, they are well done and fit with no hassles, conforming well when dosed with Solvaset. The sheet came with stencils and insignia so no Matchbox decals were harmed while doing this kit!
| FINAL BITS |
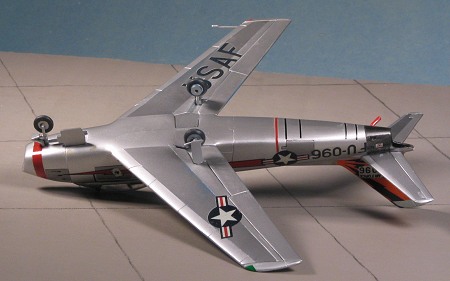 The last things to do were
to add on the landing gear bits. The inner main gear doors were glued
closed (as is the norm for these planes). Both the main and nose gears lack
a certain amount of finesse, but for the kit, it is fine. The main gear in
particular is not very strong with the gear doors actually being the same
thickness and providing much of the support once glued in place. Same can
be said for the nose gear. Somewhat weak landing gear is a bit of a
trademark for some Matchbox kits, unfortunately. The wheels are somewhat
simplified, but again, are adequate for the kit. These were painted and
glued in place. Once the masking the taken off the canopy, the kit was
done.
The last things to do were
to add on the landing gear bits. The inner main gear doors were glued
closed (as is the norm for these planes). Both the main and nose gears lack
a certain amount of finesse, but for the kit, it is fine. The main gear in
particular is not very strong with the gear doors actually being the same
thickness and providing much of the support once glued in place. Same can
be said for the nose gear. Somewhat weak landing gear is a bit of a
trademark for some Matchbox kits, unfortunately. The wheels are somewhat
simplified, but again, are adequate for the kit. These were painted and
glued in place. Once the masking the taken off the canopy, the kit was
done.
| CONCLUSIONS |
Most of you reading this will probably never build this kit. It really has little to offer, especially if fidelity to detail is one of your requirements. However, for kids, that is another story. They are not that concerned about the accuracy of the kit and are more concerned with having an F-86 to play with than anything else. For them, it is just fine and after they break off the landing gear, they'll have lots of fun attacking the dog or anything else that happens to look like a proper target!
Kit courtesy of me and easily found at swap meets.
July 2005
If you would like your product reviewed fairly and quickly by a site that has around 300,000 visitors a month, please contact me or see other details in the Note to Contributors.