| KIT #: | 83207 |
| PRICE: | $86.99 SRP |
| DECALS: | Two options |
| REVIEWER: | Scott Van Aken |
| NOTES: | New tool kit |
| HISTORY |
The Thunderjet had a distinguished record during the Korean War. Although the F-84B and F-84C could not be deployed because their J35 engines had a service life of only 40 hours, the F-84D and F-84E entered combat with 27th Fighter Escort Group on 7 December 1950. The aircraft were initially tasked with escorting the B-29 Superfortress bombers. The first Thunderjet air-to-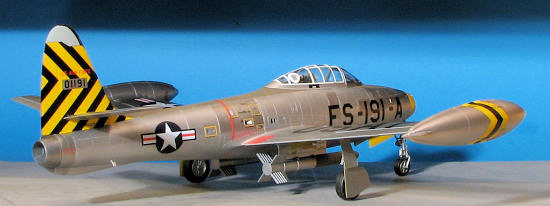 air victory was scored on 21 January 1951 at the cost of two F-84s.The F-84 was a generation behind the swept-wing Soviet Mikoyan-Gurevich MiG-15 and outmatched, especially when the MiGs were flown by Soviet pilots, and the MiG counter-air mission was soon given to the F-86 Sabre. Like its famous predecessor, the P-47, the F-84 switched to the low-level interdiction role at which it excelled.
The F-84 flew a total of 86,408 missions, dropping 55,586 tons (50,427 metric tons) of bombs and 6,129 tons (5,560 metric tons) of napalm. The USAF claimed F-84s were responsible for 60% of all ground targets destroyed in the war. Notable F-84 operations included the 1952 attack on the Sui-ho Dam. During the war, the F-84 became the first USAF fighter to utilize aerial refueling. In aerial combat, F-84 pilots were credited with eight MiG-15 kills against a Soviet-claimed loss of 64 aircraft. The total losses were 335 F-84D, E and G models.
| THE KIT |
It was very nice to see this one arrive at the door the other day. I've not much of penchant for 1/32 kits as do some other folks, but I really enjoyed the F-80C produced by Czech Model and since this one is also a Korean War veteran, it has piqued my construction juices quite a bit.
So let us take a look at what Hobby Boss has provided. Well first of all, the box is jammed full of sprues. One of those situations where one has to think about where it all goes when putting it all back in the box. It continues something I really like about Hobby Boss kits. These folks not only wrap up things that might get damaged in shipment with foam wrap, but they pack no more than  two sprues per bag (and usually only if they are duplicates of the same sprue) and they have a section off to the side of the box for added protection. In this case, the clear bits, rubber tires and the metal landing gear bits. Yup, metal bits in this one and items that are quite appropriate for a 1/32 kit. There is even what appears to be a large nose weight included in the metal parts, something I appreciate.
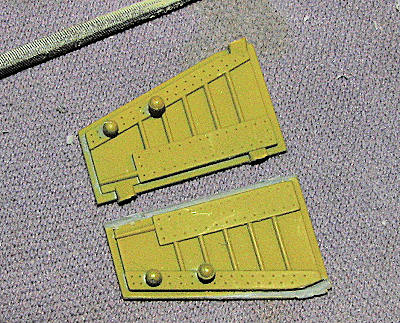
Now the F-84 is not a complex jet. At least not like the ones today and so the fiddly bits can be kept to a minimum. I like that there are no photo etch parts so I don't have to obsess over getting those installed. Well, I would have liked a set of belts for the seat, but I'm sure there are or will be plenty of those available. One is struck by the sheer number of weapons that are part and parcel of the kit. Seven different bomb types are included of which I'm sure some are supposed to be napalm and at least one other an incendiary. You also get four rockets per wing, mounted in the stacked configuration. Thankfully Hobby Boss allows the modeler to open up the holes for the rocket rails though the ones for the inner pylons are open already. Other things to attach are JATO units, Tiny Tim missiles, and a pair of drop tanks. While under the plane, I should note that the speed brake is the perforated type and there are what appear to be four fuel dump nozzles near the end of the tail pipe.
In the front, you get a very nicely done bang seat (actually two of them; one early and one later) and a well detailed cockpit in which to put it. In addition to raised detail on the side consoles and instrument panel, an instrument panel decal is included, which I'm sure most will use. The kit has you paint the interior with 'field green' and the wells with 'interior green'. I'm thinking yellow chromate for the wells. You also get a full nose gun bay as the bay cover is separate (though I did not see any hinge mechanism). The large weight I mentioned will attach to the underside of the gun bay. The nose gear well sections and the intake wall section will then fit to the underside of the gun bays. The kit does not have a full engine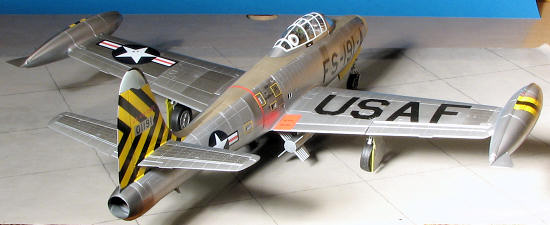 but does have a full tail pipe which is attached to a large compressor face (as if we'd be able to see it via the intake).
| CONSTRUCTION |
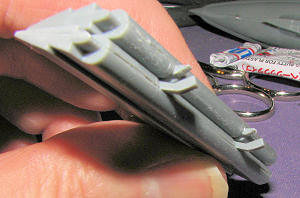
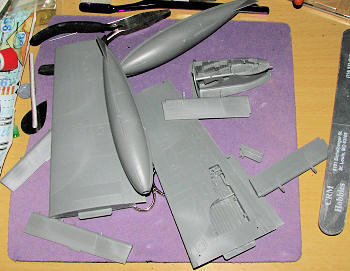 Sticking with my old ways, the first thing I did was to look for sub assemblies. As I removed sprues from their polybags, I clipped what was a viable subassembly, cemented it together and then moved to the next polybag. In this way, I tackled the wing tip tanks, nose gear well, ailerons, flaps, horizontal stabilizers and some others. What I like is that, for the most part, the sprue attachment points are on a flat portion of the part so one simply sands them away. Of course, this led me to do a bit of oversanding on just about every part so the requisite filler was needed. For the most part, I used super glue for filler as it won't shrink.
 Initial painting consisted of the inside of the tail pipe with Alclad II and the gear wells and gear door insides with chromate yellow using the small Testors bottle paint. I also cut the attachment tabs on the flaps so I could glue them in the up position and still have some remnants of an alignment tab. Probably could have removed them entirely if I wished. Just to show that one can get ahead of one's self. I carefully glued the wings closed then realized I'd forgotten to glue in the wheel wells! Fortunately, Tamiya glue is not quick setting and I was able to open them up again without any issues.
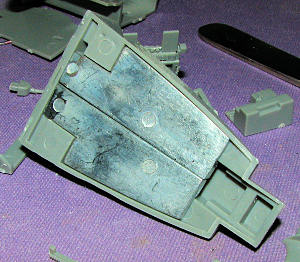 The wheel wells were installed and the wings then closed. Flaps were glued in place in the up position. While this was drying, I started assembling the two bang seats. As I've not decided which markings option to use, I figured I might as well build up both seats. During this process, I learned that the later seat was not used in the F-84E so that made things considerably easier. The gun bay had most of the parts installed, mostly for weight and because a small nose weight goes into the ammunition containers. Under this part are a pair of considerably larger weights and they were glued in place.
More construction in terms of wings with the tip tanks glued in place. I found that the fit wasn't as tight as I'd like so after a bit of sanding and attachment I filled the seam on the underside of the wing/tank join with super glue. The upper seam was fine. The cockpit was also built up and p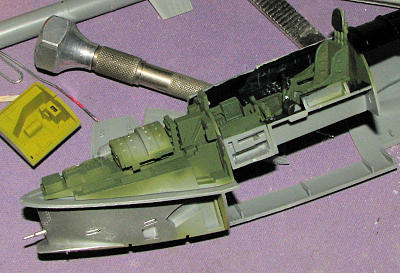 ainted. I used FS 34102 Medium Green for the cockpit interior and it seemed properly dark. The sidewalls and console tops were painted black as was the rear section that fits under the canopy. The gunsight area was built up and, minus the reflector, was painted black. It was later picked out in silver and dry brushed before the windscreen was attached, but that was much later.
Next, the nose gear well was assembled and, like the main gear and speed brake well, was painted chromate yellow. I also painted the inside of the gear doors with this color. Then the seat was installed (it is a VERY tight fit and required a bit of sanding on the arms to get it to fit), and the cockpit assembly was glued to the rear canopy blanking section. This was test fit into a fuselage half while drying to get the angles right. I next glued in the nose gear well after painting the exterior intake parts withy aluminum. Finally, the gun and accessory section was cemented in place. For those wondering, I did eventually break off the tip of the pitot tube! The speedbrake well was cemented in place and the fuselage halves taped together to allow these parts to dry.
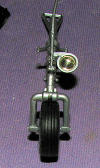 Meanwhile, I cleaned up, painted, assembled and repainted the main and nose gear assemblies and the wheel hubs. The hubs are 'supposed' to glue to each other, but I found that to be very difficult, even when clamping the wheel halves. I ended up gluing the hub sections to the tire itself and hoped that this would hold. We will see. On the nose leg, there is a large light. This was drilled out a bit and an L 180 MV Products lens was installed. Looks a ton better than what I could do with the kit parts. I use these sorts of things all the time as they are superior to any other method I've tried, including using epoxy.
 More work was required with some of the gear doors. The parts are molded in that the sprue gates intrude on the lip of the door. There is no easy way to fix this other than to sand or file them off. I start with a low speed motor tool and grind away most of it. Then, using a square miniature file, I sand away at the rest. It isn't hard and is worth the extra time. A full set of 'made in China' miniature files can be found in many places for well under $10. Highly recommended. I then installed the tail pipe and cemented the fuselage halves together. When dry, the seam was filled and sanded down with any lost detail being replaced. The nose cone was next to be installed. It fits fairly well, but I fou
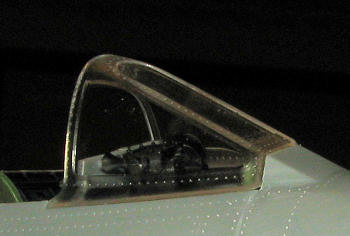 nd that it wasn't perfect so used sanding sticks to get it to match the surrounding fuselage. Then, the gun bay panel was glued down as were the two side panels. Fit here is fair, so don't put away those sanding sticks. The gunsight area was then cemented in place. Once all was dry, I test fit the cockpit windscreen. This is pretty close but not perfect as you can see. More attention is needed to get it to fit as flush as possible.
| COLORS & MARKINGS |
I guess now is as good a time as any to go into painting. I decided to use Alclad II metallics on this one. I painted all of the major assemblies separately using the Dark Aluminum as the base coat. This seems to provide a better coat than the lighter shade when painted on bare plastic. During this I had several minor disasters, such as picking up a part before it was dry and leaving a big thumb print or having something get stuck in my airbrush and when it released, out came a huge splooge of lacquer paint. Frustrating, but nothing that sanding and repainting couldn't fix.
Not only did I paint the major airframe parts separately, but I also decaled some of them prior to full assembly. By this, I mean the wings more than anything else. Seemed to be easier than twirling around a large model while doing all this. Good thing, too as the decals are ultra thin. The big USAF on the upper wing gave me fits as it was constantly folding in on itself. Took the better part of 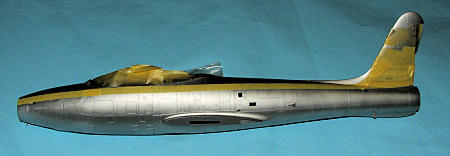 15 minutes to finally get it in place and the decal was scratched in the process. I recommend cutting the letters out separately and installing them that way. I'll be doing that to the other large, black markings. The color decals didn't seem to have this issue and it is probably due to the additional layers of ink.
Other painting done at this time was the olive drab upper fuselage section and the light aircraft grey fin tip. Much masking was needed for this to keep overspray from being an issue. After this image was taken, there was a considerable amount of additional masking done. Spray paint will get anywhere that isn't covered. I should also comment on how well the decals snuggled down. The ones I used on the nose gear doors look like they were painted on.
| FINAL CONSTRUCTION |
Couple of notes here for those still reading. First off, when one installs the flaps up, be sure these are as far out on the wing as you can get them. If not, you'll have to do as did I and sand at the parts that fit next to the fuselage to keep from having a big gap. Second, I really did find that attaching the wings at the end was the best way to handle a model of this size. Much easier to maneuver around when adding the final bits when one isn't constantly knocking the wings into things. I know that all kits don't allow this, but this one does.
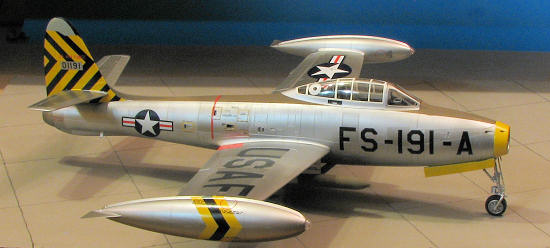
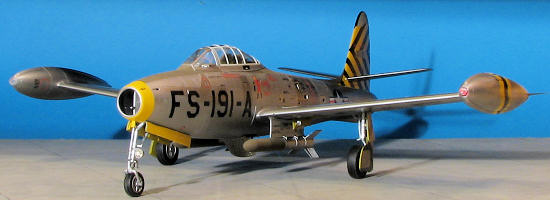 Moving on, the lower wing pylons were assembled and I chose a pair of Tiny Tim rockets for the load-out. These are really huge and Hobby Boss did not represent the nozzles on these. There should be 24 of them with 8 on the inside and 16 on the outside, all arranged in a ring. Naturally, I did not drill all these out. It was tough to find period color photos of these so I just painted them aluminum on the back and OD on the front.
The canopy was masked and painted white to represent the hold down straps. Then the white was masked and rest painted aluminum. Hobby Boss missed a seam line on the front of the canopy. The white straps do not go all the way to the front in the photos I've seen so you need to make that demarcation yourself. The canopy vent has what looks like a metallic near center so I duplicated that. It could be clear, but I've not seen a close up of this area to verify that. The ARN-6 antenna and other bits that move with the canopy were painted, drybrushed and glued in place using clear gloss paint.
 I continued with the painting and masked off several sections of the fuselage to get the dark aluminum treatment. As a note, I even painted the rudder and the fin with different shades, but later realized that the decals will cover these areas completely. Lesson on thinking ahead, I'd say. Then I started applying fuselage decals. Started with the yellow nose band and while it was quite an experience to get it in place, it fit well. The yellow isn't as opaque as I'd hoped and where it overlaps, it is a more intense shade. Still, with care and cutting of the large markings, things went on.
I did all this quite slowly, generally waiting for a marking to be completely dry before applying another. I know that some folks will go through this stage in a few days, but I've had too many glitches to not go with caution. Another note on the decals is that the largish one for the variety of vents and panels on the right fuselage side did not match the panels as printed. You will need to cut it to get proper alignment. This wasn't an issue with the left side. The two-piece fin decals fit very well though could have been a bit larger in length as there wasn't enough to keep from having bare metal show through at the very front or very rear. You could overlap on one end, but not the other.
When I went to install the anti-sway braces on the pylons, I discovered that they were molded for the largest in diameter bombs on the sprue. Anything smaller had the little hold downs grossly far from the weapon. As I was using smaller diameter Tiny Tim rockets, it just looked silly so to get them a bit closer, I installed these upside down, trimming off the little flat discs. I had to open up the wing mounting holes a tad to get the pylon pins to fit flush.
Finally, all the markings were in place and it was time to start attaching big pieces. First I made a new pitot tube for the nose. Then 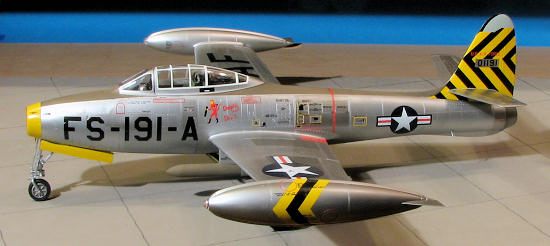 the gunsight and windscreen were cemented in place using clear paint. It seems that the canopy is not designed to be displayed open so I'll be cementing that shut. Thankfully, you can easily see inside.
The tail planes went on with no fuss and same for the wings. These were attached with small bits of super glue in case I had to break the join to level things out. Nose gear is a VERY fiddly construct and pretty wiggly as well. Perhaps this would be a good place to use that metal you are given. Main gear simply slotted into place.
Once that was dry and sturdy, the gear doors were attached. BTW, you can simply press on the main wheels as they are quite tight. Finally, the pylons and the rockets were glued in place along with the under-fuselage insert and the kit was done. In well under three weeks, which for me is really fast.
| CONCLUSIONS |
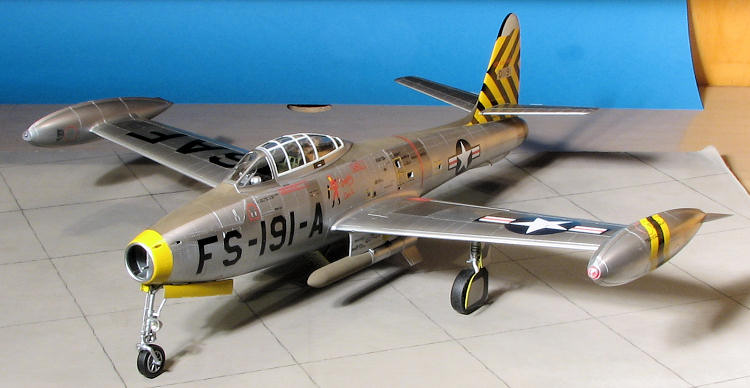
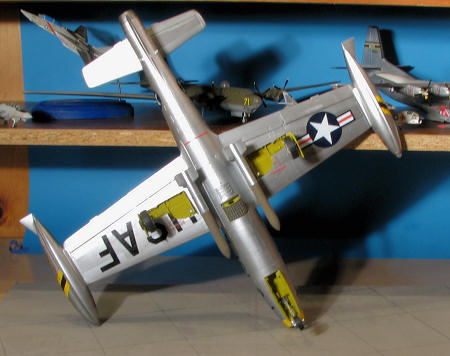
 Despite the small glitches, this is a very nice kit. The fit is actually quite good, the decals are as thin as you could ever want, it comes with more weapons than used in an Alpha Strike, and the metal gear really is a bonus. I say the latter as when done, the model is a bit on the 'wiggly' side with the plastic gear and the metal landing gear should help alleviate that. I think there should be a proper canopy open option and with the G model, you'll apparently finally get the proper E speed brake. The nose wheel is really too wide and though it looks nice, I think many would prefer plastic or resin wheels. Several companies have stepped up to offer more accurate cockpits and probably other resin bits you didn't know you needed. I've already seen several aftermarket decals which will really help to sell this one as it was heavily used by NATO and some other nations.
In all, a most worthwhile kit and if you can see your way to picking one up, you'll not be disappointed.
| REFERENCES |
http://en.wikipedia.org/wiki/F-84_Thunderjet July 2011
Copyright ModelingMadness.com. All rights reserved. No reproduction in
part or in whole without express permission.
If you would like your product reviewed fairly and fairly quickly, please contact the editor or see other details in the