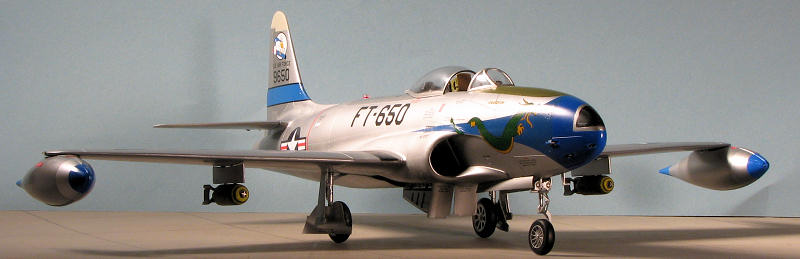
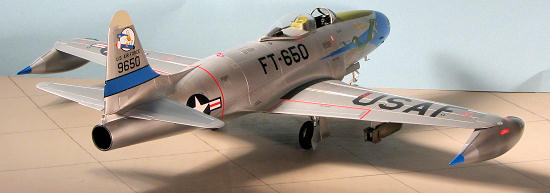
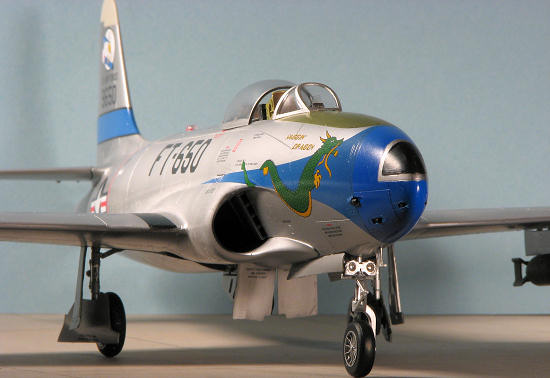
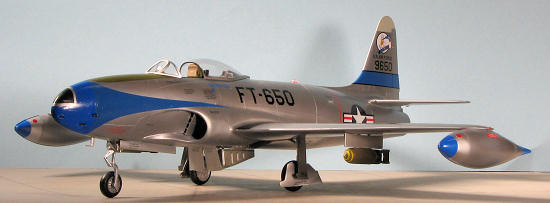
CzechModel 1/32 F-80C Shooting Star
| KIT #: | 3202 |
| PRICE: | $79.95 MSRP |
| DECALS: | Three options |
| REVIEWER: | Scott Van Aken |
| NOTES: | Includes resin and photo etched parts |
| HISTORY |
America's first truly operational jet fighter, Shooting Stars first saw combat service in the Korean War, employing both the F-80C variant and RF-80 photo-recon variants. The first jet-versus-jet aircraft battle took place on 8 November 1950 in which Lieutenant 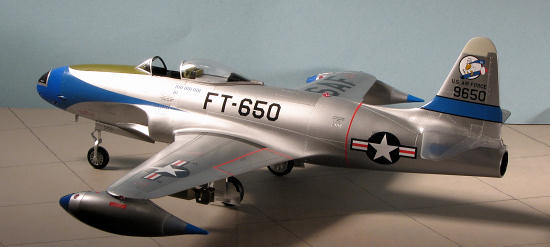 Russell J. Brown, flying an F-80, claimed a MiG-15 shot down. Despite the initial claim of success, the straight-wing F-80s were inferior in performance to the MiGs and were soon replaced in the air superiority role by the swept-wing F-86 Sabre. When sufficient Sabres were in operation, the Shooting Star was assigned to ground attack missions, advanced flight training duties and air defense in Japan. By the end of hostilities the only F-80s still flying in Korea were photo-recon variants.
Post war, the type did fly in several ANG units, though were soon replaced by the more capable Sabres. F-80s were also sold to several South American countries including Brazil, Chile, Colombia, Ecuador, Peru and Uruguay. Of course, the type was developed in to the T-33 jet trainer, an aircraft that was not only slightly faster, but served in some military air arms right up until the 21st century.
| THE KIT |
Allow me to weasel out of just adding another four paragraphs to this section by directing you tothe preview.
| CONSTRUCTION |
I started this build by looking for subassemblies. There are quite a few and so I chose the tail planes, bombs and wing tip tanks as my first go. Fit on all is fairly good. I caution the builder that this is still a short run kit. Every part needs to have its mating surfaces sanded to get rid of any ridges and give a good join. I found the drop tanks had the sprue gates molded into the mating surfaces so those have to be cleaned up. I'd also recommend removing the alignment pins. I did not on the first one and found they threw the alignment off a bit.
 I added some filler to the joins and set them aside to dry. Meanwhile, I painted as many of the parts one the sprue as I could using Interior Green, Black and Aluminum. I know that I'll have to sand or scrape on some of these (ok, ALL of these) parts, but at least it helps make the seams easier to see. When I painted the outside of the gear doors with aluminum, it showed a few that needed filler from sink areas.
I next assembled the already painted nose gear well and intake assembly. The intakes were not a great fit due as much to how the inner section is designed, but using tape to hold things in place while all dries will be a huge help. I noted how the landing gear attachment was done and could see that if one didn't install the nose gear leg when building the nose gear well, it would require some cutting later on. And it did.
With that done, I assembled the tail pipe, prepainting it with Alclad II 'Jet Exhaust. This was as much to give the plastic something on which other paint could stick as it would be painted again later. Then it was glued into place onto one fuselage half. I noticed that the very bottom would not totally close, even after trimming on the attachment area.
Next, I went to work on the cockpit. This was a pretty easy build as things go. The instructions are very good about the placement of all the various bits. I used clear gloss paint to hold on the etched instrument panel and backing. Rest of the parts fit well except for two 'L' shaped resin parts. I couldn't for the life of me figure what they were or how they fit in there so I guessed. Turns out I guessed wrong as later Squadron sent a link to a build video that showed these were cockpit lights and cable (whoda thunk it?) and I glued them in upside down. Oh well. The seat was then removed from the pour stub and the lower section glued on. This was all painted chromate green then had details picked out as per the kit instructions. The seat was set aside until near the end of  the build where it would be then installed. I also glued on the gun sight at this time. Trimming was needed on the instrument panel to get it to fit and I left of the clear part, again, until near the end of the build.
So, I now had a cockpit and that was glued into one fuselage half along with the nose gear well. I had taped the halves together to allow all this to dry and to properly position the cockpit from the underside. There is a large opening where the wing goes and this provided space to properly position things while the glue set.
While that was drying, I assembled the wings, making sure I opened up the holes wide enough for the wing tanks and pylons to fit. If you don't do this, it will be more difficult to do later as the hole openings provided are a bit too small. Though I didn't do this, I'd recommend test fitting the main gear to the gear wells before gluing the wells in place. I found I needed to use a #34 drill bit to open them up enough to get the main gear to fit. There was the usual round of filler along the joins. This was typical of just about every exterior part to some extent or another. The horizontal stabs were also glued together and cleaned up.
Then I taped the wings and tail planes to the fuselage in order to see how much nose weight I'd require. I taped led on the nose section and found it required more than I'd originally thought. Fortunately, there is a lot of room in there for this weight. That was glued in with super glue and then the fuselage halves were glued together. Fit is fairly good and doing it in stages simplified things. The biggest gap was where I'd earlier found it, under the exhaust, so that got some superglue to help fill the gap.
Once the wings were cleaned up, they were glued in. Fit here was actually quite good, though not perfect. The biggest gap was at the front underside, but nothing horrendous. I found that the lower aft wing panel lines didn't match up with the fuselage lines at that locale, but since I was going to be sanding and filling there anyway, it didn't really matter.
 With the wing in place, it was time for the exterior intake sections. I'd been warned that these would not fit well and the warning was spot on. Now, the lower section should stand proud of the fuselage. Every photo you see will show this. The upper piece should be pretty well flush. To get things to where they don't stand too proud and fit flush where they should, you'll need to do quite a bit of sanding and test fitting. I sanded on both the intake piece and the fuselage to get things pretty close. I was also glad I'd not glued the forward part of the intake trunking as that allowed me to trim a bit on the fuselage around those pieces to get a better fit.
There is a small resin vent that fit into the intake. I attached mine early and sanding caused it to be less detailed. If at all possible, glue this in after you get the intake exterior in place. I'm not sure it will be easier or not, but at least you'll keep all the detail. Attaching the intake exterior went in two main steps. First, I glued the upper piece in place and let that dry, using super glue. Then the lower piece was glued in place. By doing it in two steps, you'll find it much easier on your nerves as other wise, the pieces will keep popping out of place. I'm sure there are those who had no trouble here, but I'm not one. Looking back, it is the worst fitting part of the kit. The inevitable gaps were filled and sanded and repeated.
| COLORS AND MARKINGS |
At this time, It was a good idea to do most of the painting. I used Alclad II Aluminum and Dark Aluminum for the metal. There are many 'fad' metallics out there, but the one that works best for me time after time is Alclad II. It was painted on bare plastic/filler without a primer. One always takes the chance doing this that there will be a spot of grease on the plastic where the paint won't hold, but I lucked out this time.
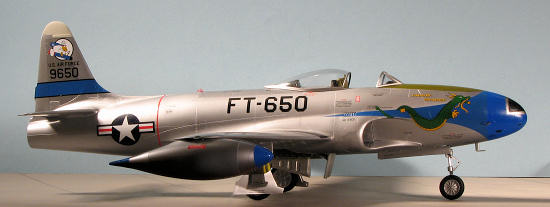
The box art scheme was my choice and that requires FS 35180. Only Life Like makes this ready to go and so I ordered a bottle. It arrived in a paste-like form, so I couldn't use it. An e-mail to the place from whence I ordered it resulted in another bottle being on 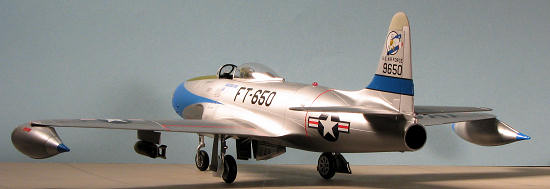 the way, but I didn't want to wait a week for it to arrive. So that meant I'd have to mix the color. I started with straight from the bottle Tamiya blue. This was sprayed on the nose and left to dry. I took a piece of decal from the markings I wasn't going to use and put it on the blue. It was darn close. In fact, under flash photograpy, one cannot tell where the decal section is. But under natural light, you can. I used that as a basis and added white to it to lighten it up a tad. Then this was sprayed on the nose as well as on the tip tank ends. This was later masked.
Meanwhile the rest of the airframe was being painted. I masked the Dark Aluminum bits and painted on the Aluminum. The nose was also masked for the radome to be later painted black. The gear doors and wells were still a puzzle as to the color. The reference has a ton of F-80 color images, and one thing I did not see in any of them, were chromate green inner gear doors. They were either unpainted or chromate yellow. Based on this, I painted all the interior gear doors with Aluminum. I left the speed brake door insides in chromate green as a photo of a restored plane showed this color. Same for the wells themselves, though the speed brake well was painted matte black. Apparently there is a lot of plumbing in this area and there is no upper cover to it. The nose gear door had the center section painted aluminum as I had a period photo showing this to be the case.
 The cockpit canopy and windscreen were masked and initially painted Black using Mr. Color lacquer. Then it was painted with Aluminum. Next step was to get it on its gear in preparation for decals. As mentioned, the main gear holes were opened up with a #34 drill bit and the main gear legs attached. I had to cut at one of the nose gear attachment points to fit in the nose gear. Later, this section was glued back in place once the gear had dried. Though the gear actuator struts were attached, the wheels and gear doors were left off until later. Using clear paint, I tacked on the canopy and windscreen then started applying decals.
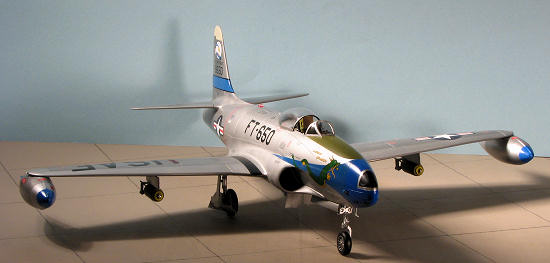
I started with all the data decals, following the guide in the back of the instruction sheet. Then the insignia and USAF markings were installed. When it got to placing the fuselage insignias, I realized that the data guide had provided the wrong location for the turbine warning/fuselage split stripe so had to pull up the one already installed with tape. Fortunately, I had a set of Microscale train stripes and was able to install a replacement. I was nervious about the nose stripe not matching my paint and while it is a bit off, it worked out quite well. I had to use Solvaset on many areas to get the decal to snuggle in place. For the OD anti-glare decal, I had to remove the windscreen as that decal butts right up to the edge of the cockpit.
| FINAL BITS |
With the decals in place, I gave the airframe a coat or two of Testors Metallizer Sealer. It did little to help the fingerprints I'd gotten on a few areas so those were sanded down and repainted. This rarely looks good and this time was no exception.
Now it was time for the seemingly millions of small bits that have to go on. First were the little resin plates that will hold the formation lights. Though you are given the option to put in a blanking piece and stick the lights further towards the fuselage, all the photos I saw had them on the tip. I then glued on the wheels, using a resin set for the main and the plastic one for the nose wheel. The resin nose wheel should be somewhat deep dished and was almost the opposite. Besides, the nose gear axle is about twice as long as it needs to be so much was cut back before gluing on the wheel. I also had to enlarge the attachment holes for the resin wheels before gluing those on.
I also super glued it in backwards, but I'm not about to break the gear to fix
it. The gear doors were not a problem, though I was somewhat surprised to note t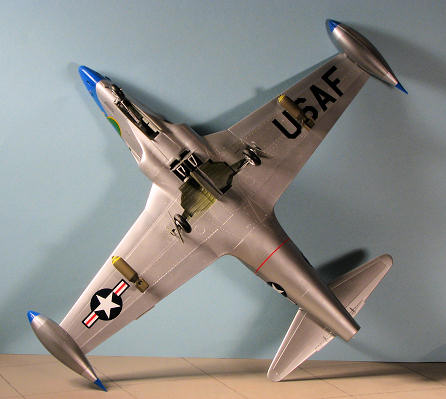 hat in this scale, no hinges are given and the majority of the doors have to be butt glued. The large main doors also need the attachment hole enlarged. This was something that EVERY attachment hold needed to have done.
The tailplanes were then glued in with one of them needing considerable trimming to get to fit. Next, the tip tanks were glued in place. The reference shows that in just about all instances, the larger Misawa tanks were used by Korea-based F-80s. It was only very early in the war that the small ones were used. I then glued on the speed brake assemblies. These were a fair fit. The retraction/extension frames should be aluminum, not chromate green. The bombs were painted with crude yellow rings on the nose, just like in the photos. The small photo etch fuses were then glued on, the bombs attached to the pylons and the pylons attached to the underside of the wings.
Getting down to the really small bits. The wing tip, upper fuselage and tail lenses were painted the appropriate color on the back and then attached using clear gloss paint. It was during some research in the reference to determine just exactly where the tail light fit that I realized that the exhaust on my kit did not jut out from the rear as it should. This is either a design flaw or a glitch on my part during installation as the part sticking out is quite prominent in photos. For the landing lights, I used #25 MV Products lenses as they fit and look a lot nicer.
A hole was drilled for the pitot tube assembly and after it was painted it was glued in place. Next were the guns. You are given three for each side, two of which are quite small. I started with the medium sized one in the back and again, using clear paint, attached them. No problem. However, it has a fairing behind it, something the other two openings do not have. It means that unless one sands away at a great deal of the side of the other barrels, they'll stick out rather badly. I managed to do an acceptable job on three of them, but the fourth, a little bitty one, went screaming through the air "freedoooooooom", never to be seen again. I was just unhappy with how the gun barrels looked and so decided to go ahead and drill out the holes in the nose for replacements on the forward four. Fortunately, QuickBoost makes a set of 1/48 B-17 gun barrels and those are what I used. It required a #58 drill bit to open the holes wide enough. This left bare plastic so that section was repainted with a brush. Naturally, the color doesn't completely match, but it is close enough.
 Getting close to the end. The rear view mirror was attached, again, using clear paint, then the seat was glued in. I know now that this is not the right seat for an F-80 and photos in the reference prove that. Apparently, it is for a T-33. Finally, the masking was removed from the clear bits and the canopy was posed in the open position, held in place by clear paint. This aircraft should look terribly abused and unwashed, but you know, it is a model and I like clean-ish aircraft. I'll leave the grunging up to those who are good at it. I've seen too many poorly done weathering jobs to add mine to the list!
Oh yes, there was just one other thing (said in my best 'Peter Falk as Colombo' voice), I used clear matte and brushed it on the anti-glare decal. Didn't want to stretch screwing things up by masking and spray painting. For those who have a rather odd curiosity about things like this, I did knock off nearly a dozen pieces and have to reattach them during this build. Some of them twice.
| CONCLUSIONS |
One has to give Squadron a pat on the back for doing a 1/32 F-80C. It is a perfect model for this scale. Large, but not huge. Overall, it was well done. Not to say it didn't have fit issues, but it is, after all, a short run kit. Also not to say that there are not accuracy issues, but those are mostly confined to the cockpit. If there is one place where improvement is going to do the most, it is with this part of the aircraft. The tub is acceptable to most, but it is a facsimile of what is in the actual aircraft, save for the superbly done instrument panel. The seat issue is a head-smacker as that should not have been allowed to happen.
 While it is true that the average modeler either won't notice or won't care, the fact is that many who build this are not going to fit into that category. I'll give Squadron a B on this one. It is the new Squadron's first complete model kit and there is a learning curve involved. There is also a replacement resin cockpit with the proper seat for those who want to improve that area.
Now that you know what it is like, would I recommend it. Sure. It does make into a very nice model. The decals are great, the overall shape of the airplane is fine and it stretches those modeling skills a bit. It has resin, but not too much. The photo-etch is superb and again, there isn't a lot of it. I find I get really bogged down with a lot of resin and photo etched parts. Those who have had some experience with short run kits will have no problems building this one and I'm sure I'll be seeing a lot of them on contest table this year.
| REFERENCES |
http://en.wikipedia.org F-80 Shooting Star Units Over Korea, Warren Thompson, Osprey, 2001
April 2009
Copyright ModelingMadness.com. All rights reserved. No reproduction in part or in whole without express permission.
If you would like your product reviewed fairly and fairly quickly, please contact the editor or see other details in the Note to Contributors.
Back to the Review Index Page 2021