| KIT #: | H-221 |
| PRICE: | $0.89 when new (1955) |
| DECALS: | One option |
| REVIEWER: | Scott Van Aken |
| NOTES: | Reissued several times over the years |
| HISTORY |
The Northrop F-89 Scorpion was an early American jet-powered fighter
designed from the outset as an all-weather interceptor, the first jet-powered
aircraft designed as such. Though its straight wings limited its
 performance, it
was among the first United States Air Force (USAF) jet fighters with guided
missiles, and notably the first combat aircraft armed with air-to-air nuclear
weapons (the unguided Genie rocket).
performance, it
was among the first United States Air Force (USAF) jet fighters with guided
missiles, and notably the first combat aircraft armed with air-to-air nuclear
weapons (the unguided Genie rocket).
The major production model was the F-89D, which first flew 23 October 1951 and entered service in 1954. It removed the cannon in favor of a new Hughes E-6 fire control system with AN/APG-40 radar and an AN/APA-84 computer. Armament was two pods of 52 2.75 in (70 mm) "Mighty Mouse" FFAR rockets, for a total of 104. A total of 682 were built. In August 1956 a pair of F-89D interceptors were scrambled from Oxnard Air Force Base to shoot down a runaway F6F-5K drone leading to The Battle of Palmdale incident.
| THE KIT |
This is one of Revell's early airplane kits, developed during the days when most US produced airplane kits were box scale. In other words, they were designed to fit into a standard box. The result was some rather odd scales, but the up side is that most of the models from these kits were about the same size. In this case, we end up with 1/80 scale. Not too far off from a 'normal' 1/72 scale, but small enough to be noticeable when with others of the proper scale.
 There really is not all that much to
the kit itself. Revell saves us from the concern of building up a cockpit by
having this item already molded as one piece, complete with two crew
members. This simply gets trapped between the two fuselage halves. The
horizontal stabilizer fits atop the lower fit with the rest attached to it.
There really is not all that much to
the kit itself. Revell saves us from the concern of building up a cockpit by
having this item already molded as one piece, complete with two crew
members. This simply gets trapped between the two fuselage halves. The
horizontal stabilizer fits atop the lower fit with the rest attached to it.
The nose gear well is a separate item with the doors attached. There is no real wheel well detail. The two engine pods have separate intake sections and there are heat shields for the exhaust. There is no compressor detail. For things under wings you get two fuel tanks and the two large wing rocket pods.
Instructions in my reissue were just like the original with generic color information. There is also a generic decal sheet with no unit markings. Did I mention that the decal placement guides are molded onto the plastic?
| CONSTRUCTION |
While it has been a while since I built this one, aside from the dodgy fit of most parts, there wasn't much in terms of hassles. I had to do quite a bit of sanding in some spots, but tried to keep it to a minimum to maintain the raised rivet detail and the many engraved panel lines. Engraved? Yep, even in 1955 or so, there were kits with a lot of engraved panel lines and apparently this was one of them.
 I spent a lot of time painting up the cockpit piece as it is
relatively visible through the canopy. The canopy is one of those deals where
the center brace is part of the canopy frame and one installs the two (slightly
undersize) clear bits into it. For this one I painted the frame first. I also
installed a goodly amount of weight in the nose to help prevent tail sitting.
The wing tip pods have a separate forward half and two back sections. These fit
well onto the wing. The fuel tanks have the pylon molded onto one half.
I spent a lot of time painting up the cockpit piece as it is
relatively visible through the canopy. The canopy is one of those deals where
the center brace is part of the canopy frame and one installs the two (slightly
undersize) clear bits into it. For this one I painted the frame first. I also
installed a goodly amount of weight in the nose to help prevent tail sitting.
The wing tip pods have a separate forward half and two back sections. These fit
well onto the wing. The fuel tanks have the pylon molded onto one half.
The biggest section that needed fussing with was the engines as those sections did not fit quite as well as I would have liked. I also had a lot of work to do with the lower fuselage seam. Struts had the usual mass of ejector pin marks (as did quite a few other bits) and I took care of most of them as best I could.
| COLORS & MARKINGS |
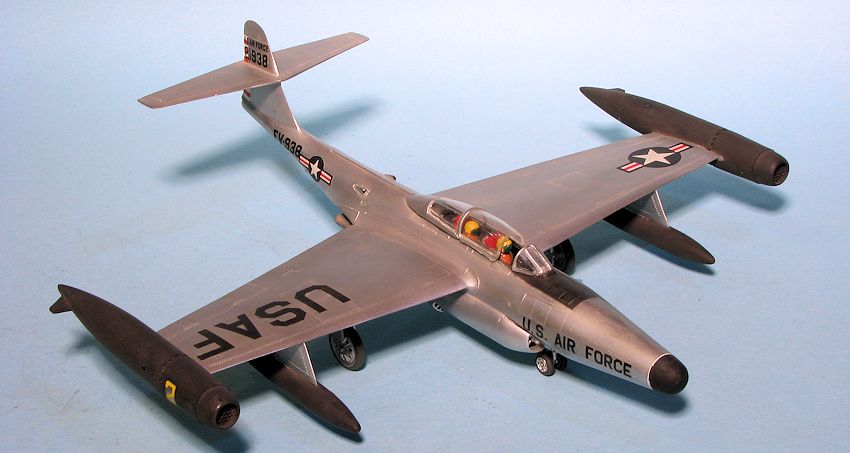
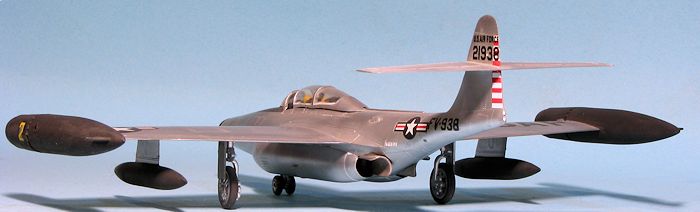
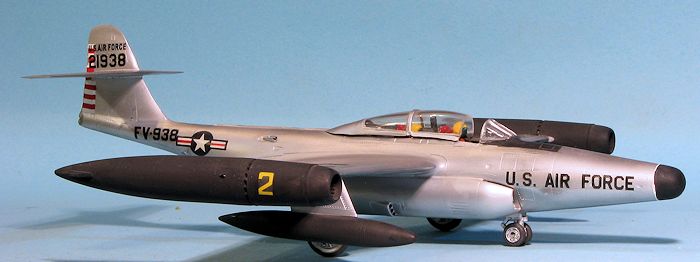
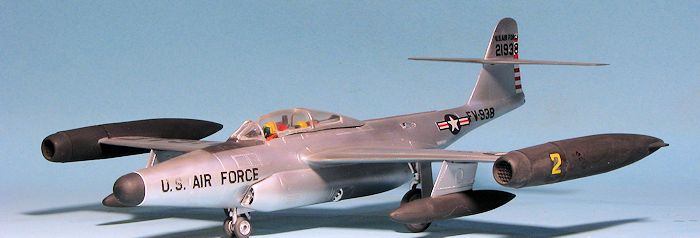
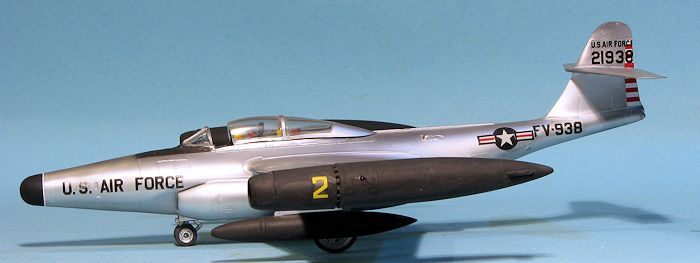
Once the gear was on and the clear bits masked, I sprayed the entire airframe with Metallizer non-buffing aluminum (Alclad II was not around at that time). The wing tip pods and fuel tanks were painted black as was the nose cone and the short anti-glare panel.
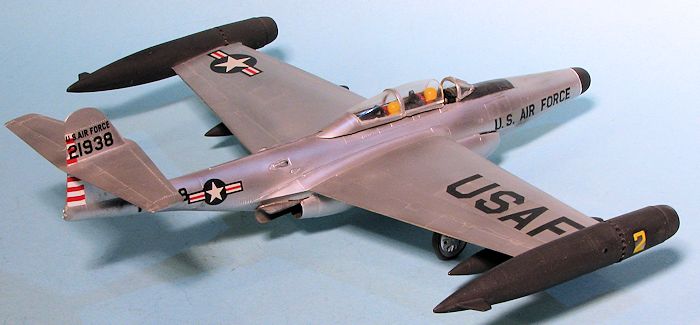 I used the kit decals as I was sure I'd not be able to find
aftermarket. I was fortunate in that most fit into the engraved spaces on the
airframe. I left off the tail decals as I wanted to try to make something a bit
different. I found a photo somewhere of a Scorpion with red and white rudder
stripes so I used white and red decals to duplicate this. I also scrounged some
numbers for the tip pods, though didn't gloss coat the area first and so these
are quite obvious. With the stripes in place I attached the tail serials only to
find they are larger than the engraved sections.
I used the kit decals as I was sure I'd not be able to find
aftermarket. I was fortunate in that most fit into the engraved spaces on the
airframe. I left off the tail decals as I wanted to try to make something a bit
different. I found a photo somewhere of a Scorpion with red and white rudder
stripes so I used white and red decals to duplicate this. I also scrounged some
numbers for the tip pods, though didn't gloss coat the area first and so these
are quite obvious. With the stripes in place I attached the tail serials only to
find they are larger than the engraved sections.
The last steps were to attach the wheels, remove the tacked on canopy and open it up a bit and remove the masking. It has spent the last 25-30 years on my shelf as the F-89 entry in my P-1 to F-117 US fighters collection.
| CONCLUSIONS |
 This is very much what one would call a nostalgia
build. With more modern kits by Hobbycraft and Revell to take its place along
with its odd scale, it is not something that a 'serious' modeler would want to
build (no, seriously). However, it does actually make into a nice looking model
in its own right and if you already have one, and you just like to build model
planes, then go ahead and give it a go.
This is very much what one would call a nostalgia
build. With more modern kits by Hobbycraft and Revell to take its place along
with its odd scale, it is not something that a 'serious' modeler would want to
build (no, seriously). However, it does actually make into a nice looking model
in its own right and if you already have one, and you just like to build model
planes, then go ahead and give it a go.
| REFERENCES |
http://en.wikipedia.org/wiki/Northrop_F-89_Scorpion
July 2015 Copyright ModelingMadness.com. All rights reserved. No
reproductio in part or in whole without express permission. If you would like your product reviewed fairly and fairly quickly, please
contact the editor or see other details in the
Note to
Contributors.