Airfix 1/72 F-86F/E(M) Sabre
| KIT #: | A03082 |
| PRICE: | $11.75 SRP |
| DECALS: | Two Options |
| REVIEWER: | Scott Van Aken |
| NOTES: | New tool kit |
| HISTORY |
 For me, the latter is the case. When my father was based at Wheelus AFB in the early 1950s, I was introduced to aircraft. As dad was a comm tech working around teletypes and long range communications networks, he wasn't attached to a squadron so some of the places we lived didn't have an airbase. But Wheelus did and what a base. It was basically a place where aircraft came to expend a bunch of ordnance in terms of bullets, rockets and bombs by blasting holes in the sand of the Sahara. It also had a large control line airplane club that had a spot to fly near the end of the active runway. On some Saturdays, my father took me to watch the control line planes and the real ones that thundered off the runway close by. The majority of aircraft were B-29s and F-86s. It is here that I learned to love aircraft in general, and the F-86 in particular.
In those days, USAF squadrons all had rather gaudily painted aircraft. No need to put on camouflage and hide as we do today. The US was top dog and we didn't care about such things as camouflage. Let others hide behind it as we didn't need to. While I don't remember any specific color schemes (heck, I still wasn't old enough to start kindergarten), I do remember the flood of color that was part of the aircraft of the time. Even the B-29s seem to have had color in them, and the F-86s were the best, taking off in groups of two or four then doing high speed passes down the runway. I loved it and have never really experienced the same since.
| THE KIT |
Hornby's work at re-inventing Airfix has been going full bore for a couple of years now and the difference between now and then is obvious to even the most daft. New kits to replace some of the older ones is the mantra or so it seems and here is one to put to pasture the old Heller mold that the company was using.
 Molded very much like all of its new kits, the engraving may be a bit much for some, but most of us can deal with it OK. Four standard grey sprues and one clear one for the canopy and windscreen come in the now standard folded cardboard box. This one is made in India so Hornby is still spreading the manufacturing.
So let us get the the straight Sabre bits. This one has a 6-3 non-slatted wing with a fence. Sabre people realize that pretty much it is the wing that determines the accuracy of the markings to be used. Heaven forbid that some one put slatted wing Sabre markings on a fixed wing F-86. Heads will roll, I tell you!. The kit has a nice cockpit which includes a pilot figure. No harness on the bang seat which is pretty much like the real thing, only much simplified. Decals for instruments, which is OK. An intake section is included with the upper piece having '3 Grams' engraved on it. Now this means that 3 grams of weight is needed.
The wing can have pylons added to the inner section for the use of bombs if one so wishes. Now I'm not sure if the USAF version is the fighter bomber -35 or not, but in this scale, it probably doesn't matter and those wanting to use the pylons and bombs will need to do a bit of research if accuracy is important. The kit has well done landing gear with flattened tires included and two 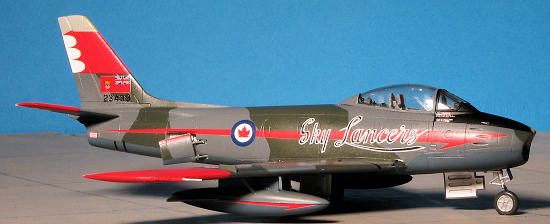 styles of nose wheel. There are separate 'gear up' gear doors with additional reinforcement to allow them to be easily installed, a nice touch. The same goes for the separate speed brakes; a closed option is given. It will be interesting to see if the molding is such that these brakes are properly drooped down when open. In addition to the bombs, the standard early drop tanks are provided for the outer stations. This is topped by a two piece canopy/windscreen that can be posed open if one wishes.
Kit instructions are well drawn with the usual Humbrol paint numbers in place of real paint names except for the camo and markings guide where the colors used on the outside are identified. Markings are for two planes. One is 'The Huff' as shown on the box art. The other is an Italian plane with the 4th Stormo in 1958. This is in standard NATO colors. This, of course, is the F-86E(M) version or a Sabre 4. Decals are well printed and include not only the Korean War bands but a mass of data markings. I should note that the USAF plane has the correct North American applied curved font.
| CONSTRUCTION |
First thing I should mention is that if one is doing a Canadair Sabre (such as perhaps the Italian option), then this kit isn't exactly correct for that. Most won't be able to tell, but the Canadair Sabres all had an extra small exhaust vent on the left fuselage about half way back. Later Sabre 6s had 'sugar scoop' intakes on both sides of the fuselage just below the rear of the wing.
Now that is out of the way, step one for me was to cement the wings and drop tanks together. The sprue attachment points invade on the plastic parts and while most are easy enough to clean, the one for the upper tank sections won't be. These parts have a thin lip that runs around them so removing the excess plastic will take some careful work.
The interior is pretty basic stuff, but not bad considering the price of the kit. The seat was glued in place and the rear bulkhead behind it. This was then painted dark gull grey as was the inside of the fuselage using a largish paint brush. I a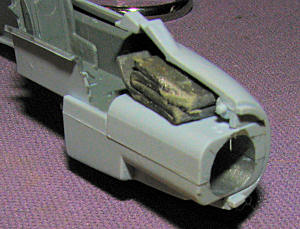 lso glued the intake section together and painted the inside aluminum using Humbrol #11. This part was then glued into the left fuselage half. The interior was then snapped into place to be sure everything dried in proper alignment. Three grams of weight was then added atop the intake section. This is a relatively large piece of weight and there isn't a ton of room, but I eventually got it to fit.
I then snapped the interior out and added the decals to the instrument panel and side consoles. These are very nicely printed and have minimal carrier film around the edges so no real need to trim these prior to application. I used Microsol to help them stick, but am not sure this was really needed.
With that accomplished, the control stick and the main instrument panel were glued in as was the exhaust piece, and the other fuselage half was attached. Fit is good and though I did have some seams to fill (as I do on almost everything I build), nothing major. I was somewhat concerned about the exhaust bit as on every other Sabre kit I've built in this scale it was tube shaped. This one is more conical, but it is not at all obvious once it was installed.
Next was the wing attachment. So far,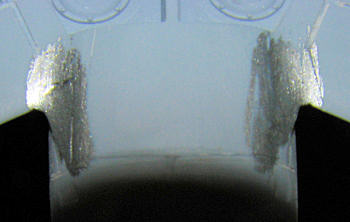 this part has been the least good fit of any. I'm sure that most will not have too much trouble, but there are gaps on the lower rear that need filled and the forward section didn't fit as snugly as hoped with a small step in there. I also had gaps at the forward upper wing and the lower aft root wouldn't mate all the way down. This meant filler in several applications. Thankfully, the plastic is fairly soft so it is easy to sand. This fit issue also extended to the drop down doors on the forwar
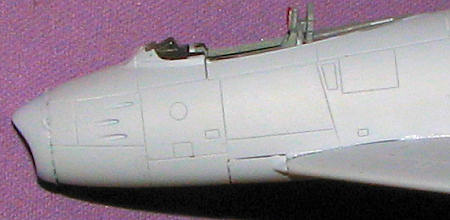 d wing root area and the intake piece where the nose section wouldn't fit quite all the way as you can see from the image. As a bit of an aside, when I am doing filler work and have trouble determining if more has to be done, I use silver paint over the area as it quickly will show seams that are not normally visible. You can see in the small image of the lower wing root how the area on the right is OK, but the on the left still needs a bit more work. It is quick, easy and saves one from having to go back over something late in the build.
With the airframe pretty well complete, I glued on the windscreen after masking it. I had forgotten to install the movable canopy section when gluing the fuselage halves together, but fortunately, after attaching the small hold down piece to the underside of it, there was enough give to the slot in the back of the seat where it snapped in place. The canopy itself was masked and attached. Then the tail planes were glued on and it was off for some paint.
| COLORS & MARKINGS |
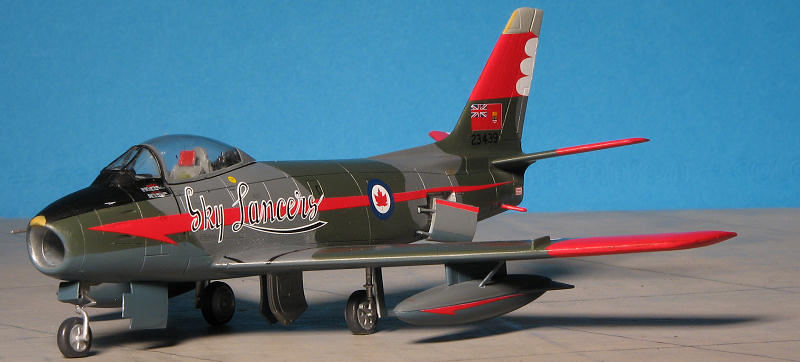
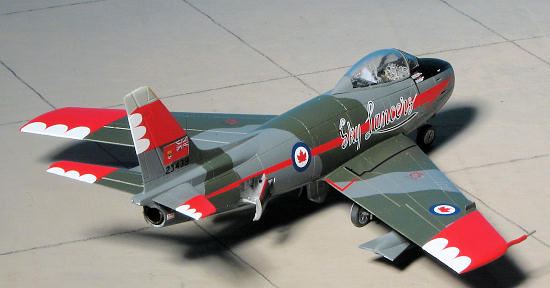
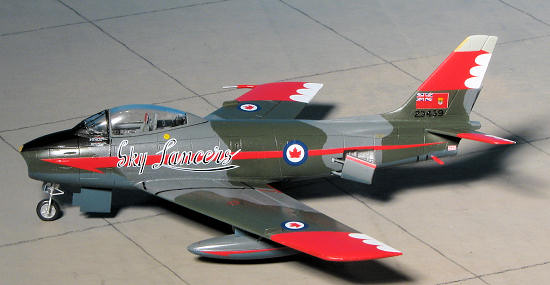
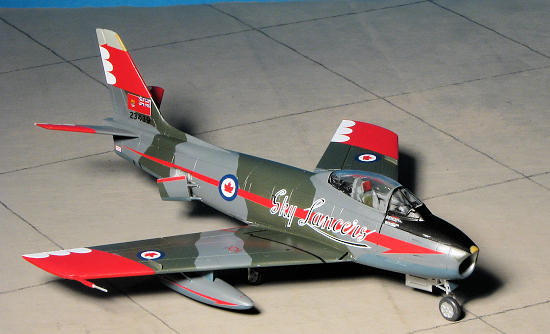
This one would be an RCAF plane from the Sky Lancers aerobatic team in 1956. This meant Dark Green, Dark Sea Grey over PRU Blue. I used an unknown acrylic for the blue and painted everything that would be this shade. Then the lower fuselage and wings and tailplanes were masked over and the upper surfaces painted Dark Green using Testors Model Master enamels. With that done, the green areas were masked and the rest of the airframe painted Dar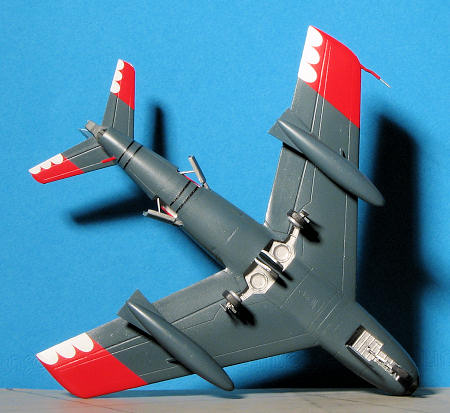 k Sea Grey, again using the Testors enamels. This included the drop tanks, which also had to be carefully masked.
With the main colors on, the tail tip was masked and painted Light Gull Grey (Testors enamels again) while the anti-glare panel was painted with Floquil's Racing Black lacquers. I brush painted the wheel wells with Humbrol #11 Aluminum and installed the gear legs. You can put away your poison pens if you are going to tell me that the gear wells and speed brake wells are supposed to be Chromate Green. I know, but chose not to do this. My kit, my choice and it still looks nice. A coat of gloss clear acrylic (Future) was sprayed over all this and it was time for the decals.
As mentioned, I was doing the Sky Lancers display team plane and for this I used Leading Edge Decals 72.65, which allows one to do one plane from the 1955 season and another from the abbreviated 1956 season. According to the instructions, any F-86F-30 with the 6-3 wing would be appropriate and that is what the Airfix kit is. Having chosen the 1956 version, I had a choice to paint the red bits or use the decals. I chose the latter and should have chosen the former as these decals are a tad too small for the Airfix kit. I have a feeling they were designed for the Hobbycraft or Fujimi version, though no kit is specified in the instructions.
Regardless, the decals went on quite well without the use of any setting solutions. The set doesn't have a full stencil suite so the kit doesn't have all that many. As usual, it took me several days to apply all the markings. Usually, with a plane like this, it is not unknown for it to take 4-7 days just to apply decals. To touch-up the areas where the decal didn't meet, I used Testors Guards Red enamel. It seems to be a pretty good match. Gloss White for the rear sections.
| FINAL CONSTRUCTION |
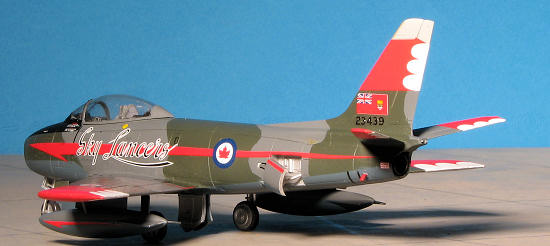 After most of the decals were on, other bits were installed. This included the pitot tube (which was painted red), speed brakes, wheels, gear doors and the fuel dump. The nose gear wheel didn't go on as far as I'd have hoped, but it isn't all that noticeable. The drop tank pylons have a curious horizontal curve to them that I've not seen on any other Sabre kit. Naturally, I put them on the wrong wings as the curve in the drop tank attachment point doesn't match. Again, it isn't that noticeable. A few more decals and some more touch up painting, then it was time for a clear coat.
Now, the instructions state that a freshly painted plane would be glossy and the paint got more and more matte with time and exposure. As display planes, they wouldn't be grungy, but they wouldn't be fully matte either. I picked a semi-gloss clear and shot on several coats, doing the anti-glare panel in full matte by brushing on some Vallejo matte clear. The masking was removed and I was delighted that I didn't screw anything up in the process.
| CONCLUSIONS |
 This is a very nice kit at a reasonable price. It seems like all of Airfix's new mold kits are superbly done, though are all lacking a small amount in the sort of detail we come to expect from other kits. In the case of the Sabre, this is apparent in the missing upper fuselage vent and the lack of a scribed radome for the gun laying radar, among a few. I also found that the upper and lower speed brake doors had some odd thick section on the top and bottom that are not on the real doors. I also found that the general detail is good, but not as crisp as on some others. But these are minor and while the Fujimi kit is still the best one in this scale (at least in my opinion), this one is less expensive and perhaps not as fiddly to build. Well worth the effort of locating and building.
 March 2011
If you would like your product reviewed fairly and fairly quickly, please contact the editor or see other details in the Note to Contributors.