| KIT #: | 8759 |
| PRICE: | $10.00 'used' |
| DECALS: | Three options |
| REVIEWER: | Scott Van Aken |
| NOTES: | Most recently released under the Italeri label |
| HISTORY |
Commencing with the Operation Rolling Thunder campaign, the
Starfighter was used both in the air-superiority role and in the air support
mission; although it saw little aerial combat and scored no air-to-air kills,
Starfighters were successful in deterring MiG interceptors. Starfighter
squadrons made two deployments to Vietnam, the first being from April 1965 to
November 1965, flying 2,937 combat
 sorties from
DaNang AB. During that first deployment, two Starfighters were shot down by
ground fire. One was shot down by a Shenyang J-6 when the F-104 strayed into
Chinese airspace, and two F-104s were lost to a mid-air collision while
searching for the missing jet. The 476th Tactical Fighter Squadron deployed to
Vietnam from April 1965 to July 1965, losing one Starfighter; and the 436th
Tactical Fighter Squadron deployed to Vietnam in July 1965 through October 1965,
losing four.
sorties from
DaNang AB. During that first deployment, two Starfighters were shot down by
ground fire. One was shot down by a Shenyang J-6 when the F-104 strayed into
Chinese airspace, and two F-104s were lost to a mid-air collision while
searching for the missing jet. The 476th Tactical Fighter Squadron deployed to
Vietnam from April 1965 to July 1965, losing one Starfighter; and the 436th
Tactical Fighter Squadron deployed to Vietnam in July 1965 through October 1965,
losing four.
Starfighters returned to Vietnam when the 435th Tactical Fighter Squadron deployed from June 1966 until July 1967, in which time they flew a further 2,269 combat sorties, this time from Udorn, for a total of 5,206 sorties. Nine more F-104s were lost. The Starfighter units transitioned to F-4 Phantoms in July 1967, having lost a total of 14 F-104s to all causes in Vietnam. F-104s operating in Vietnam were upgraded in service with APR-25/26 radar warning receiver equipment, and one example is on display in the Air Zoo in Kalamazoo, Michigan.
| THE KIT |
Back in the 1980s, AMT/ERTL began reboxing a lot of ESCI kits. In 1987 they became majority owners of the company. In 1993 the company was liquidated with molds appearing all over the world. AMT/ERTL collected as many as they could and released them under the AMT brand. Somehow, many of these ended up with Italeri, which has reboxed a considerable number of them, including this one.
 ESCI 1/72 kits were generally very good, something that could
not be said of their 1/48 offerings. They still hold up quite well compared to 'replacemnt'
newer toolings of the same subject and scale. This one is pretty basic, however
it does have a few neat options. For one thing, there are two different rear
fuselages to allow the early and later F-104s to be modeled. There are also two
different nose gear doors, though I've only ever used the completely rectangular
ones.
ESCI 1/72 kits were generally very good, something that could
not be said of their 1/48 offerings. They still hold up quite well compared to 'replacemnt'
newer toolings of the same subject and scale. This one is pretty basic, however
it does have a few neat options. For one thing, there are two different rear
fuselages to allow the early and later F-104s to be modeled. There are also two
different nose gear doors, though I've only ever used the completely rectangular
ones.
The gear bays are minimalist with no retraction struts for the main landing gear. Cockpit is also basic with several seats being offered in this boxing along with the RHAW antennas for the Canadian plane. Slots are already cut in the lower wings for the inner pylons. There are the small finlets for the S variant as well as a centerline and pylon mounted fuel tanks. Under fuselage Sidewinder mounts are also provided as are a single pair of missiles. The cockpit canopy is a single piece.
 Markings in this box are for a QF-104A, a Canadian 421
Squadron special plane in red, and a German 'last flight' scheme in white for
WTD 61 plane. Since the latter scheme is from 1991, I have to assume this boxing
is after that. Decals are mostly very nicely done and printed by Scalemaster. As
seems to be the norm with this company, the reds are all off register so
Canadian and American insignia will have to come from another source.
Markings in this box are for a QF-104A, a Canadian 421
Squadron special plane in red, and a German 'last flight' scheme in white for
WTD 61 plane. Since the latter scheme is from 1991, I have to assume this boxing
is after that. Decals are mostly very nicely done and printed by Scalemaster. As
seems to be the norm with this company, the reds are all off register so
Canadian and American insignia will have to come from another source.
| CONSTRUCTION |
While this is a pretty straight-forward kit, I built this just
before and after cataract surgery, so my less than pristine vision caused quite
a few errors, especially when it came to decals. Once the tub is built
 up and
the instrument decals are in place, it along with the nose gear well can be
attached to a fuselage halve and the halves closed. I also built up the aft
fuselage and found it to be a bit wider than the forward section. This meant a
bit of sanding was needed to smooth things out.
up and
the instrument decals are in place, it along with the nose gear well can be
attached to a fuselage halve and the halves closed. I also built up the aft
fuselage and found it to be a bit wider than the forward section. This meant a
bit of sanding was needed to smooth things out.
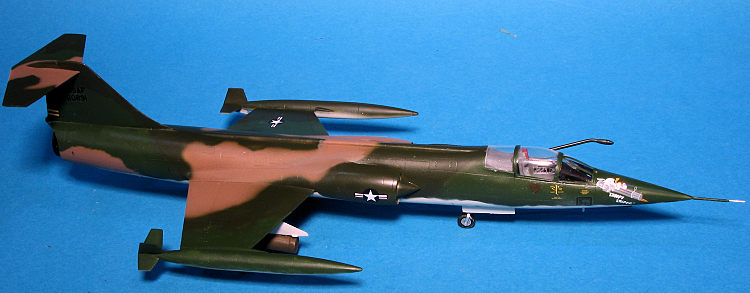
I also installed the speed brakes in the closed position as most photos show the plane on the ramp like this. The exhaust was assembled, painted and set aside. I also assembled the tip tanks. Once the seat was painted, it was installed with the rest of the interior bits above the instrument panel and behind the seat. I had to trim the seat quite a bit to get it to fit as it was too tall. The canopy was masked and glued on. Fit is fairly good.
At this time, I thought it would be wise to start painting. The wheel wells were filled with Silly Putty and it was off to the paint booth.
| COLORS & MARKINGS |
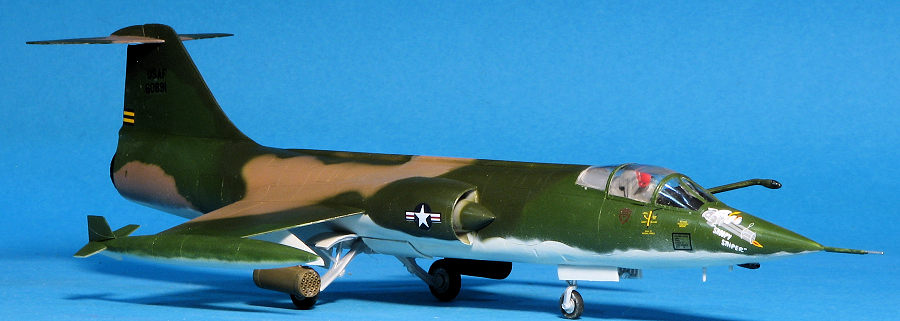
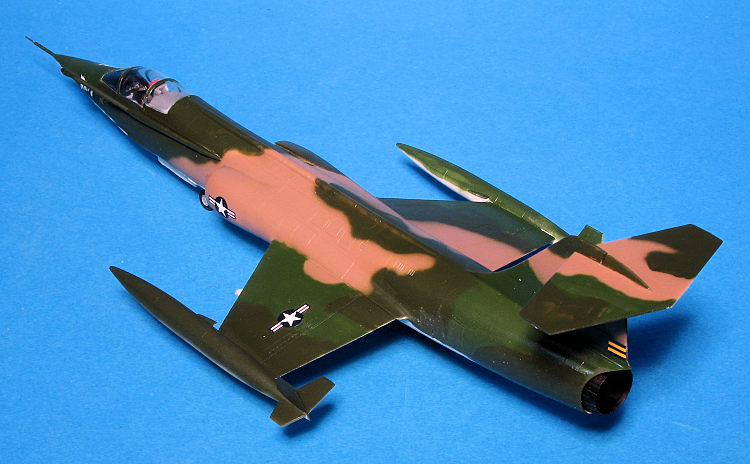
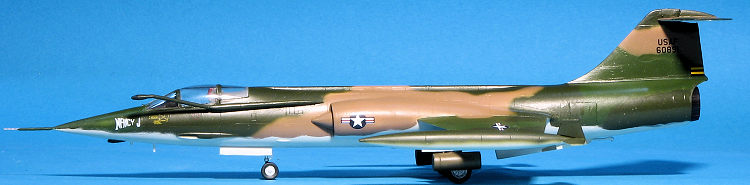
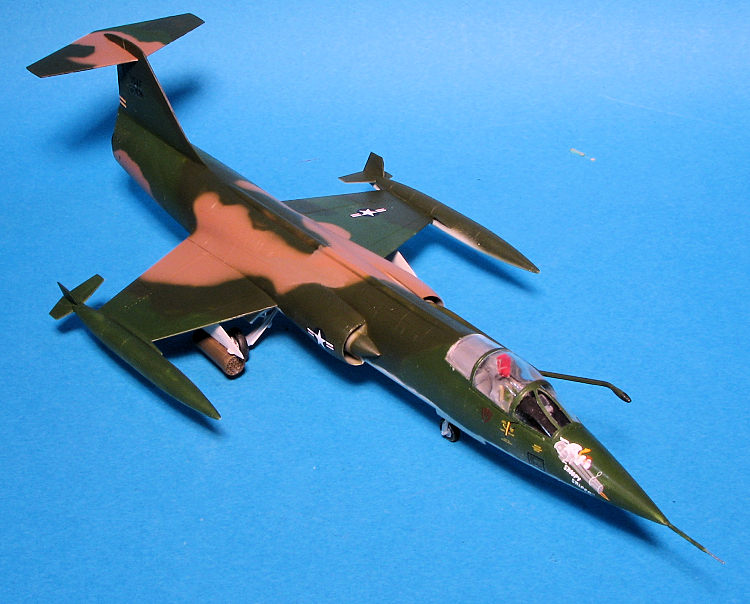
For this kit, I used Caracal CD 72064, F-104C in Vietnam. There are a number of very nice options all but two camouflaged. Model Master enamels were used for the SEA camouflage schemes as I have quite a stockpile of these colors, bought when Model Master announced it was curtailing them in favor of acrylics. I started with the underside, then on the top went from lighter to darker. All were hand sprayed, and it is here that my fuzzy sight caused me the most problem. Eventually I got all the colors in place.
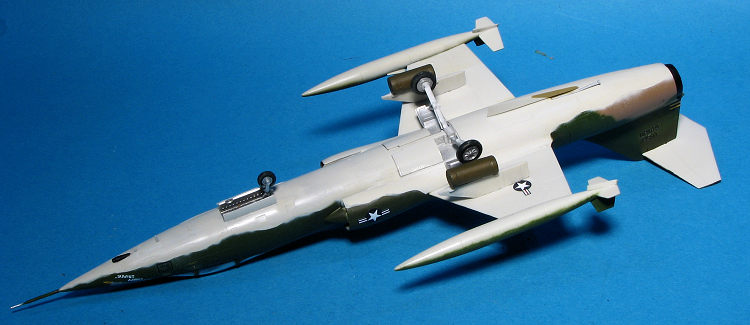 The kit was then returned to the bench to have the landing
gear installed. The doors have to be cut apart prior to gluing on. The large
main gear doors were never fully closed on the ground due to interference from
the retraction struts. Even though this kit does not provide those, I glued the
big doors nearly closed anyway.
The kit was then returned to the bench to have the landing
gear installed. The doors have to be cut apart prior to gluing on. The large
main gear doors were never fully closed on the ground due to interference from
the retraction struts. Even though this kit does not provide those, I glued the
big doors nearly closed anyway.
Tip tanks were installed and they are a fairly loose fit. Returning to the paint booth, a coat of clear gloss was applied in preparation for decals. I picked Nancy J/Snoopy Sniper as the option. These planes have minimal markings on them so decaling went pretty quickly.
Wheels attached, horizontal stab pushed in place (it is a very tight fit), exhaust installed as was one of the RHAW antennas under the nose. I installed the wing pylons after drilling holes for a pair of rocket pods. These came from a Hasegawa weapons set, were painted OD and glued on using a section of wire to ensure a positive fit. I picked the pods as I saw a photo on line of such an arrangement.
Last bits to be added were the tail hook and the pitot tube. I had to drill out the nose to get the pitot to fit and it will probably be the first think to be broken away.
| CONCLUSIONS |
Oddly, if you want an early Starfighter in 1/72 scale, then I believe this is still the only option as I don't think Hasegawa did one in this scale. (I have since been informed that Revell did one in 1996, which was released under the Monogram label.) It is not a difficult build as things go, though it also isn't up to modern standards in terms of some detail areas. They are not difficult to find on the second hand market, though some sellers are confused as to what they are really worth! Recommended to all who want a Vietnam War F-104C.
| REFERENCES |
https://en.wikipedia.org/wiki/Lockheed_F-104_Starfighter
9 June 2017
Copyright ModelingMadness.com. All rights reserved. If you would like your product reviewed fairly and fairly quickly, please
contact the editor
or see other details in the
Note to
Contributors. Back to the Main Page
Back to the Review
Index Page
Back to the Previews Index Page