Hobby Boss 1/48 F-80A Shooting Star
| KIT #: | 81723 |
| PRICE: | $46.99 |
| DECALS: | Two options |
| REVIEWER: | Scott Van Aken |
| NOTES: | Includes p.e. fret |
| HISTORY |
The Lockheed P-80 Shooting Star was the first jet
fighter used operationally by the United States Army Air Forces (USAAF).
Designed and built by Lockheed in 1943 and delivered in just 143 days from the
start of 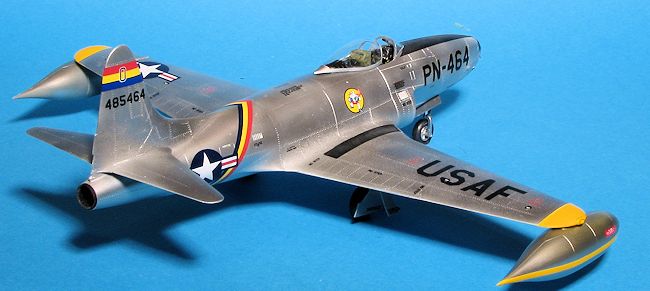 the design process, production models were flying but not ready for
service by the end of World War II. Designed with straight wings, the type saw
extensive combat in Korea with the United States Air Force (USAF) as the F-80.
America's first successful turbojet-powered combat aircraft, it helped usher in
the "jet age" in the USAF, but was outclassed with the appearance of the
swept-wing transonic MiG-15 and quickly replaced in the air superiority role by
the transonic North American F-86 Sabre. The F-94 Starfire, an all-weather
interceptor on the same airframe, also saw Korean war service. The closely
related T-33 Shooting Star trainer would remain in service with the U.S. Air
Force and Navy until the 1970s and many still serve in a military role or are in
private hands.
the design process, production models were flying but not ready for
service by the end of World War II. Designed with straight wings, the type saw
extensive combat in Korea with the United States Air Force (USAF) as the F-80.
America's first successful turbojet-powered combat aircraft, it helped usher in
the "jet age" in the USAF, but was outclassed with the appearance of the
swept-wing transonic MiG-15 and quickly replaced in the air superiority role by
the transonic North American F-86 Sabre. The F-94 Starfire, an all-weather
interceptor on the same airframe, also saw Korean war service. The closely
related T-33 Shooting Star trainer would remain in service with the U.S. Air
Force and Navy until the 1970s and many still serve in a military role or are in
private hands.
| THE KIT |
This kit has been much anticipated by fans of the Shooting Star. To date, we have only had the Monogram kit available to us and that one is from the 1970s. This is a new tool, engraved panel line kit with the now de riguer recessed rivet detail that is as modern as they get. The grey sprues are superbly molded with more than enough detail to satisfy most.
There is a nicely done interior complete with seat, control stick and
rudder pedals that fits into a tub with raised detail on the sidewalls. The
instrument panel has a decal to help out. There are also interior sidewalls. A
nicely done gunsight is included and there is an etched harness. Now, here is a
bit of a 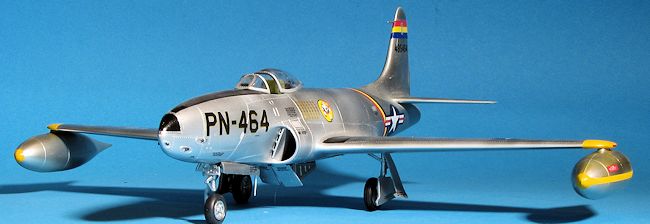 quandary. The F-80A originally did not have an ejection seat. The kit
only supplies a bang seat. A photo from the USAFM web site shows a late
production F-80A with a bang seat, though the head rest is rounded. It
is obviously flown by a test pilot as he is wearing a fedora. As it still wears
the PN buzz number prefix, it would be from about the time of the kit markings
which are from 1948 when the aircraft went from P-80 to F-80.
quandary. The F-80A originally did not have an ejection seat. The kit
only supplies a bang seat. A photo from the USAFM web site shows a late
production F-80A with a bang seat, though the head rest is rounded. It
is obviously flown by a test pilot as he is wearing a fedora. As it still wears
the PN buzz number prefix, it would be from about the time of the kit markings
which are from 1948 when the aircraft went from P-80 to F-80.
The kit has a separate forward and aft fuselage, breaking at the normal spot for working on or replacing the engine. In fact, you get an engine center section and the long tailpipe to install behind the main gear. This means you'll need quite a bit of weight in the nose to overcome this weight. Frankly, I don't see why this was done. One could have easily molded each fuselage half in one piece to save the seam, but things look like this was done to do a T-33 and F-94 using most of the same bits.
I was glad to see that Hobby Boss got the proper canopy shape without the rear 'pip' of the F-80C, though it still seems a bit long to my eye. The cover for the gun radar is a separate clear piece, though I'm not sure why. I should mention that the F-80A originally had no gun radar and had a landing light installed in the nose. The radar was later retrofit into extant A models. While on the subject of the fuselage, I have to say that to my eye, the intakes look too large. The lower part of the intake seems to blend in with the lower fuselage. Looking at photos, there is a definite section of side fuselage under each intake.
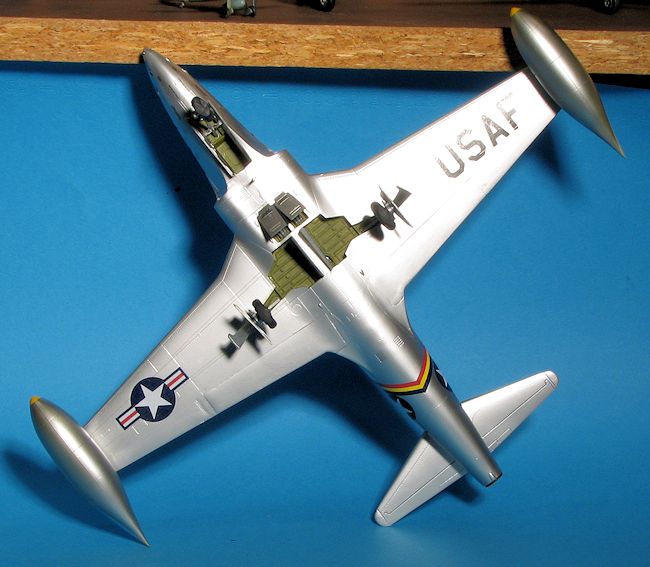
Moving to the wings, there are separate flaps which are designed to be
modeled lowered. There are separate wheel wells and some piping is provided to
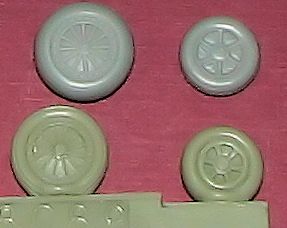
make those look nicer. Separate speed brakes are also provided. The wheels are a
bit shallow in terms of detail and will benefit from replacement. They are
properly spoked and the nose wheel is not the later 'finned' version. I think it
should have round lightening holes. The instructions would have you open holes
in the wings for wing racks, but to my knowledge, the
 F-80A did not have those.
The B model had a strengthened wing that was able to handle bombs or additional
fuel tanks. Both are included in the kit should you decide you want to use them.
Also not appropriate for the A model are the large Misawa tip tanks that are
supplied. Use the smaller tanks.
F-80A did not have those.
The B model had a strengthened wing that was able to handle bombs or additional
fuel tanks. Both are included in the kit should you decide you want to use them.
Also not appropriate for the A model are the large Misawa tip tanks that are
supplied. Use the smaller tanks.
Instructions are well drawn and provide Gunze
color information. They would have you paint the bang seat aircraft grey. No
cockpit color information is provided. Wheel wells are chromate green with
unpainted metal
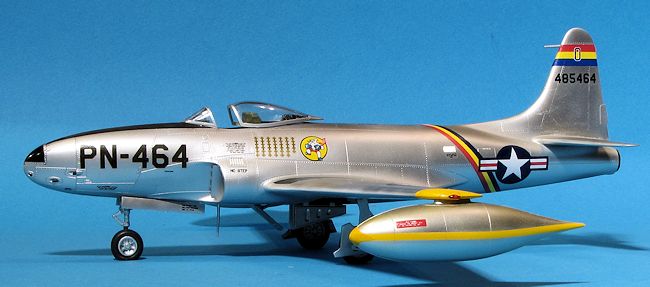
inner gear doors. You
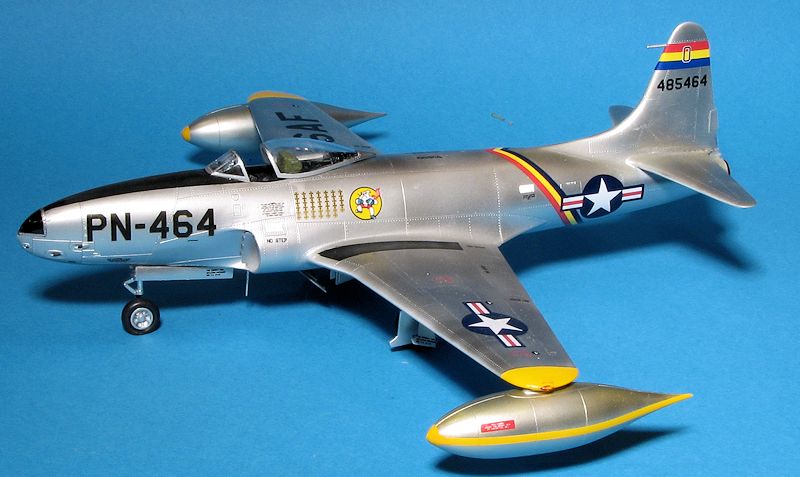
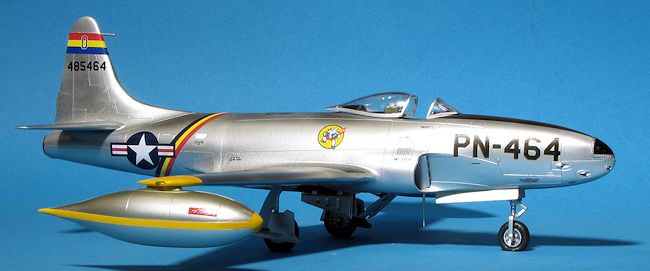
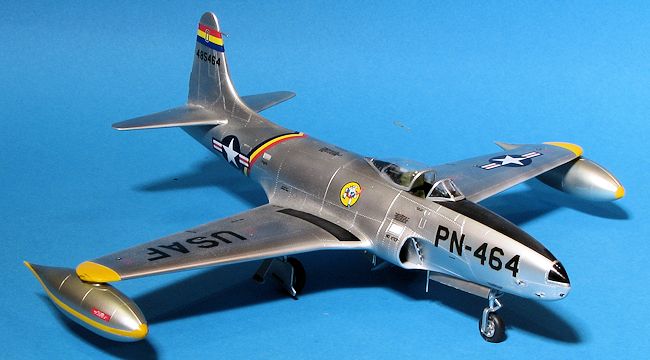
get two sets of markings, both from 1948. One is the box art plane that will
require some careful masking to duplicate. This is from the 61 FS/56 FQ (I think
that is supposed to be FG). and has the later FN buzz number. The other
appears to be the plane of the group commander judging from the multi-color
bands. This one still has the older PN buzz number. It has yellow wing tips and
yellow arrows on the tip tanks. These yellow bits will also need to be painted,
as will the black anti-glare nose markings and black wing walk areas. I am sure
there will be aftermarket done for this one. The sheet is a goodly size and is
well printed. I have had little in the way of difficulties with Hobby Boss
decals in the past, finding them to fit rather well.
| CONSTRUCTION |
Despite the less than sterling commentary floating
around about this kit, I like the aircraft and have enjoyed the building
experience when it comes to Hobby Boss kits so I thought I'd give this one a go.
I like to do sub-assemblies so I opened the sprue bags and started clipping
bits. One thing I noticed when removing the lower wing piece is
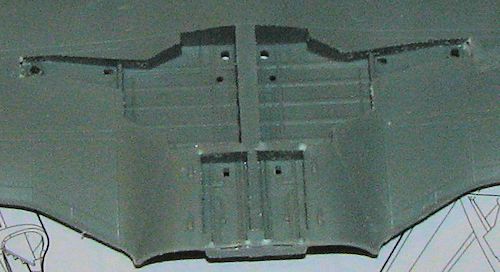 that the area where the wheel
wells and the speed brake well are to be glued in place showed a lot of
deformation. The plastic in this area is very thin and I was surprised it was
not broken, it was so flimsy. You can see the stress areas in the photo. Once
the well pieces were installed, they firmed up quite well and should work out
OK, though the areas to the front of the speed brake well (near the bottom of
the image) as still quite flimsy.
that the area where the wheel
wells and the speed brake well are to be glued in place showed a lot of
deformation. The plastic in this area is very thin and I was surprised it was
not broken, it was so flimsy. You can see the stress areas in the photo. Once
the well pieces were installed, they firmed up quite well and should work out
OK, though the areas to the front of the speed brake well (near the bottom of
the image) as still quite flimsy.
The upper wing pieces were glued in place and I glued the horizontal stabs. I
like that the elevators are molded on one piece as that makes for a thin
trailing edge. It would be nice if that was done for the ailerons as well, but
actually, the fit of the upper wing sections is quite good. I also glued the
wheels together and the tip tanks. Interestingly, these tanks are split
horizontally instead of along the natural vertical seam, so one will need filler
to get them smooth. I also th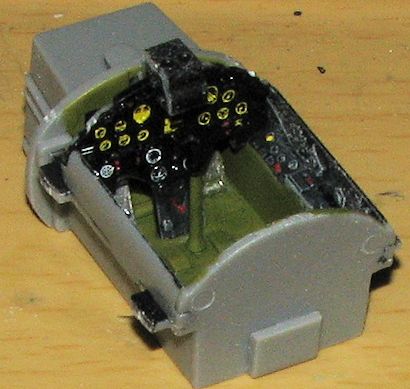 ought the weld seam along the vertical axis was a
lot smaller than I recall the one on the Monogram kit being.
ought the weld seam along the vertical axis was a
lot smaller than I recall the one on the Monogram kit being.
I then started assembling the cockpit and the seat. The seat has a bunch of parts and as usual, I'll install that item near the end of the build. The instrument panel has a two-piece decal that fits quite well and worked well with Mr. Mark Softer setting solution. The tub below the side panels was painted Interior Green using up some of the last of my Polly Scale paint. Everything above the side consoles is black and that includes the small side panels. Rudder pedals were painted aluminum. The black sections were dry brushed to bring out some detail and a bit of red and yellow as sparingly used to pick out a few details. The gun sight is three pieces and once the first two were assembled, it was glued atop the instrument panel. It all looks decent enough though I'm sure a resin cockpit will be even more detailed.
I then glued the exhaust sections together and prepared that for installation. The intake sections are a very nice fit and basically snap into place. At this time, I decided to glue the front and rear fuselage sections together. The instructions would have you not join these until very late in the build, but I felt it might be a good ideal to do this early and perhaps save a possible poor fit.
I then attached the nose gear well and then glued in the cockpit into one fuselage half. Instructions call for 8 grams of nose weight and I attached what I hope was enough. Each of the gun barrels is a separate piece. Those were drilled out and glued in place. The exhaust section was painted and glued in place. I then taped the major bits together to make sure I had enough weight and then glued both the fuselage halves together and then the wing. A few gaps to fill, some caused by the way the sprue attaches to the part and the need to sand it away before joining the bits. This usually resulted in a bit of oversanding, resulting in the gap.
 With that done, the tailplanes were glued on and I
went on to the flaps. Looking at a lot of period photos of F-80s, most of them
did not have the flaps lowered. This is typical wherein you'll get the option to
lower the flaps and then find out that the planes rarely had them down on the
ground. Like with Spitfires and MiG-21s. Naturally, the flaps are not molded to
be up. I had to remove the attachment tabs then grind away some of the lattice
detail in the flap to get it to fit. Thinning out the inner trailing section
will also help. I now had a pretty complete airframe.
With that done, the tailplanes were glued on and I
went on to the flaps. Looking at a lot of period photos of F-80s, most of them
did not have the flaps lowered. This is typical wherein you'll get the option to
lower the flaps and then find out that the planes rarely had them down on the
ground. Like with Spitfires and MiG-21s. Naturally, the flaps are not molded to
be up. I had to remove the attachment tabs then grind away some of the lattice
detail in the flap to get it to fit. Thinning out the inner trailing section
will also help. I now had a pretty complete airframe.
The area surrounding the cockpit was painted black and the gun sight's clear bit was attached. I then masked the clear bits and glued on the windscreen. Back at the seat, I wasn't sure what color to paint it once I had it all together. I checked the ejection seat web site for images of the P-80 seat and sure enough, they had three color photos of the seat. Well, it was sorta like the kit seat. I'm not sure where Hobby Boss came up with the seat they did. It is close, but not the same as what I saw in the pictures. Anyway, it was painted interior green with a green drab parachute and drab harness. This seat doesn't have the parachute pack but the kit does come with straps. The straps were painted OD and then attached to the seat. I glued on the windscreen and pressed the canopy is place before heading to the paint shop.
| COLORS & MARKINGS |
Since I had chosen the less gaudy of the two schemes, I needed to paint the wing tips as well as the nose and outer stripe on the wing tanks white before painting those areas yellow. Those areas were masked off and I started spraying the Alclad II Aluminum. This showed up several seams that I'd missed (the curse of aluminum paint) so I headed back to the bench to fix them. Once that was done, it returned to the spray booth and got a coat of white primer then more Alclad II.
| FINAL CONSTRUCTION |
 Returning to the bench, the kit had the landing gear
installed. I screwed up by not installing the outer gear doors before the main
gear (Wot? Read the instructions?) and I fear this was a mistake. The nose and
main gear are both quite sturdy once the glue dries. Main gear legs are a bit
wiggly. The instructions have you glue the gear doors and the small retraction
brace between them before installing this assembly. I did not and recommend you
do as the instructions mention. I also installed the inner gear doors. These fit
superbly thanks to the well thought out tabs on the doors.
Returning to the bench, the kit had the landing gear
installed. I screwed up by not installing the outer gear doors before the main
gear (Wot? Read the instructions?) and I fear this was a mistake. The nose and
main gear are both quite sturdy once the glue dries. Main gear legs are a bit
wiggly. The instructions have you glue the gear doors and the small retraction
brace between them before installing this assembly. I did not and recommend you
do as the instructions mention. I also installed the inner gear doors. These fit
superbly thanks to the well thought out tabs on the doors.
It was at this point that I started applying decals.
I found no issues with the markings aside from the yellow being perhaps a bit
too light for insignia yellow. I used Mr. Mark Softer on them and had no issues
with the decals overreacting to it. Microsol did pretty much nothing. As usual,
it took the better part of a week to apply decals. Mostly because I do not rush
this stage. The decals are quite thin so one does have to take care not to let
them fold over on themselves or they are the devil to straighten back out. I had
forgotten to paint on the wing walk areas so used solid black decal for these.
 I should also
mention that the placement diagram shows the buzz number outlined in yellow
while it is not on the decal sheet.
I should also
mention that the placement diagram shows the buzz number outlined in yellow
while it is not on the decal sheet.
There were still a few things to attach. One were the wheels. I found the kit wheels to be lacking in depth and the main wheels are too wide so, despite not liking the 'flat tire' look, I used a set of True Details resin replacements as they do an 'early' set for the F-80. Though the price of these has doubled over the years, still worth it.
I also glued on the clear wing tips. These are handed, but the instructions only show an unnumbered part going on the tips. Look at them and you'll figure out which goes where. The landing lights and tail mounted pitot were glued in place. Note that the A model did not have the L shaped pitot under the nose. The last bits were to attach the canopy and the nose radar. This latter part was painted on the inside as they were quite glossy when new. I then glossed up the wing tips and flattened the anti-glare panel and wing walks.
| CONCLUSIONS |
 I have to say
that the kit went together quite well. Hobby Boss has managed to properly think
through the engineering of their kits. However, it still has intakes that are
too large to my eyes and while that may not be a deal killer for many (as the
end result still very much looks the part), I would encourage HobbyBoss to pay
a bit more attention to getting all the details right. There really is no excuse
not to.
I have to say
that the kit went together quite well. Hobby Boss has managed to properly think
through the engineering of their kits. However, it still has intakes that are
too large to my eyes and while that may not be a deal killer for many (as the
end result still very much looks the part), I would encourage HobbyBoss to pay
a bit more attention to getting all the details right. There really is no excuse
not to.
| REFERENCES |
Review kit courtesy of Squadron Products. Get yours at your local retailer.
If you would like your product reviewed fairly and fairly quickly, please contact the editor or see other details in the Note to Contributors.