| HISTORY |
Italaerie 1/72 F-84F Thunderstreak
| KIT #: | 107 |
| PRICE: | $4.00 from the 'junk kit' table |
| DECALS: | Five options |
| REVIEWER: | Scott Van Aken |
| NOTES: | Raised panel lines |
| HISTORY |
In 1949, a swept wing version of the F-84 was created with the hope of bringing performance to the level of the F-86. The last production F-84E was fitted with a swept tail, a new wing with 38.5 degrees of leading edge sweep and 3.5 degrees of anhedral, and a J35-A-25 engine producing 5,300 pound-force (23.58 kN) of thrust. The aircraft was designated XF-96A. It flew on 3 June 1950 with Otto P. Haas at the controls. Although the airplane was capable of 602 knots (693 mph, 1,115 km/h), the performance gain over the F-84E was considered minor. Nonetheless, it was ordered into production in July 1950 as the F-84F Thunderstreak. The F-84 designation was retained because the fighter was expected to be a low-cost improvement of the straight-wing Thunderjet with over 55 percent commonality in tooling.
 In the meantime, the USAF, hoping for improved high-altitude performance
from a more powerful engine, arranged for the British Armstrong Siddeley
Sapphire turbojet engine to be built in the United States as the Wright J65. To
accommodate the larger engine, YF-84Fs with a British-built Sapphire as well as
production F-84Fs with the J65 had a vertically stretched fuselage, with the air
intake attaining an oval cross-section. Production delays with the F-84F forced
the USAF to order a number of straight-wing F-84Gs as an interim measure.
In the meantime, the USAF, hoping for improved high-altitude performance
from a more powerful engine, arranged for the British Armstrong Siddeley
Sapphire turbojet engine to be built in the United States as the Wright J65. To
accommodate the larger engine, YF-84Fs with a British-built Sapphire as well as
production F-84Fs with the J65 had a vertically stretched fuselage, with the air
intake attaining an oval cross-section. Production delays with the F-84F forced
the USAF to order a number of straight-wing F-84Gs as an interim measure.
Production quickly ran into problems. Although tooling commonality with the Thunderjet was supposed to be 55 percent, in reality only fifteen percent of tools could be reused. To make matters worse, the F-84F utilized press-forged wing spars and ribs. At the time, only three presses in the United States could manufacture these, and priority was given to the Boeing B-47 Stratojet bomber over the F-84. The YJ65-W-1 engine was considered obsolete and the improved J65-W-3 did not become available until 1954. When the first production F-84F finally flew on 22 November 1952, it differed from the service test aircraft. It had a different canopy which opened up and back instead of sliding to the rear, as well as airbrakes on the sides of the fuselage instead of the bottom of the aircraft. The aircraft was considered not ready for operational deployment due to control and stability problems. The first 275 aircraft, equipped with conventional stabilizer-elevator tailplanes, suffered from accelerated stall pitch-up and poor turning ability at combat speeds. Beginning with Block 25, the problem was ameliorated by the introduction of a hydraulically powered one-piece stabilator. A number of aircraft were also retrofitted with spoilers for improved high-speed control. As a result, the F-84F was not declared operational until 12 May 1954.
Project Run In completed operational tests in November 1954 and found the
aircraft to be to USAF satisfaction and considerably better than the F-84G.
However, ongoing engine failures resulted in the entire fleet being grounded in
early 1955. Also, the J65 engine continued to suffer from flameouts when f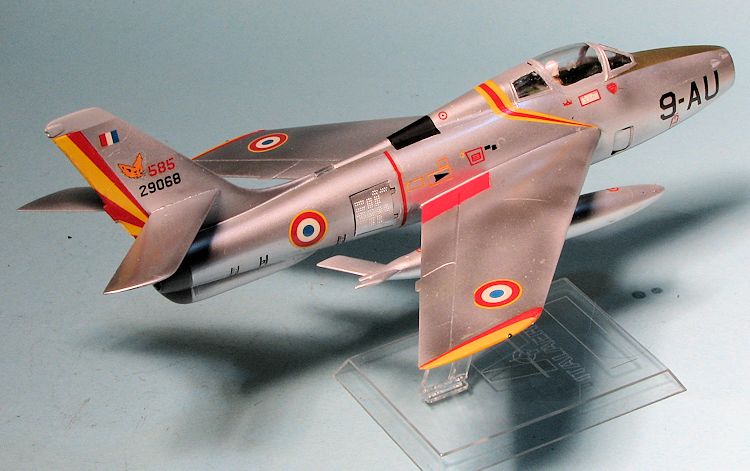 lying
through heavy rain or snow. As the result of the problems, the active duty phaseout began almost as soon as the F-84F entered service in 1954, and was
completed by 1958. Increased tensions in Germany associated with construction of
the Berlin Wall in 1961 resulted in reactivation of the F-84F fleet. In 1962,
the fleet was grounded due to the corrosion of control rods. A total of 1,800
man hours were expended to bring each aircraft to full operational capacity.
Stress corrosion eventually forced the retirement of ANG F-84Fs in 1971.
lying
through heavy rain or snow. As the result of the problems, the active duty phaseout began almost as soon as the F-84F entered service in 1954, and was
completed by 1958. Increased tensions in Germany associated with construction of
the Berlin Wall in 1961 resulted in reactivation of the F-84F fleet. In 1962,
the fleet was grounded due to the corrosion of control rods. A total of 1,800
man hours were expended to bring each aircraft to full operational capacity.
Stress corrosion eventually forced the retirement of ANG F-84Fs in 1971.
In what is probably one of the very few air-to-air engagements involving the F-84F, two Turkish Air Force F-84F Thunderstreaks shot down two Iraqi Il-28 Beagle bombers that crossed the Turkish border by mistake during a bombing operation against Iraqi Kurdish insurgents. This engagement took place on 16 August 1962.
The F-84F was retired from active service in 1964, and replaced by the North American F-100 Super Sabre and relegated to duty in the Air National Guard. The last F-84F Thunderstreak retired from the ANG in 1971. Three Hellenic Air Force RF-84Fs that were retired in 1991 were the last operational F-84s.
| THE KIT |
The
F-84F has not been served all that well by kit makers in 1/72 scale. Your editor
can only think of two mainstream kits produced of this aircraft in this scale
and those are by Airfix and Italeri. As a note, it was pointed out to me that
Hawk did one, though I think it was more of a prototype. There may well have been resin kits and I
believe that PJ Production did one. As a note, this is a very old boxing of the kit and thus the longer spelling of Italaerie
The kit itself has three sprues of which one is clear. This is a kit of the
raised panel line era and I am pretty sure it is from the early 1970s as the box
has the old Italaerie spelling of the company name on it. There is little in the
way of cockpit detail, which basically consists of a seat shape, a rear bulkhead
on which to place the seat, and a pilot to put in the seat. No floor, no control
stick, no rudder pedals. There is a space for an instrument panel on the
anti-glare panel. I know of no aftermarket cockpit.
Main gear is molded into one of the gear doors and the separate wheels are then
cemented to the axles on the door. The nose gear and wheel is a single piece.
The kit does comes with the ability to build it with the wheels up. There is a
separate windscreen and canopy. The canopy can be posed open, though there is
really nothing to see in the cockpit. The kit does come with a display stand.
Instructions
in my kit consist of four construction steps and no 'underway' color
information. There are markings for two planes. One is a generic USAF aircraft
in unpainted metal while the other livery option is for the Italian aerobatic
team that was formed for the Olympic Games. There are options for several
different serial numbers and these planes were all painted with different color
upper fuselages and fins, the wings being in the Italian Tricolor. The decals in
my kit were trash, the reason the kit was only $4.00, however, there have been
sheets offered that feature this aircraft, so I will at least be able to build
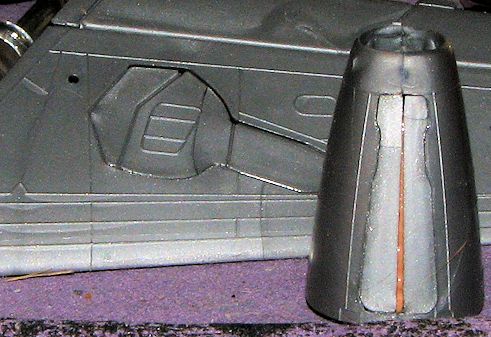
it. 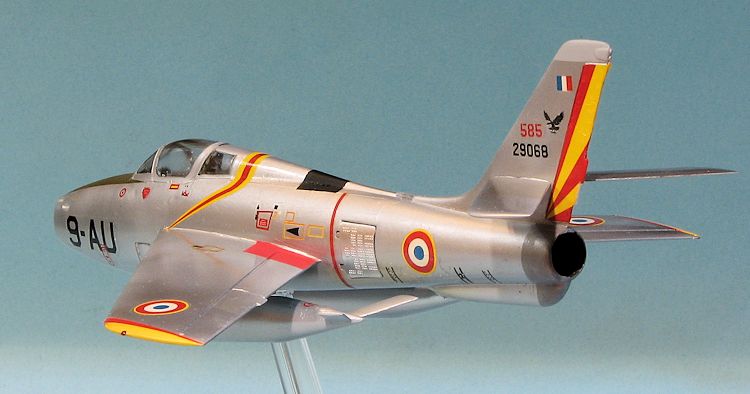 Since Italeri has also boxed this as an RF-84F, there is a separate nose. Weight
needs to be placed into the nose gear well halves which also form the intake
interior. I suggest filling it. The wheel wells in the wing are not boxed in.
Wings are two upper and lower sections that are joined and fit into the
fuselage. The fuselage has separate speed brakes, but no actuators. There is no
jet pipe so it may be wise to either make one or put in a blanking plate to
prevent see-through. For things under wings, you have four wing pylons and four
large fuel tanks.
Since Italeri has also boxed this as an RF-84F, there is a separate nose. Weight
needs to be placed into the nose gear well halves which also form the intake
interior. I suggest filling it. The wheel wells in the wing are not boxed in.
Wings are two upper and lower sections that are joined and fit into the
fuselage. The fuselage has separate speed brakes, but no actuators. There is no
jet pipe so it may be wise to either make one or put in a blanking plate to
prevent see-through. For things under wings, you have four wing pylons and four
large fuel tanks.
| CONSTRUCTION |
It has been over 20 years since I last built one of these and before that I built several of this version and the similar RF-84F. Italeri simply provided a new nose for the recce bird. I started by gluing together drop tanks, the wing halves and the nose gear well. The wings have all the edges molded into the top part with the underside being a smaller insert that includes the already drilled out pylon holes.
I then assembled the cockpit such as it is. The interior bits were painted
and I glued in the small quarter
 windows in to the fuselage halves. Then nose
gear well was trapped between the nose halves and I cemented the fuselage halves
together. There is a considerable seam where the nose fits and after filling and
sanding this as well as the lower wing insert I decided to go ahead and remove
all of the raised detail. I had opened the hole in the fuselage to take a stand
so this would fit into the scheme of things. I found out that all of the gear
doors were smaller than the area in which they had to fit so they needed a lot
of attention. In order to get them to where they could be reasonably flush with
the surrounding airframe, I used Silly Putty to hold them in place while super
glue and other cements were used to form a permanent bond.
windows in to the fuselage halves. Then nose
gear well was trapped between the nose halves and I cemented the fuselage halves
together. There is a considerable seam where the nose fits and after filling and
sanding this as well as the lower wing insert I decided to go ahead and remove
all of the raised detail. I had opened the hole in the fuselage to take a stand
so this would fit into the scheme of things. I found out that all of the gear
doors were smaller than the area in which they had to fit so they needed a lot
of attention. In order to get them to where they could be reasonably flush with
the surrounding airframe, I used Silly Putty to hold them in place while super
glue and other cements were used to form a permanent bond.
With the fuselage properly filled and sanded, I attached the wings. These are a particularly poor fit with huge gaps that required a lot of attention and considerably slowed the build. The horizontal stabilizers were then glued in place. Meanwhile the pilot was painted and after the clear bits masked, he was plunked into the seat. I also filled the rather large gap at the front of the windscreen as well as those around the canopy hinge area.
After sanding smooth the inner wing pylons, those were installed. The outer pylon holes were filled in as I found more photos of these planes without them than with them. With the clear bits attached, it was time for some paint.
| COLORS & MARKINGS |
I first sprayed it with Testors grey primer. There
were a few panel lines I missed and a sunken in area or two from the filler, but
I decided to forge ahead as this isn't a contest model. A coat of Alclad II
Aluminum was applied to the airframe and the drop tanks. I then masked off the
anti-glare panel and painted it olive
 drab. The large radome on the spine was
given some black and the area around the exhaust was sprayed dark aluminum.
drab. The large radome on the spine was
given some black and the area around the exhaust was sprayed dark aluminum.
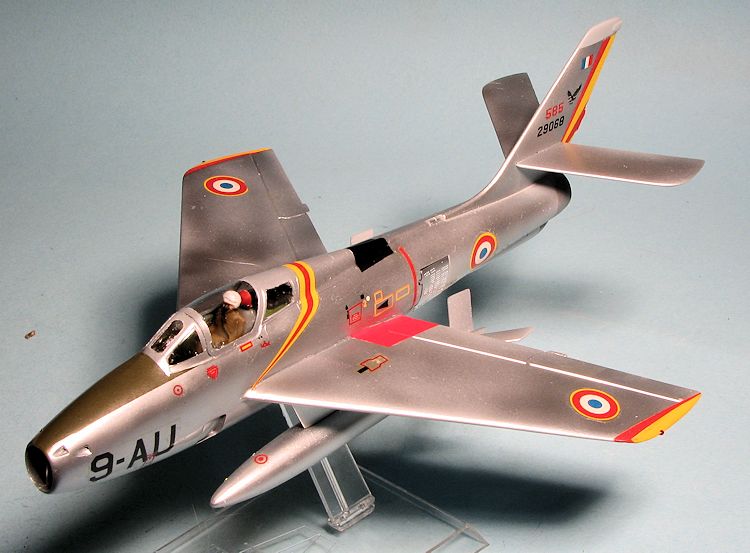
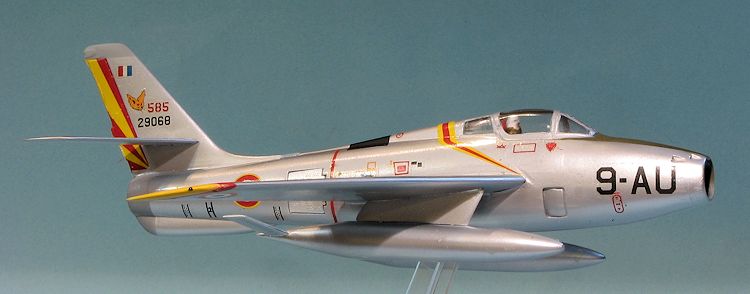
Looking at the decals I would be using (Modeldecal sheet #43 from 1977) showed that I needed to paint the flap warning areas red, the fin tip a light grey and the wing tips in yellow. More masking and those areas were painted. I also painted the speed brakes with polished aluminum.
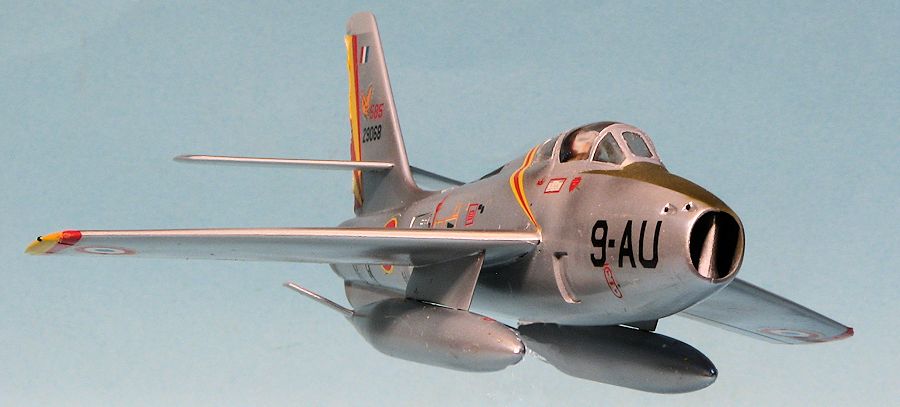
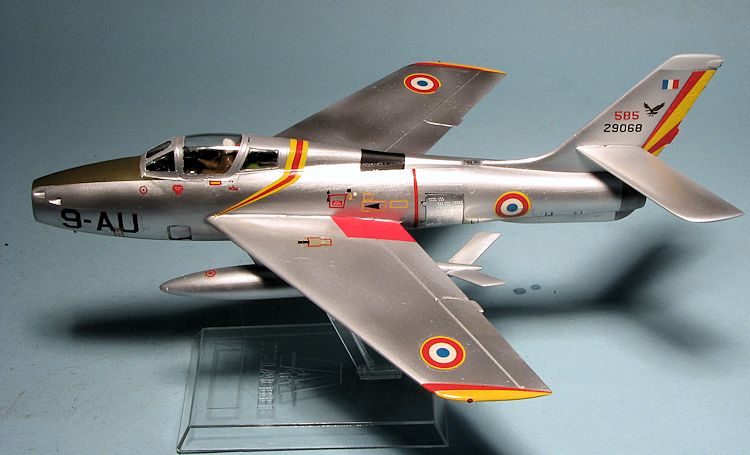
Due to the age of the decals (nearly 40 years old), I was concerned that they would no longer be viable. However, I found that not to be the case. I chose the markings of EC 1/9 'Limousin' from 1961 with the nice yellow and red markings. I did note that the rudder stripes are probably fitted for the Airfix kit as the trim tab section was too high for the Italeri version. I was also able to salvage the refueling door from the kit decals. Modeldecals are pretty thick compared to what we expect today so all the markings have a rather clear ridge around them.
Once the markings were all on, I glued together the stand and then attached the aircraft to it at a jaunty angle. The aircraft had to be glued on and I used super glue. The whole thing was given a coat or two of clear gloss acrylic and the matte areas were brush painted with clear matte. Last steps for this one were to remove the masking and glue on the speed brakes, the spine light (which doesn't fit too well) and at last, the drop tanks were pressed on as they are a tight fit.
| CONCLUSIONS |
 I often wonder
why I build kits like this, especially with a lot of more modern ones around.
Seems like I have some sort of psychological need to build abandon kits and I'm
sure psychiatrists would have a field day with that. I also happen to like the
swept wing F-84 and available kits are pretty much limited to these oldies.
Building stand models is also a nice break from things and they seem to actually
take more work than if they were on their gear. I notice that these tend
to be built in groups with long layoffs in between. Bottom line is that I get a
nice looking model at a bargain price that, while it won't win contests, will
help eat up another set of decal markings (actually the second one on the sheet
I used, which surprised me). If you are tired of fiddling with detail and want
to build something that just looks nice, give a kit like this a try.
I often wonder
why I build kits like this, especially with a lot of more modern ones around.
Seems like I have some sort of psychological need to build abandon kits and I'm
sure psychiatrists would have a field day with that. I also happen to like the
swept wing F-84 and available kits are pretty much limited to these oldies.
Building stand models is also a nice break from things and they seem to actually
take more work than if they were on their gear. I notice that these tend
to be built in groups with long layoffs in between. Bottom line is that I get a
nice looking model at a bargain price that, while it won't win contests, will
help eat up another set of decal markings (actually the second one on the sheet
I used, which surprised me). If you are tired of fiddling with detail and want
to build something that just looks nice, give a kit like this a try.
| REFERENCES |
http://en.wikipedia.org/wiki/Republic_F-84F_Thunderstreak
January 2015
Review kit thanks to my inherent cheapness.
If you would like your product reviewed fairly and fairly quickly, please contact the editor or see other details in the Note to Contributors.