| KIT #: | 80258 |
| PRICE: | $9.99 MSRP |
| DECALS: | Two options |
| REVIEWER: | Scott Van Aken |
| NOTES: | You could call this an EZ build kit...until you build one. |
| HISTORY |
 Probably the eminent Allied fighter jet of the early and mid 1950s was the F-86 Sabre. Combat proven in Korea, it was considered by many nations to be something that they wanted in their inventory. It was manufactured by the Japanese who built hundreds of the F-86F-40 version and even more were churned out by Canadair who provided these aircraft for the USAF and many NATO countries.
The F-86F-30 was a variant that was produced in the greatest numbers, though the -35 and -40 were often quite close and many were upgraded to -40 condition. While waiting for the Hunter to get on line, the RAF was one of the bigger users of the type with many squadrons flying the aircraft in the early/mid 1950s. Often overlooked by RAF enthusiasts because they 'weren't made here', the Sabre made a considerable contribution to the RAF's NATO commitments and many pilots actually preferred it to British-made jets they later flew.
| THE KIT |
The Hobby Boss kit is not, of course, marketed as a Sabre F.4, but as a standard Korean War F-86F-30. Typical of their lower priced kits, there are not a lot of parts, with the majority of the fuselage molded as one piece with the lower fuselage incorporated with the wings. A basic cockpit that has a seat and control stick are included. No instrument panel or even a decal are provided. 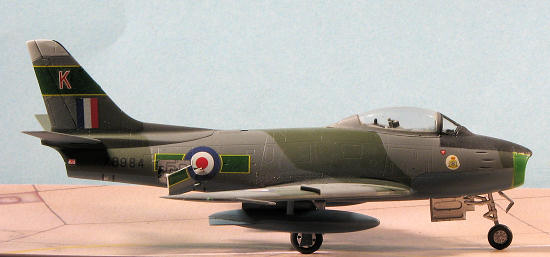 There is a nice intake trunking on which the cockpit sets and there is a nose piece that slots in place. The speed brakes are molded in the full open position and typically, do not have the 'droop' the real ones exhibit when open.
Landing gear is sturdy and gear doors have huge tabs to fit into equally huge slots. There are convincing early fuel tanks (without the little winglets on the fins), and this is all topped with a one-piece canopy, also with huge tabs.
The decal sheet is superb with markings for two Korean War planes. One is James Jabara's 334 FS aircraft from July 1953. The sheet includes the fuselage band so no painting needed here. The other is a South African Air Force plane from 2 Sq, also from mid 1953. Unfortunately, the orange in the SAAF insignia and fin flash is printed red, making these markings useless. Instructions are pretty basic as is the kit and paint information is provided for Gunze paints. Fortunately, since Gunze is either unavailable or has priced itself out of the market in many places, generic color information is given.
| CONSTRUCTION |
I'd like to think that this was going to be an easy build, but of course, there were situations that arose which one never fully expects.
I brazenly started with the cockpit, painting it Dark Gull Grey with black consoles and a black instrument panel section. The seat was also painted grey with a red head rest facing. I then assembled the drop tanks, filling in the gaps for the small brace section. 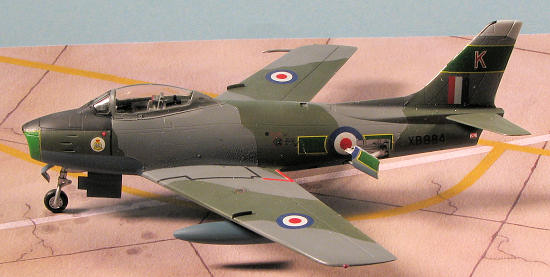 The lower fuselage join is one that really needs a lot of filler. Simple builds they can be, if you don't mind huge join seams. For the rest of us, it is several applications of filler and sanding. Be sure to add weight to the nose when installing the intake and before closing the fuselage halves. Don't forget there is an exhaust piece as well. I nearly did.
I then pushed on the nose piece, only to be rewarded with a large crack on the right fuselage. You see, the nose mounting tabs are a bit larger than the slots and pushing it in will result in the fuselage cracking. I pulled out the nose piece, enlarged the openings and reapplied. Along with filler and sanding to take care of the broken seam.
Construction continued as I masked the canopy and glued it in place. I'd already decided to do an RAF version so had grabbed the instrument panel decal from Modeldecal sheet #97, which I'd used several years ago on a Hobbycraft Sabre. It was now a good time to paint this beastie.
| COLORS & MARKINGS |
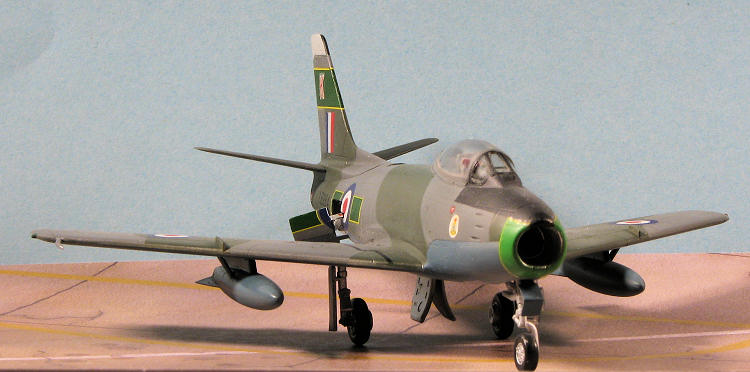
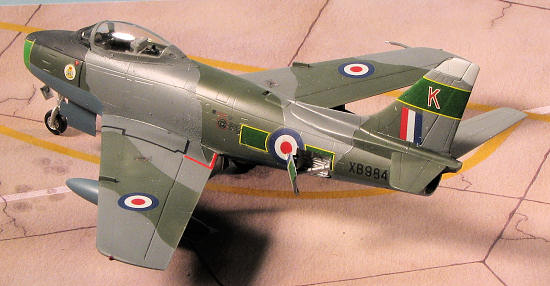
RAF Sabres were in Dark Green/Dark Sea Grey over PRU Blue, a color combination that I particularly like. Fortunately, I had all these colors. The upper surface ones were Model Master Enamel while the PRU Blue was from an old and now near empty 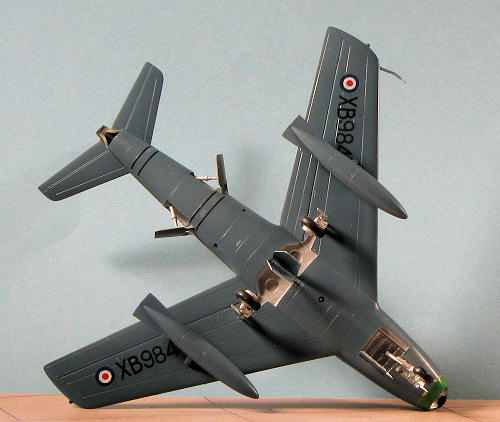 Aeromaster Acrylic bottle.
First step was to paint the PRU Blue. I painted the horizontal stabiliators separately from the rest of the airframe. The drop tanks and pylons were also painted PRU Blue. The color demarcation line on these planes is quite sharp so I masked rather than hand spray it. The two upper colors were applied with little drama either, the Tamiya Tape holding well, and not pulling up any paint when removed. The nose anti-glare panel was painted with Gunze Mr.Color Black lacquer. I then realized I'd forgotten to paint the speed brakes and gear doors. That was taken care of with the inner gear doors painted Aluminum, using Alclad II. Apparently Canadair did not use a green chromate primer as all references I've seen have specified aluminum. I also painted the nose with a green for the scheme I wanted to use.
That done, a coat or two of Future/Kleer was applied in preparation for the decals.
But first, landing gear. The main gear fit quite well with no problems. The holes for the nose gear, however, seemed flashed over. I opened them up with a scalpel and installed the nose gear. Imagine my surprise to see the gear tabs sticking through the lower intake walls! Makes one want to say 'darn'.
Well, nothing to do about it but continue. Modeldecal sheet 97 was printed in 1989, making my copy 20 years old. I also had used up the common markings on the Hobbycraft kit and while I got many of them from the Hobby Boss sheet, some were just not to be had. The Modeldecal markings were showing their age somewhat. I chose the 3 Squadron jet with the green tail band. Initial application of the band was good, but when I move it, the part that wraps around the forward section of the fin splintered. 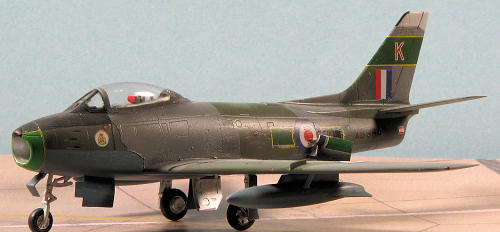 Copious applications of Solvaset helped somewhat, but it isn't perfect. This is another 'darn'. The rest of the Modeldecal markings were put on slowly to be sure that I got them all correct.
There is one thing I should mention about Modeldecal. It is a system. Their sheets provide the unique markings for a scheme and with RAF aircraft, one is expected to get their insignia, number and letter sheets to complete the markings. Yep, you have to cut out each number and letter of the serial number for each option. This means you need Modeldecal sheets 33, 35 and 36 for the numbers and letters and sheet 47 for the insignia and fin stripes. Fortunately, I've been a Modeldecal fan since I first discovered aftermarket decals and have a goodly supply. Hannants also reprints many of these sheets, having bought the company way back when. It does make decal application a bit time consuming, especially the small fuselage serials.
| CONSTRUCTION CONTINUES |
Finally the decals were all applied. I had to cut the speedbrake door hinges so that they could be closed up while the roundels and other markings that went over the doors were applied. A new scalpel blade was used to cut the doors once the decals had 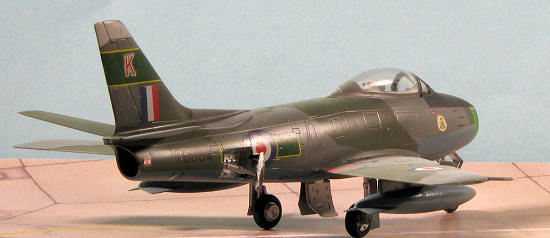 dried. I then positioned the doors to hang down when open rather than be straight out. This required the actuator attachment to be trimmed down as these are keyed with a D shaped hole.
I then attached the main wheels and the front nose gear door. This door should butt right up against the nose gear on the bottom but there is a huge gap. This is probably due to the nose gear being mounted too far back in the well. Thankfully, I had put enough weight in the nose to prevent tail sitting, though it will do so if you push on the back. The tail planes were simply snapped into place. I had to trim back the drop tank pylon pins to get the tanks to fit closer to the underside of the wing.
Then it was the usual. Attach the gear doors and do the touch-up painting that seems to always be needed at the end of a build. The masking was removed and that was it.
| CONCLUSIONS |
To be honest, this was not as easy a build as I'd thought it might be. Sure, the parts fit was good, but the additional work needed f or the large fuselage seam, painting the three color camo, and getting the speedbrakes in position for the decals, as well as adding all those serial decals really increased the build time. Were I doing the kit markings, it may not have taken so long.
However, I found that the Hobbycraft kit may well have been no more difficult a build in this case and I'd have benefited from the additional detail and accuracy that the HC kit offers. Both have their plusses and minuses and while this one is a bit light on detail (no fuel dump pipe, for instance), it does make into a very nice kit for the shelf.
Here is another to which you can thank me for the huge expenditure of funds.
March 2009
If you would like your product reviewed fairly and fairly quickly, please contact the editor or see other details in the Note to Contributors.