Academy 1/72 T-6G Texan
| KIT #: | 82114 |
| PRICE: | $7.99 on the price sticker |
| DECALS: | Two options |
| REVIEWER: | Scott Van Aken |
| NOTES: | 1998 release |
| HISTORY |
The North American Aviation T-6 Texan is a single-engined advanced
trainer aircraft used to train pilots of the United States Army Air Forces
(USAAF), United States Navy, Royal Air Force, and other air forces of the
British Commonwealth during World War II and into the 1970s. Designed by North
American Aviation, the T-6 is known by a variety of designations depending on
the model and operating air force. The United States Army Air Corps (USAAC) and
USAAF designated it as the AT-6, the United States Navy the SNJ,
an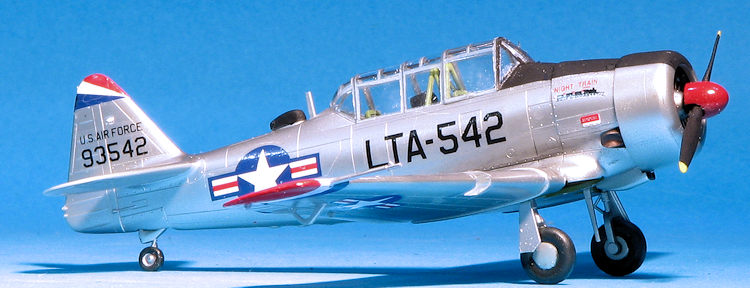 d British Commonwealth air forces, the Harvard, the name by which it is
best known outside of the US. After 1962, US forces designated it the T-6.
It remains a popular warbird aircraft used for air show demonstrations and static
displays. It has also been used many times to simulate various Japanese
aircraft, including the Mitsubishi A6M Zero in movies depicting World War II in
the Pacific.The last military to use the T-6/Harvard was the South African Air
Force which retired the last one in 1995.
d British Commonwealth air forces, the Harvard, the name by which it is
best known outside of the US. After 1962, US forces designated it the T-6.
It remains a popular warbird aircraft used for air show demonstrations and static
displays. It has also been used many times to simulate various Japanese
aircraft, including the Mitsubishi A6M Zero in movies depicting World War II in
the Pacific.The last military to use the T-6/Harvard was the South African Air
Force which retired the last one in 1995.
The T-6G was an earlier model AT-6/T-6 re-built between 1949-1953 with improved
cockpit layout, increased fuel capacity, steerable tailwheel, updated radios and
a 600hp R-1340-AN-1 engine. Identifiable by simplified canopy framing. 2068
modified.
| THE KIT |
Academy's kit has been with us for nearly two decades and is a very nice kit. I includes a well appointed interior with sidewall detailing. The roll over bar is molded into these side pieces making for easy assembly. Probably the only thing missing are seat belts.
In the front is an engine face with separate exhaust system. A single piece prop has the option of a spinner if you wish to add it. The cowling is a single piece and lacks the wartime gun trough. For those wondering, a wartime AT-6/SNJ cannot be built using this kit without replacing the cowling, canopy and some other bits.
 Wings are a full lower piece and separate upper halves. There is a
centerpiece that fits in to be the roof of the main gear well. Interestingly,
the clear bits are a separate windscreen, separate forward canopy and the rest
of the clear pieces are molded as one. At this stage, I'm not sure if the
forward canopy can be posed open or not. There are different radio masts and an
ADF antenna to be fitted.
Wings are a full lower piece and separate upper halves. There is a
centerpiece that fits in to be the roof of the main gear well. Interestingly,
the clear bits are a separate windscreen, separate forward canopy and the rest
of the clear pieces are molded as one. At this stage, I'm not sure if the
forward canopy can be posed open or not. There are different radio masts and an
ADF antenna to be fitted.
The wing has separate aileron hinges on the bottom, separate landing lights and a radio antenna. Landing gear is nicely done and you have gear doors that can be attached, though not all planes had doors so check your references.
Instructions are well done with generic color names in several
languages. Markings are for the box art plane of the Korean Air Force, and
unpainted USAF 'Mosquito' as used in the Korean War and a camouflaged Israeli
airplane. The decals look very nice and while I have never had issues with
Academy decals, others have so be advised.
| CONSTRUCTION |
 at the same
time as the side walls as it will fit a lot better if you do. The front
panel was glued to the inside of one fuselage half, and after opening a hole
for a radio mast, the fuselage halves were glued together
at the same
time as the side walls as it will fit a lot better if you do. The front
panel was glued to the inside of one fuselage half, and after opening a hole
for a radio mast, the fuselage halves were glued together| COLORS & MARKINGS |
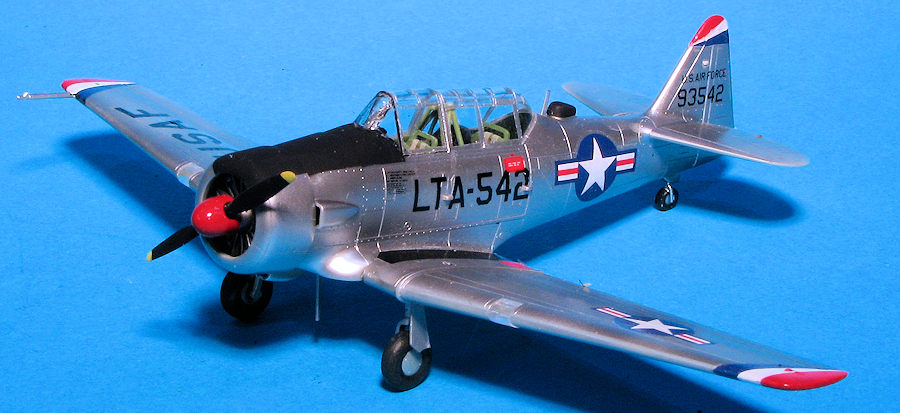
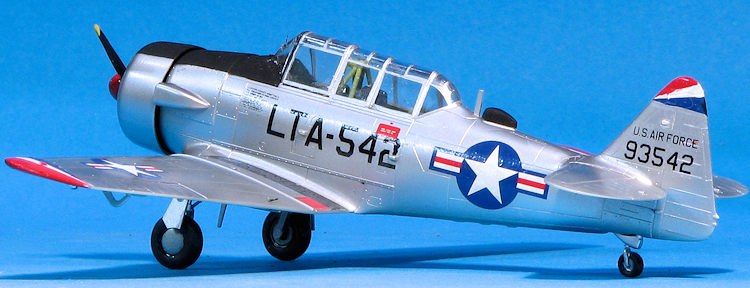
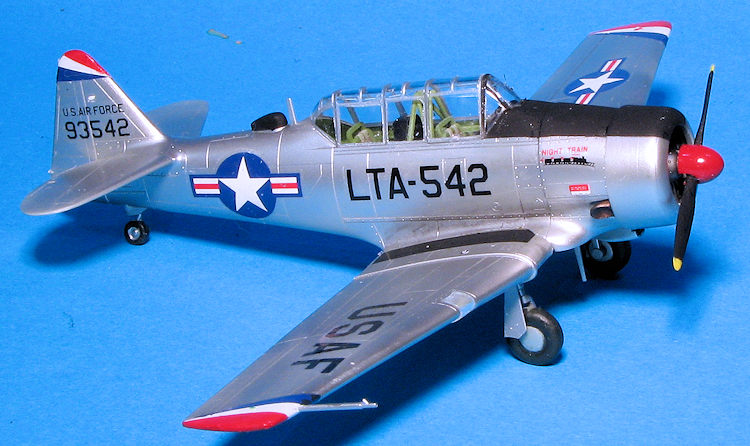
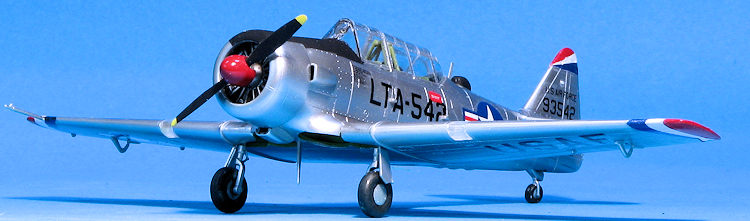 I chose the USAF LT-6G option
which meant overall aluminum with a black anti-glare panel. I filled the wheel
wells with Silly Putty, attached the pitot tube and radio mast before painting
everything with Alclad II aluminum. Main wheels and tail wheel assembly was also
painted aluminum and later brush painted with Tamiya's NATO black.
I chose the USAF LT-6G option
which meant overall aluminum with a black anti-glare panel. I filled the wheel
wells with Silly Putty, attached the pitot tube and radio mast before painting
everything with Alclad II aluminum. Main wheels and tail wheel assembly was also
painted aluminum and later brush painted with Tamiya's NATO black.
With that all done, I cemented on the landing gear to keep the airframe off the ground and then attached the engine and exhaust. I had to cut the mounting points from the back of the engine piece to get the proper cowling alignment.
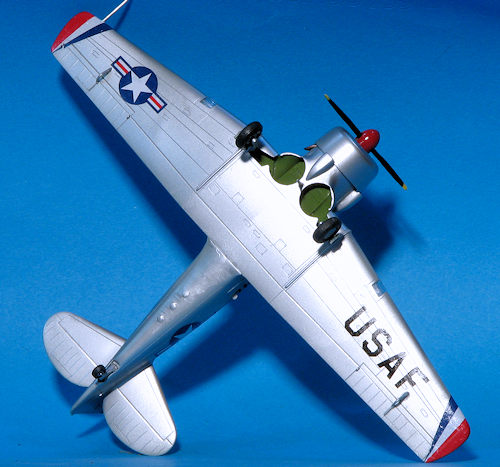 The LT-6G option has red, white, and blue wing tips and fin tip. The Academy
decals for these areas gave me fits. They refused to conform over the wing tips
using standard (Microsol) decal fluid. In fact, the parts that needed to curve
around flaked off when forced. Stronger fluids caused the inks to run. If doing
this option, I highly recommend painting these areas. They are straight lines so
should be fairly easy to do. The rest of the markings, since they did not have
to go around tight curves, worked fine. Note that you'll need to cut the side
numbers where they go around the steps. Unfortunately, finding aftermarked for
the T-6 in this scale is not simple as not that much has actually been done.
The LT-6G option has red, white, and blue wing tips and fin tip. The Academy
decals for these areas gave me fits. They refused to conform over the wing tips
using standard (Microsol) decal fluid. In fact, the parts that needed to curve
around flaked off when forced. Stronger fluids caused the inks to run. If doing
this option, I highly recommend painting these areas. They are straight lines so
should be fairly easy to do. The rest of the markings, since they did not have
to go around tight curves, worked fine. Note that you'll need to cut the side
numbers where they go around the steps. Unfortunately, finding aftermarked for
the T-6 in this scale is not simple as not that much has actually been done.
Last steps were the installation of the prop and the remaining antennas as well as the gear doors. The landing light covers were a perfect fit as well. The masking was taken off and that was it.
| CONCLUSIONS |
This is really a great little kit, marred only by the less than great
decals. It is much nicer than the Heller kit, and miles ahead of the Airfix kit
(which is only one that actually does a Harvard). I've not built the Hobby Boss
kit so cannot use that as a comparison. The kit builds quickly and the end
result is a very nice little model for the display shelves.
| REFERENCES |
https://en.wikipedia.org/wiki/North_American_T-6_Texan
23 December 2016
Copyright ModelingMadness.com. All rights reserved.
If you would like your product reviewed fairly and fairly quickly, please contact the editor or see other details in the Note to Contributors.
Back to the Main Page Back to the Review Index Page Back to the Previews Index Page2026