Kitty Hawk 1/48 F2H-2 Banshee
| KIT #: | KH 80131 |
| PRICE: | $64.00 |
| DECALS: | Four options |
| REVIEWER: | Scott Van Aken |
| NOTES: | New tool kit 2016 |
| HISTORY |
The F2H-2 was the foundation for three minor variants of the Banshee. The first, the F2H-2B, had strengthened wings and a strengthened inner pylon under the portside wing to allow the craft to carry a 1,650 lb (748 kg) Mark 7 nuclear bomb or a 3,230 lb (1,465 kg) Mark 8 nuclear bomb. In order to compensate for the vastly increased load, the F2H-2B was fitted with stiffer landing gear struts and a pilot-switchable power booster for the ailerons; the latter was necessary so pilots could control a roll to the left with a heavy Mark 8 nuclear bomb fitted on the left-hand pylon. One 20 mm cannon was omitted to make room for additional electronics to arm the nuclear weapon.
 The F2H-2N was a night fighter variant outfitted with a 2 ft 10 in
(0.86 m) longer nose that housed a Sperry Corporation AN/APS-19 radar unit. The
cannons were moved rearwards in the nose to make room for the radar. One F2H-2N,
BuNo 123311, was eventually returned to
McDonnell to serve as the prototype for the enlarged and enhanced F2H-3 and
F2H-4 series. A handful of F2H-2Ns retained the "kneeling" nose feature of the
earlier F2H-1.
The F2H-2N was a night fighter variant outfitted with a 2 ft 10 in
(0.86 m) longer nose that housed a Sperry Corporation AN/APS-19 radar unit. The
cannons were moved rearwards in the nose to make room for the radar. One F2H-2N,
BuNo 123311, was eventually returned to
McDonnell to serve as the prototype for the enlarged and enhanced F2H-3 and
F2H-4 series. A handful of F2H-2Ns retained the "kneeling" nose feature of the
earlier F2H-1.
The F2H-2P was a photo-reconnaissance version with six cameras housed in a 2 ft 5 in (0.74 m) longer nose; it was the first jet-powered reconnaissance aircraft used by the USN. Remote controls allowed the pilot to rotate the cameras in the vertical and horizontal planes, and the aircraft could be fitted with a pair of underwing pods that each contained 20 flash cartridges for night photography. The camera bay was electrically heated to prevent frost. The F2H-2P was considered a valuable photo-reconnaissance asset due to its long maximum range for a jet aircraft, maximum operational altitude of 48,500 feet, combined with its speed that made it extremely difficult to intercept by other combat jet aircraft of the early 1950s era.
An interesting note is that the Banshee was one of the few fighters that could intercept the B-36. Thanks to is broad, straight wing, it could not only reach the B-36's altitude, but could maneuver as well. Swept wing jets might be able to get there, but once they maneuvered, they tended to stall.
| THE KIT |
 Modelers have been waiting a long time for a nice Banshee in 1/48
scale. This is not the first time the plane has been kitted in this scale, the
most widely available one being a Hawk kit from back when dinosaurs ruled the
earth that was lacking in detail and had some shape issues.
Modelers have been waiting a long time for a nice Banshee in 1/48
scale. This is not the first time the plane has been kitted in this scale, the
most widely available one being a Hawk kit from back when dinosaurs ruled the
earth that was lacking in detail and had some shape issues.
I am not one to break out the micrometer when it comes to kits, but I'd say this one should fill the bill for most of us. The box contains three large sprues and one clear. Detailing is typical of modern kits with engraved detailing and that includes rivet patterns.
The cockpit has nice detailing and one gets decals to use on the panels if one wishes, though the printing on these is not as clear as it could be. There is an eight piece ejection seat and photo etch harness. This fits into a tub that you build up with inside panels and aft bulkhead. There is a rear shelf that fits behind the armor plate.
Nose gear well builds up out of five main pieces with piping on the 'roof' and nose gear door hinges on the side panels. I like that this is done during initial build up as often these are difficult to get in place later. Once the cockpit and nose gear well are built up (and the instructions have to attach the nose gear at this time), Those and the tail hook well fit into fuselage halves and the halves are closed.
Next steps have you construct the main gear assemblies and your
choice of nose. The gun nose has full guns with ammo bins. There are panels on
the side that can be displayed open and come with door braces. The cap then fits
in place. Those not wanting the doors op en can leave off the ammo bins to
provide room for weight. No weight is indicated, but you will need it. The
camera nose is even more complex with all those clear windows on the side of the
panels. There are five cameras provided: four are vertical and one is for the
nose. The lower windows fit into place once the nose halves are assembled. There
is no room for nose weight in the nose, but there may be enough just forward of
the instrument panel and behind the nose well.
en can leave off the ammo bins to
provide room for weight. No weight is indicated, but you will need it. The
camera nose is even more complex with all those clear windows on the side of the
panels. There are five cameras provided: four are vertical and one is for the
nose. The lower windows fit into place once the nose halves are assembled. There
is no room for nose weight in the nose, but there may be enough just forward of
the instrument panel and behind the nose well.
One reason you'll need weight is that there are two complete engines provided and you won't be able to leave them out as they are integral with the intakes and exhaust. Kitty Hawk has designed the kit with a separate lower central wing section onto which the engines and main gear wells will fit. Instructions would have you paint the gear wells white, but I don't think that is correct for the sea blue options.
Then come the wings. Kitty Hawk's instructions call the folded wings 'closed' and the lowered wings 'open' so be sure to keep that in mind during the build. It can initially be confusing. Before installing the lower fuselage/wing section, one will have to install the two short upper wing pieces and then decide on raised or lowered flaps. While only the lowered option is shown, I'm betting you can model them up.
For the outer wings, there are inserts that fit in the end of both wing sections for the folded wing option. There is a lot of detail in these areas with seven separate bits in each wing stub. For the lowered wings there is no positive alignment section so care will be needed if doing the plane with straight wings. When I build this kit, I'll probably attach the upper wing first and when it is in place, then go with the lower. That should prevent any issues with a step.
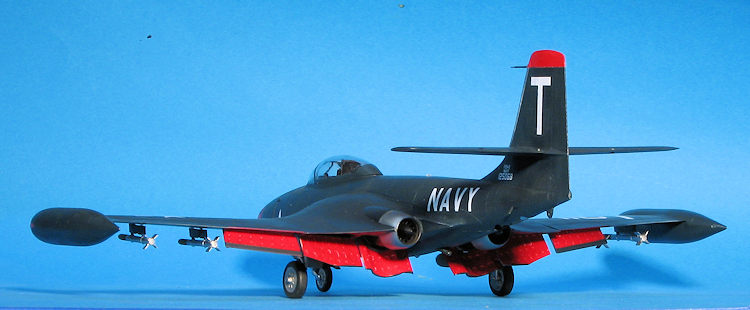
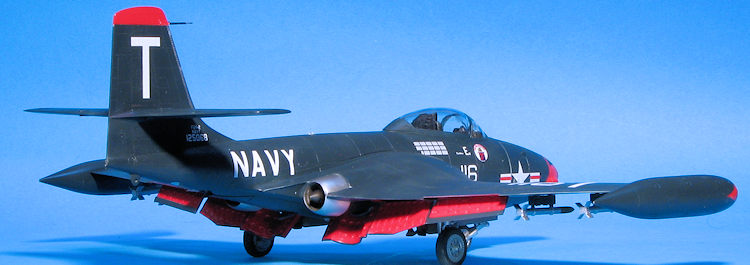
You can also model the wing spoilers deployed and that is what the rest of the photo etch is for. Frankly, I don't recall seeing photos with these deployed on the deck, but the option is there. There are wing trailing edge speed brakes, and these will be deployed open with the wings folded. Pictures show that when the flaps are lowered, the lower parts of these speed brakes are also lowered. The inside of these and the flaps are red so I'm assuming the flap wells are this shade also.
 Wing tip tanks are designed so you can model the plane without them
installed, but this would be relatively rare on the -2/2P. Kitty Hawk has opened
all the holes for the bomb and rocket racks and you will have to fill them if
not using them all (such as with the photo recce bird). Period photos of the
photo recce version show them usually devoid of lower wing racks, but at least a
couple show Marine planes with the outer ones installed.
Wing tip tanks are designed so you can model the plane without them
installed, but this would be relatively rare on the -2/2P. Kitty Hawk has opened
all the holes for the bomb and rocket racks and you will have to fill them if
not using them all (such as with the photo recce bird). Period photos of the
photo recce version show them usually devoid of lower wing racks, but at least a
couple show Marine planes with the outer ones installed.
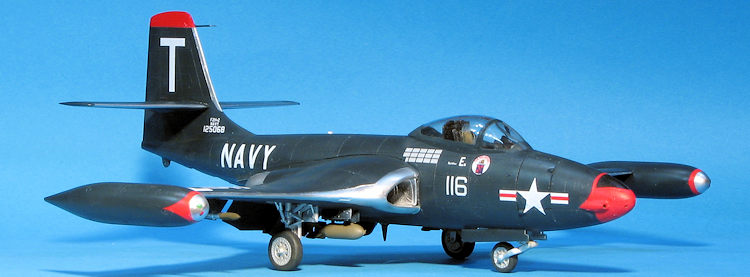
The kit comes with two bombs and four rockets so you won't be able to fill all eight pylons, but you can get close. The windscreen and canopy are separate so you can show off the interior.
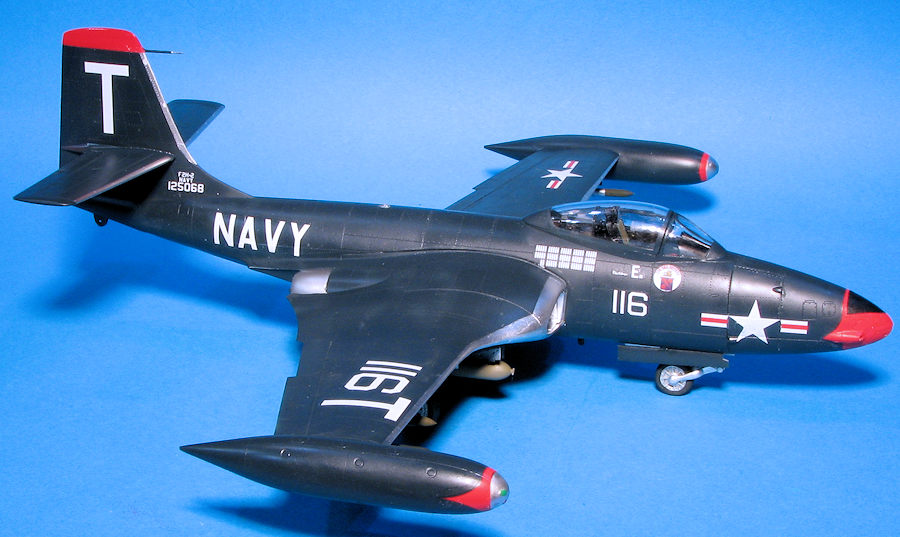
Instructions are very nicely done with a lot of color information and some detail images to help keep things properly aligned. Markings are for four aircraft. Two are in overall gloss sea blue, both markings options which have been in Airfix or MPC 1/72 kits. One is with VF-11 and the other with VMJ-1. Then there is a light gull grey over white plane with red trim which is also a VMJ-1 aircraft. Finally, in light gull grey and white with large international orange pieces is one based at El Toro for use by reservists and desk jockeys who need to get in their hours to keep their flight pay. The decals are very nicely done and should be extremely thin, based on past experience.
| CONSTRUCTION |
Throwing caution to the wing, I decided to follow the instructions and this, unsurprisingly, begins in the cockpit. First order of business is the ejection seat. This pretty well sets the stage for the rest of the kit. The fit of the parts is OK, but isn't perfect. The main issue is the lack of really positive locaters. I ran across this issue throughout the build process and what it means is that when you start to build a subassembly, the bits are a bit on the fluid side until the glue sets. It is important to test fit subassemblies prior to the glue fully setting to be sure that it will fit where it should.
For the seat, the most problematic portion is that on the very back.
I also found that while the shoulder belts were a good length, the lap belts
were far too long. I sort of wadded them up to make it look busy after trimming
off a fair portion of them. All the interior bits are painted black save for the
seat insert which I painted khaki green just to add some color. I also painted
the ejection handles red. The de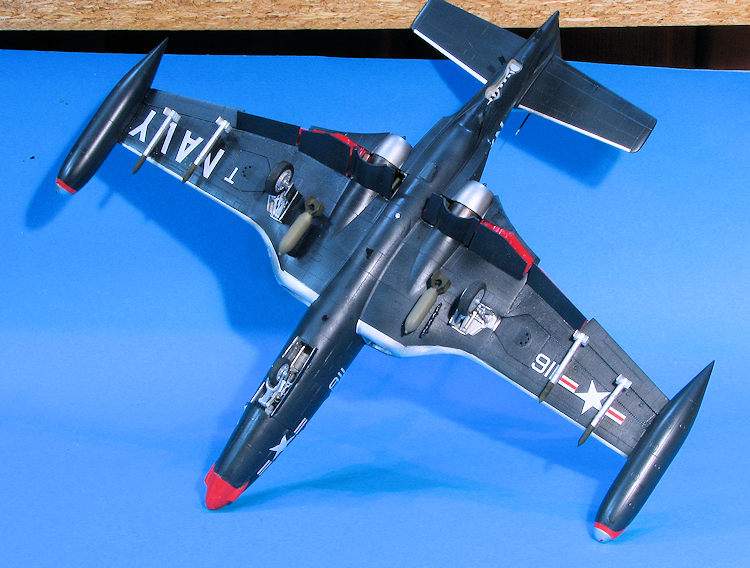 cals for the instruments fit very well and
conformed to all the protuberances on the side consoles with a touch of Mr Mark
Softer. It would be wise to glue the seat in as early as possible as it needs to
be in place to ensure the back piece fits. If you recall, I said that you
needed to test fit bits while the glue was still able to be moved around. This
is quite true of the rear bulkhead piece and the side panels. Once they were
solid enough to where they didn't just fall apart when touched, I placed the
cockpit in the fuselage halves to be sure all matched up well. This showed that
the right side panel fit well; the left not so much and I was able to make
adjustments.
cals for the instruments fit very well and
conformed to all the protuberances on the side consoles with a touch of Mr Mark
Softer. It would be wise to glue the seat in as early as possible as it needs to
be in place to ensure the back piece fits. If you recall, I said that you
needed to test fit bits while the glue was still able to be moved around. This
is quite true of the rear bulkhead piece and the side panels. Once they were
solid enough to where they didn't just fall apart when touched, I placed the
cockpit in the fuselage halves to be sure all matched up well. This showed that
the right side panel fit well; the left not so much and I was able to make
adjustments.
I then build up the nose gear well. The instructions have you build the entire nose gear and install it during construction. I left off the part that holds the nose gear to put on later in the build. Building up the gear assembly was one of the most fiddly and frustrating parts of the build so far. The retraction strut broke while cutting it from the sprue. Attachment points are not positive so it is difficult getting the parts aligned. I recommend attaching the gear to the well before the glue dries or you will not get it all in. I had to do a lot of fussing with tweezers to get everything into place.
With that done, the cockpit, gear well, and tail hook well were glued in place and the fuselage halves cemented together. Fit here was fairly good, though I had issues getting the fin halves totally closed as the tail bumper and pitot impede on the mating surfaces enough to cause gaps. There is a small piece forward of the tail hook well that fits above the opening and not in it. That was attached after the halves were all together.
Meanwhile, I started assembling the engines. These assemblies are handed to keep that in mind. The small blades on the exhaust piece are very fragile and I broke several removing it from the sprue. Intake braces are equally fragile, but I got those free without damage. While building the engines, I did the tip tanks. When it comes to assembling these, the instructions have you glue parts 10 to 11 and 1 to 2. However, 10 and 11 both have sockets and 1 and 2 both have pins. It is easy to straighten out.
With the engines done, the intake sections were attached at the same
time the engines were installed in the lower wing. This helps to ensure proper
alignment. One also has to install the exhaust as the design of the aft wing
makes it impossible to glue in place later. Upper wings were then glued in
place. I installed the inner rib detail on the wing stub to help have something
to provide support for the upper wing in the extended position. This inner wing
assembly was then glued to the fuselage. The upper fit was great, the lower, not
quite so much, but not terrible. I should point out that I prepainted all the
red areas on the underside of the wing as well as all the flap bits prior to
assembly. Also did this with the engines as you will see the aft section quite
clearly if you lower the flaps. About the only fit issue with th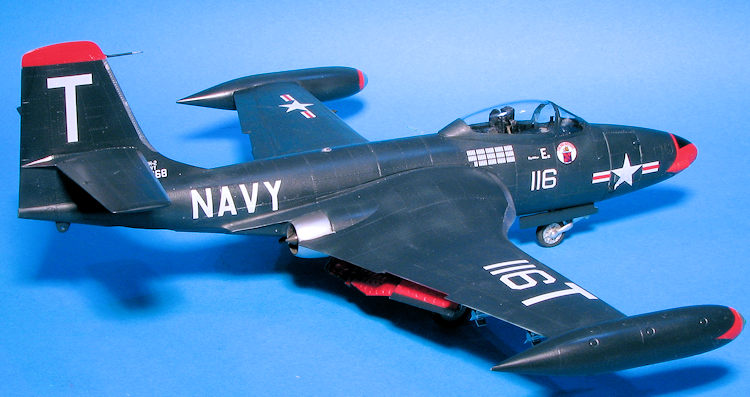 e engines is
that I could not get the exhaust areas flush with the upper wing.
e engines is
that I could not get the exhaust areas flush with the upper wing.
While that was drying, I did the outer wings. There are nice photo etch spoiler assemblies that are provided in the kit, but these were rarely deployed on the deck. Kitty Hawk provides inserts. These are quite thin and fragile. They also simply slot in place. However, there is nothing to keep them from slipping down into the slot so one has to be very careful installing these. On the first, I had already glued the wing halves so installed the first and when dry, filled the space with Silly Putty to provide some support for the other piece. When it came to the other wing side, I installed these first before gluing the wing halves together.
Next the outer wings were installed. The kit was not designed for extended wings and while the upper section fit fairly well after some trimming, there are gaps on the lower side that have no support and need super glue to fill. There is also a notch on the forward wing at the join that I filled, assuming it wasn't really there on the real plane. With the wings folded, you'd not have any issues.
With the installation of the tailplanes, I had pretty much a complete airframe. It seemed like a good time to put in some nose weight. I installed about 15 grams in the gun bay and it seems that it will be enough. I'll still leave the door off until the landing gear are installed as there is still some room for additional weight if I need it.
I then glued on the upper of the outer flap/speed brake parts. While looking for images of the flaps, I discovered that the upper piece should have a notch in the back as the lower piece includes part of the upper wing surface. Kitty Hawk has these parts reversed so when you build yours, be sure that the short one is on the top. It was easy enough to remove the wrong part and put the proper one in its place.
The tip tanks were next, These have no positive locators and are rather loose
on the wing tip so you have to simply line them up best as you can then apply
cement. With those in place, I flipped the airframe over and, using Silly Putty,
either filled in the various gear openings or used it to tack the lower flap
pieces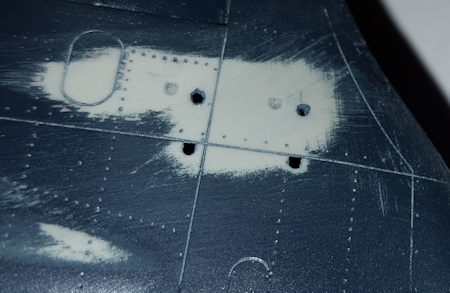 in place. I did this in preparation to painting that area. I also
pondered what to do about the inner bomb racks. These are staggered and are
supposed to be even with each other, though I don't know which one is in the
right spot. Figuring that I had a 50/50 chance of getting it right, I drilled
new holes for the outer pylons, using the inner ones as a guide. I also glued on
the outer wing racks. This proved to be a mistake as I had to break them off to
put down the decals that went under them. It was easy enough to repair as I used
short lengths of wire and drilled holes in the pylons and wires to reinstall,
but I should not have had to do so.
in place. I did this in preparation to painting that area. I also
pondered what to do about the inner bomb racks. These are staggered and are
supposed to be even with each other, though I don't know which one is in the
right spot. Figuring that I had a 50/50 chance of getting it right, I drilled
new holes for the outer pylons, using the inner ones as a guide. I also glued on
the outer wing racks. This proved to be a mistake as I had to break them off to
put down the decals that went under them. It was easy enough to repair as I used
short lengths of wire and drilled holes in the pylons and wires to reinstall,
but I should not have had to do so.
I next installed the instrument panel assembly and glued on the windscreen. This had to be trimmed to get a good fit. The canopy was tacked in place and both were masked. Using Silly Putty, I filled in all the gear wells and used that material to tack on the various flap sections, which had been prepainted. It was then time to hit the paint shop once everything (and that included the engine exhaust sections) had been properly masked. I also attached the other side of the gun bay as it seems the 15 grams weight was enough.
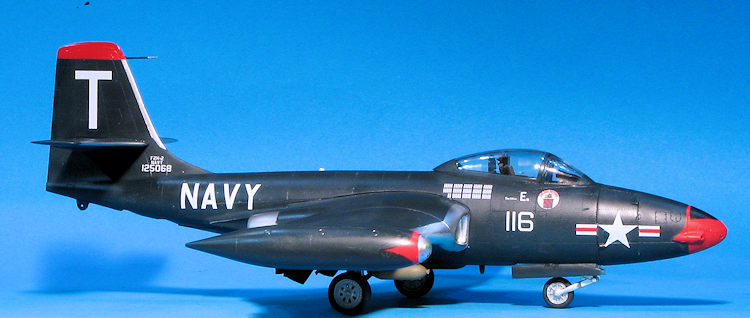
| COLORS & MARKINGS |
As much as I would have liked multiple Korean War options, the
kit provides but one and while the scheme has been used before in other kits in
other scales, I did not have these particular markings on my shelf so, rather
than wait for however long it might take for aftermarket to provide options, I
used it. This meant an overall sea blue. I used Model Master enamels for this.
Apparently thinning the gloss sea blue with lacquer thinner makes it semi-matte,
but I had enough to paint the airframe and some left over for the inevitable
touch-ups. Once that was dry, more masking for the aluminum leading edges and
the tip of the wing tanks. This was quite time consuming, with the usual three
hours of masking for five minutes of painting, but it is worth it. I used Alclad
II Aluminum for this and the sea blue made f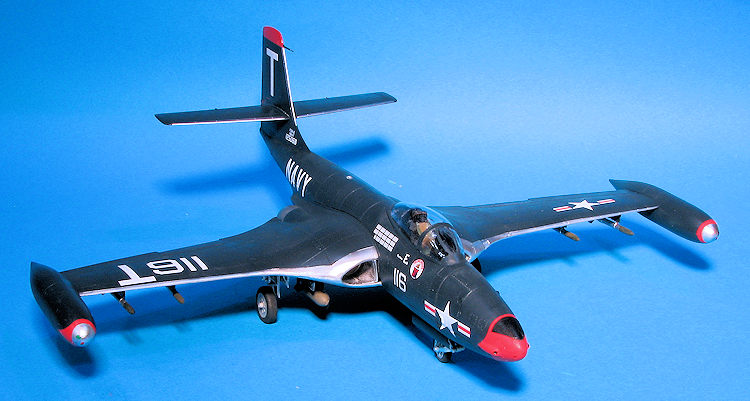 or
a nice backing for the paint. I also had to paint the tip of the fin red and
used Gunze for that.
or
a nice backing for the paint. I also had to paint the tip of the fin red and
used Gunze for that.
Now for the decals. I was a bit apprehensive about applying the nose
decals as there are the big gun ports. However, the only other option was paint
and I wasn't sure I was going to get the scallops right. It turns out that the
decals for the nose are too short and do not meet at the underside. They also
required multiple applications of setting solution to snuggle down properly.
Same for the tip tank markings, which did not form a tight enough curve so, like
the nose, there are wrinkles. Thankfully, there are lots of red bits not used so
I cut patches from them for the rest of the nose. This included areas around the
gun ports. The rest of the markings were not a problem and went on just fine,
even over the semi-matte finish.
I also had a chance to use AOA decals tail hook stripe decals and they
worked just great.
I used Mr Mark Softer on each decal and it seems to have taken
care of any issues. So much so that I'm seriously considering no clear coat as
the decals are pretty matte and the gloss sea blue turned near matte after a
while on the decks.
| FINAL BITS |
With the decals in place, there was the usual myriad other bits. One was the tail hook. There is a V section behind the hook that has a second part that needs to be attached. However, Kitty Hawk neglected to drill a hole for it. I had the same issue when attaching the rest of the nose landing gear. No holes drilled in the part. Easy enough to fix with a small drill, but it should have already been drilled out.
Attaching the gear doors was fun as they are a bit
fussy, but for those used to doing kits like this, pretty standard stuff. Both
the nose wheel and main wheels fit very well. I did have trouble painting them
as 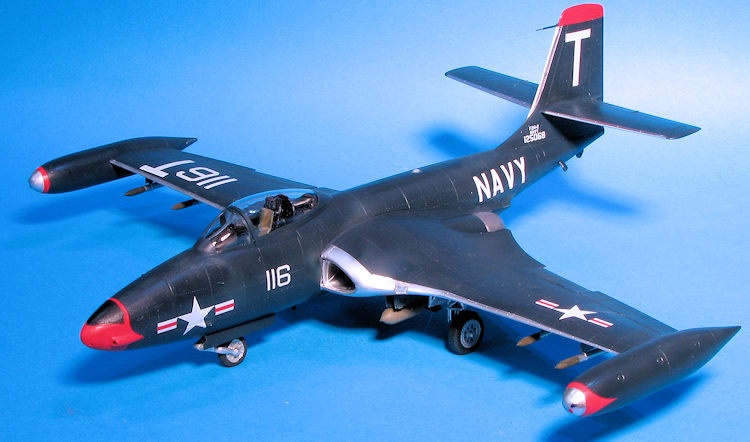 there is no
positive demarcation between wheel and tire. I do wish there would be at least a
short raised line to help us out. Either that or supply wheels masks.
there is no
positive demarcation between wheel and tire. I do wish there would be at least a
short raised line to help us out. Either that or supply wheels masks.
Now the flaps. These were rather tricky to attach. There is no positive contact point for the outer ones, the middle ones have a thin lip to help and the inner ones have to have the ends of the attachment points cut off as they simply do not fit into the mounting holes. I used super glue for them all and strived to have them all at the same angle.
Then I installed the lower fuselage radio antennas, reattached the pitot on the fin and glued on the ordnance. These have a tiny attachment point on each pylon. There are very small pins on each pylon that correspond to equally tiny sockets on each rocket and bomb. Though the instructions show a bomb and rocket on each inner plylon, by the time the bomb is attached, there doesn't seem to be enough room to put the rocket as the pylons are quite close together. So I put the rockets on the outer wing. This was followed by a bit more touch up painting. The last things I did was to remove the masking from the clear bits and attach the landing light and upper/lower fuselage lenses. I did not clear coat it.
| CONCLUSIONS |
 I
have built several Kitty Hawk kits over the last few years. I've found each one
of them to have their challenges and still consider them to be short run kits.
They have great detail; as much as even the fussiest modeler could possibly
want. I have been looking forward to this one ever since I heard it was to be
released. It was an interesting build that takes those modeling skills you have
built up, but the end result is worth it.
I
have built several Kitty Hawk kits over the last few years. I've found each one
of them to have their challenges and still consider them to be short run kits.
They have great detail; as much as even the fussiest modeler could possibly
want. I have been looking forward to this one ever since I heard it was to be
released. It was an interesting build that takes those modeling skills you have
built up, but the end result is worth it.
| REFERENCES |
Wikipedia and a few other Internet sites for photos.
14 October 2016
Thanks to Glen Coleman and Kitty Hawk Models for the review kit. You can find this kit at your favorite hobby shop or on-line retailer.
If you would like your product reviewed fairly and fairly quickly, please contact the editor or see other details in the Note to Contributors.