| KIT #: | AA-2057 |
| PRICE: | $99.00 |
| DECALS: | One option |
| REVIEWER: | Scott Van Aken |
| NOTES: | Resin kit with vacuformed plastic clear bits. |
| HISTORY |
In
1943, the USAAF had an
urgent need to fly photo-reconnaissance missions over the Pacific Theater to
identify Japanese positions and movements. But its airfields were far too
distant for the medium-range planes to make the round trip. Its only recourse
was to issue a request for a new long-range, high altitude reconnaissance plane
capable of the long-endurance missions the Pacific War required. In March 1944,
Republic Aircraft responded to the USAAF by proposing to modify its
 experimental
civilian RC-2 transport to the specifications. The proposal was accepted and
Republic received an order for two prototypes which designated XF-12. Its
competitor was the Hughes XF-11. While the Rainbow was under development, the USAAF converted several B-29 bombers into recon aircraft, reclassifying them as
F-13s. Even after the war, Republic continued to develop the Rainbow, changing
its designation from the XF-12 ("F" for "Photo" instead of the more logical 'P'
which was already being used for 'Pursuit/Fighter') to the XR-12 ("R" for
"Reconnaissance"). The first XR-12 made its maiden flight in February 1947.
Its performance was up to expectations, making it the fastest four piston-engine
aircraft flying at the time. Development of the two prototypes continued until
1948 when the USAF canceled the program, choosing recce variants of existing
B-29s and B-50s instead.
experimental
civilian RC-2 transport to the specifications. The proposal was accepted and
Republic received an order for two prototypes which designated XF-12. Its
competitor was the Hughes XF-11. While the Rainbow was under development, the USAAF converted several B-29 bombers into recon aircraft, reclassifying them as
F-13s. Even after the war, Republic continued to develop the Rainbow, changing
its designation from the XF-12 ("F" for "Photo" instead of the more logical 'P'
which was already being used for 'Pursuit/Fighter') to the XR-12 ("R" for
"Reconnaissance"). The first XR-12 made its maiden flight in February 1947.
Its performance was up to expectations, making it the fastest four piston-engine
aircraft flying at the time. Development of the two prototypes continued until
1948 when the USAF canceled the program, choosing recce variants of existing
B-29s and B-50s instead.
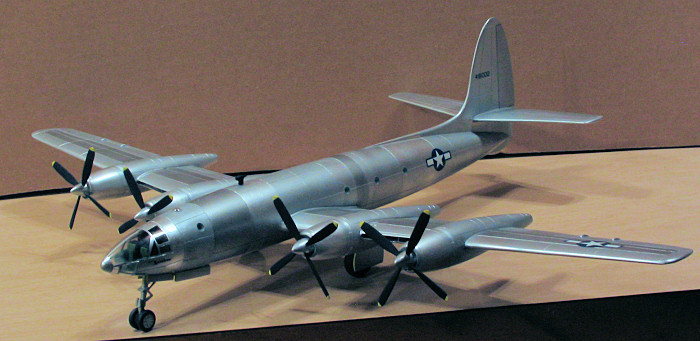
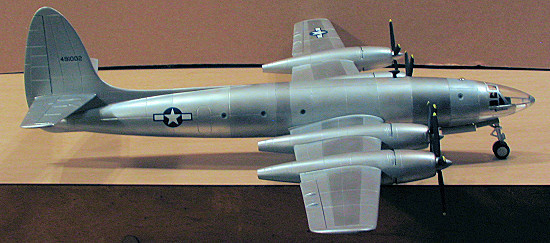
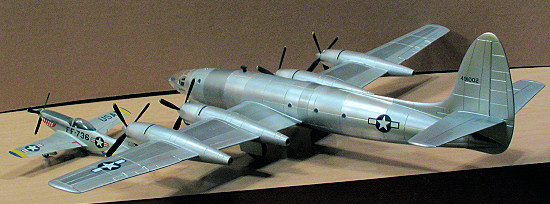
Many of us would have been delighted if the Rainbow had reached production as it has to be one of the five most beautiful aircraft to have ever graced the skies.
| THE KIT |
This has to be the largest kit that Anigrand Craftworks have yet produced. The kit fuselage is so large that sections of the inner box had to be cut away to get it to fit diagonally. Fortunately, there was not a bit of damage, in part to Anigrand USA's careful packaging.
 Molded in Anigrand's usual tan resin with large
engraved panel lines, this one has little in the way of molding glitches,
despite its size. I can see a few air bubbles and some big ones under the
surface of the lower fuselage, but these shouldn't be a problem. The kit
includes the usual weak-framed vac pieces including a number of circles to use
on the fuselage windows. I'd use Crystal Clear or white glue myself as it will
be easier to work with.
Molded in Anigrand's usual tan resin with large
engraved panel lines, this one has little in the way of molding glitches,
despite its size. I can see a few air bubbles and some big ones under the
surface of the lower fuselage, but these shouldn't be a problem. The kit
includes the usual weak-framed vac pieces including a number of circles to use
on the fuselage windows. I'd use Crystal Clear or white glue myself as it will
be easier to work with.
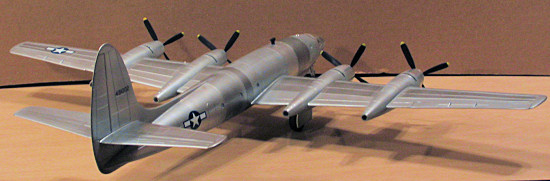
The very long wings were warped, but it is to be expected from long, thin resin moldings like this. The hot water treatment will fix that in no time. There are alignment pin holes for the wings and tail planes; some of which will need drilled out more as they have resin blobs in them. The real improvement in this kit is that the landing gear seem to be reinforced with wire. This is a big plus with all the weight of the resin and what you'll have to put in to prevent tail sitting. You may want to add wire to the axles as well, just in case.
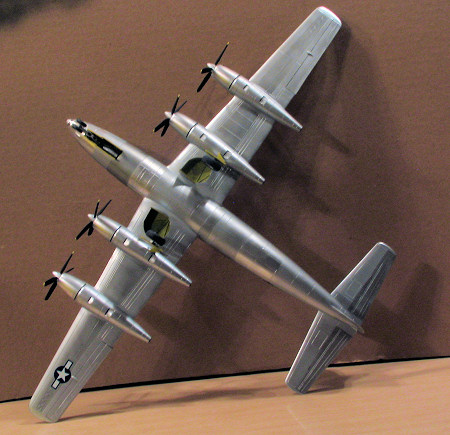
 The engine nacelles are numbered though they are
different sizes depending on whether they are inboard or outboard. It seems as
if Anigrand made a small glitch with the spinners as they are drilled for three
blades; just like what happened with the XP-58. Not a problem to fix; if you
have the skills for this sort of kit, you can fill and re-drill spinners.
The good news is that new spinners are being produced. Those ordering kits from
Nostalgic Plastic/Anigrand USA will have their kits shipped once these
replacements are received. Contact your seller about replacements.
The engine nacelles are numbered though they are
different sizes depending on whether they are inboard or outboard. It seems as
if Anigrand made a small glitch with the spinners as they are drilled for three
blades; just like what happened with the XP-58. Not a problem to fix; if you
have the skills for this sort of kit, you can fill and re-drill spinners.
The good news is that new spinners are being produced. Those ordering kits from
Nostalgic Plastic/Anigrand USA will have their kits shipped once these
replacements are received. Contact your seller about replacements.
Instructions are standard Anigrand with a history, photo, exploded view and parts list on one side with the painting and decal placement guide on the other. Like most prototypes, this one is unpainted metal with insignia, serial and name. In this case, two small decal sheets with the serial and name are included with the insignia coming from another sheet. Anigrand decals generally work quite well so should provide no surprises. Those wanting something a bit thinner may want to replace the insignia with aftermarket.
| CONSTRUCTION |
I have to say that this is a rather intimidating kit. Nothing really outside the norm aside from its huge size. This has to have some of the largest resin castings I've ever seen in a 1/72 kit. It was not at all surprising to find the wings rather badly warped, but a couple of treatments with near boiling water took care of much of that. I was somewhat dismayed to find the fuselage requiring so much work. Not just the usual air pockets, but in this case, there were quite a few, well, divots in the fuselage. These were little hollowed out areas all over the place and are not at all easy to fix. Most of the fillers you try won't stick as they are so shallow. Even super glue was not as successful as I'd have liked. It was just a case of keeping at it until they were all done, or as many as I could get. I don't want you to think the surface looked like a golf ball, but I'd have to say there were a good 25 or 30 of these things to fill.
 I knew that this would need a lot of nose weight.
Fortunately, the landing gear are reinforced with wire, though not the axles or
the nose gear fork. I filled as much of the nose as I could with weight and
carefully glued the fuselage. I did it in sections to try to keep things
straight. The fin was then attached and later the tail planes. I made a bit of a
mess of the tail planes as things just didn't dry very even. Had to break them
off and give it another shot.
I knew that this would need a lot of nose weight.
Fortunately, the landing gear are reinforced with wire, though not the axles or
the nose gear fork. I filled as much of the nose as I could with weight and
carefully glued the fuselage. I did it in sections to try to keep things
straight. The fin was then attached and later the tail planes. I made a bit of a
mess of the tail planes as things just didn't dry very even. Had to break them
off and give it another shot.
Meanwhile, I glued the wings, again, going from the root to the tip and gluing in sections. This wasn't bad and worked out fairly well. There were some rather large pockets in the wing tips so I had to be quite careful. Then the engine nacelles were glued on. This seemed to go rather well. I'm not sure if it was designed that way, but there are little nubs that fit into the wing panel lines and help to align things. It was pointed out that the exhaust should be oval vice round and all of mine suffered mightily from air pockets on the exhaust. So much so that I ended up sanding them all back a bit as it was easier than trying to fill all those holes. Doesn't seem to have taken away from the look, though.
With the fuselage and wings pretty well done, I then attached the wings. These were done one at a time and I recommend doing them both at once so you can be sure of the proper alignment. The wing roots are a bit longer than the wings so there will be some adjustment needed in terms of sanding once things are dry. I also made the sockets in the wings much larger as the way they were, when the wings were mated, they left some rather large steps in the roots. Enlarging these holes gave more slop and allows better alignment.
Then I noted that there was not enough nose weight. I broke away the back bulkhead of the cockpit and added several more ounces of weight in the forward fuselage until I was sure it wouldn't tail sit. This hole was covered up by a piece of sheet plastic once it was all in. Then, as often happens, I got involved in other projects and the kit sat for a few weeks.
| COLORS & MARKINGS |
However, before it sat I applied several coats of Alclad II on it. For some reason, it just didn't look right to me. I first painted it with Aluminum and then Airframe Aluminum. Neither seemed to hit it and it was this as much as anything else that caused me to set the kit aside for a short period.
 When I did pick it back up. I went to work painting the
wheels, landing gear legs, doors and spinners. I attached the landing gear at
this time as well. The nose gear fits quite well but some trimming is needed in
the gear well to get it to fit. I also glued on the main gear. For these to fit,
one had to cut things flush. Well, the wire sticks out rather far, so I drilled
through the top of the wing to allow the wire to provide some additional support
rather than have just butt joined main gear. The resulting hole was filled and
sanded smooth.
When I did pick it back up. I went to work painting the
wheels, landing gear legs, doors and spinners. I attached the landing gear at
this time as well. The nose gear fits quite well but some trimming is needed in
the gear well to get it to fit. I also glued on the main gear. For these to fit,
one had to cut things flush. Well, the wire sticks out rather far, so I drilled
through the top of the wing to allow the wire to provide some additional support
rather than have just butt joined main gear. The resulting hole was filled and
sanded smooth.
The interior was also painted using standard US Interior Green. I cleaned up the seats and consoles, painting them Interior Green with black facings on the consoles and instrument panels. The seats go OD cushions. I had to trim down the little attachment stubs on all the interior bits as they were too large for the slots into which they were to fit.
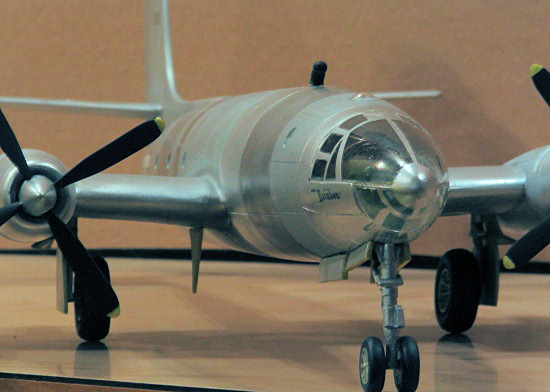
Then the canopy. Now I'm not a fan of vac canopies and when I have to join two of them together, well, it was time for nerves. What I did do was to trim each one of them separately to fit into the little channels provided on the airframe. This takes time and patience as the parts need to be constantly checked. I did mask off the parts I didn't want painted prior to all this. I used thin strips to outline the windows as Anigrand's transparences have almost no raised detail and what is provided is somewhat indistinct. When the parts finally fit, I had cut into the 'clear' bits themselves. Anigrand canopies are generally a bit oversized and this one is no exception.
I first cemented in place the upper section. I did this
using standard white glue. When it was fully dry, I did more test fitting and
when satisfied, the lower section was glued in place as well. This was then
taped in place until dry. I then went over all the join
 areas with a bit of superglue,
especially the nose section as the join there was not completely flush. By
building up a bit of superglue, I was able to sand away the overlapping join.
areas with a bit of superglue,
especially the nose section as the join there was not completely flush. By
building up a bit of superglue, I was able to sand away the overlapping join.
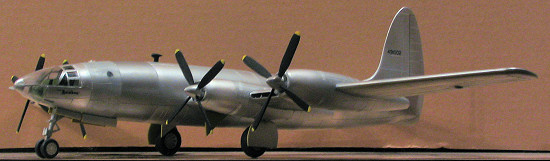
Then it was back to painting. I decided to completely repaint the airframe and so sprayed on a full coat of Floquil Old Silver. This gave me a baseline so that I could start anew. I then sprayed on several different shades of Alclad II to break up the monotony of the scheme. This also took quite some time and a lot of tape! Finally, it was enough.
The decals were applied and I warn you now to be sure to have plenty of slimy stuff under the decal as once it grabs, it sticks like a limpet. Must be the Alclad! A dose of Solvaset helps it to stick a tad better.
| FINAL CONSTRUCTION |
Back on the bench, I painted the wheel wells with
yellow zinc chromate primer. Then I glued on the nose and main wheels. I was not
surprised when, despite all the nose weight, the aircraft was still a tail
sitter! Muttering to myself, I decided to work on the props. As I mentioned,
Anigrand had to redo the spinners for four blades after originally providing
three bladed items. Your kit will have the four bladed spinners. I first drilled
out the holes, as much to remove any gunk as anything else. Then I cleaned up
all 16 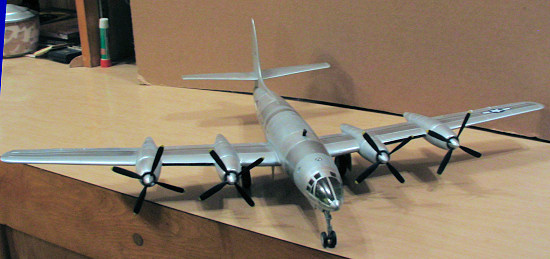 blades (only broke one!), and painted them black. The tips were brush
painted with Vallejo acrylics and then the blades were carefully inserted into
the spinners after some touch-up painting was done. One of the spinners was mis-drilled
so that one blade was not 90 degrees apart from its mates. This was 'cured' by
grinding the hole oval until the blade was in the proper spot. Then the ensuing
large hole was filled with superglue, sanded and touched up as best I could.
This portion of the spinner was eventually glued on with this glitch on the
bottom.
blades (only broke one!), and painted them black. The tips were brush
painted with Vallejo acrylics and then the blades were carefully inserted into
the spinners after some touch-up painting was done. One of the spinners was mis-drilled
so that one blade was not 90 degrees apart from its mates. This was 'cured' by
grinding the hole oval until the blade was in the proper spot. Then the ensuing
large hole was filled with superglue, sanded and touched up as best I could.
This portion of the spinner was eventually glued on with this glitch on the
bottom.
Meanwhile, the wheels were glued in place and I hoped that this would be enough to encourage it to stay on its gear as the main wheels are MUCH larger than those on the nose. Didn't happen. The addition of another large weight in the nose gear well did help. I then scribed the gear doors and snapped them into segments. These are butt joins and the outer small doors need to be 'folded' to clear the larger door. The upper dome was cut out of the vac backing and glued in place with white glue. The side windows were made entirely out of white glue. No way could I get the small vac windows cut properly to fit. This wasn't helped by the near indistinguishable outlines etched on the vac sheet. I do so wish that Anigrand would address the lack of distinct frames and edges on their vac bits. The upper ADF antenna was painted black and stuck in the hole drilled for it and the props were pushed into the holes and held on by a touch of superglue. The hubs do fill the holes so the air pockets there are all but invisible.
| CONCLUSIONS |
 I'm quite
pleased with the outcome on this. I have to say that there were times when I
wasn't sure just how well this one was going to turn out. It is by far the
largest all resin kit I've ever built and due to its size as much as anything
else, it was quite a challenge. I'm not sure how long those resin axles will
hold up all the weight of the kit so once this one gets properly gawked at, it
will be hanging from the wall along with other models that are too big for
shelves and cases.
I'm quite
pleased with the outcome on this. I have to say that there were times when I
wasn't sure just how well this one was going to turn out. It is by far the
largest all resin kit I've ever built and due to its size as much as anything
else, it was quite a challenge. I'm not sure how long those resin axles will
hold up all the weight of the kit so once this one gets properly gawked at, it
will be hanging from the wall along with other models that are too big for
shelves and cases.
Frankly, I never thought I'd see this kitted as anything other than a vacuform and though there are a few inaccuracies (like round vice slightly oval exhausts), few will notice it. If you are comfortable with resin kits and beauties like this attract you, then by all means go for it!
July 2006
# 1423 in a series
Copyright ModelingMadness.com. All rights reserved. No reproduction in part or in whole without express permission.
If you would like your product reviewed fairly and fairly quickly, please contact the editor or see other details in the Note to Contributors.