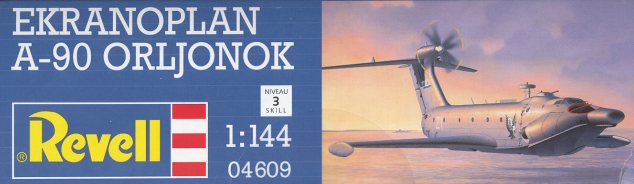
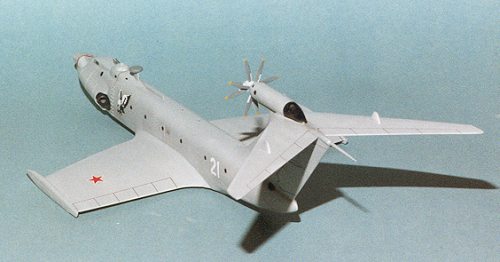
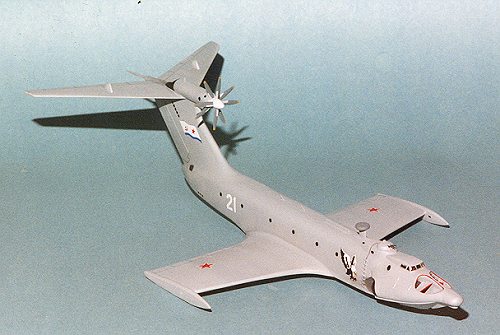
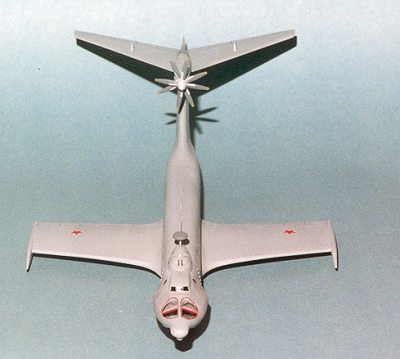
Revell 1/144 Ekranoplan A-90
| KIT # | 4609 |
| PRICE: | $20.50 |
| DECALS: | See review |
| REVIEW : | |
| NOTES: | Is this a weird kit or what!? |
| HISTORY |
From out of the blue of the Eastern sky.... it's Sky King! Well, not really, but if ever there was a TV show 'what if' vehicle that came to life, it would be the Ekranoplan! I had heard about these things back several years ago and would never have thought that someone would ever put one to plastic. Here's a quick synopsis of what it is taken from the instruction sheet:
The Soviets were looking for a way to move a lot of men and materiel quickly overwater and other semi-smooth terrain. What they came up with was a very large ground effects vehicle the 'flew' a few feet above the surface. The benefit of this type of transportation is that it is fast (around 500kph), 'flies 'under most enemy radar, can carry a lot of cargo/troops, is much more fuel-efficient than an aircraft, and can also travel some distance over land if there are no real obstacles. I noticed on the completed kit that there seems to be some sort of beaching wheels under it which would allow it to move rather easily on concrete surfaces.
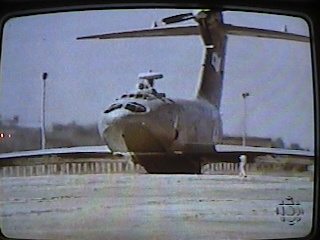
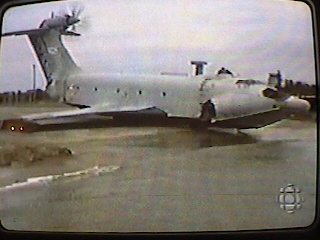
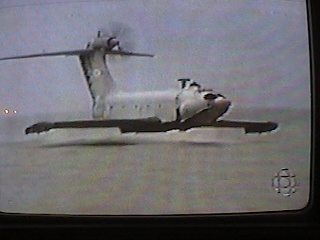
The prototype Ekranoplan M-1 was first discovered by US spy satellites enveloped in a cloud of spray while undergoing trials on the Caspian Sea in the early 1970s. It was a much smaller (100 meters long) technology demonstrator. It was envisioned that 120 of them would be built, but in effect only four were built, one of which was a static test airframe. Of the other three, one was lost in an accident in Sept 1992 and the other two were used operationally until October 1993. What killed the project was the dissolution of the Soviet Union and the inability of any of the new states to handle a large budget item like the Ekranoplan. I did manage to locate some images of it thanks to a reader who sent in a few screen captures. I have included them in this section so you can see the thing in action. As you notice, small it isn't!!!
| THE KIT |
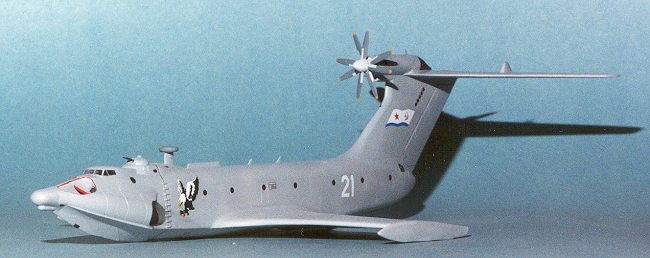
First off, it is very gratifying to see that a major kit maker has the foresight to produce a kit like this. Revell of Germany has been a very surprising company and has given us as modelers a surprising array of interesting subjects over the last five years or so. I would never have dreamed that this kit would ever have been made and it was with much anticipation that I awaited its coming to the US after hearing of its release in Europe. Once they hit the shelves, I immediately bought one (at retail price yet!).
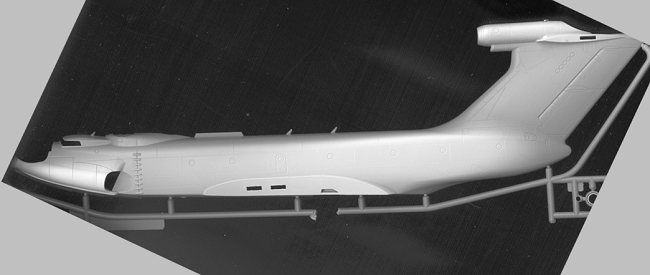
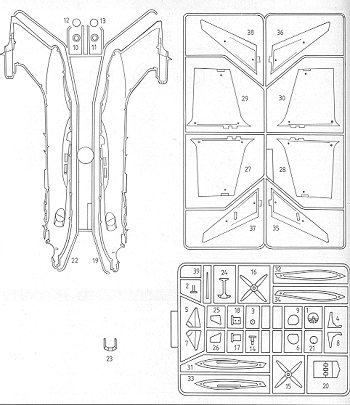 I have been unable to show all the parts of the kit as they
are too large for my scanner, but have shown the fuselage, a closeup of the nose
and the parts diagram from the instructions to give you an idea of what the 41
parts look like. There is one clear bit for the cockpit and no interior detailing
at all as usually befits kits of this scale.
I have been unable to show all the parts of the kit as they
are too large for my scanner, but have shown the fuselage, a closeup of the nose
and the parts diagram from the instructions to give you an idea of what the 41
parts look like. There is one clear bit for the cockpit and no interior detailing
at all as usually befits kits of this scale.
Instructions are typical Revell AG in that they are on newsprint quality paper, have many pages of warnings, and the usual drawings for the 23 construction and decaling steps. Colors given are generic names with Revell AG paint codes. Three of the colors called out must be mixed, which includes the overall color of the kit.
I have heard that this kit does not build well, however, one really never knows until one tries. It looks great on the sprues and with a minimal number of parts should be a relatively fast build. It will certainly bring comments wherever it is shown and is the kind of interesting and unusual subject that should sell very well.
| CONSTRUCTION |
 "First starting with the cockpit". Well, not on
this one we won't because there isn't any. This is airliner scale you know, and
we don't have any cockpits! As some of you are aware of my penchant for
initially disregarding instructions and getting right to doing subassemblies, that is
what I did. Those subassemblies were the wings, tailplanes, 'sponsons', gun
turret, roof radar, and the large nose inlets.
"First starting with the cockpit". Well, not on
this one we won't because there isn't any. This is airliner scale you know, and
we don't have any cockpits! As some of you are aware of my penchant for
initially disregarding instructions and getting right to doing subassemblies, that is
what I did. Those subassemblies were the wings, tailplanes, 'sponsons', gun
turret, roof radar, and the large nose inlets.
It was pretty obvious that the nose inlets would need filler. It was equally as obvious that the plastic of this kit is rather soft and easily deformed. Reminds me of those many KP kits Inbuilt back in the 80s. So I installed the nose intakes minus the aft screens in each fuselage half before tackling the seams in order to give them some strength. I also installed the housings for the exhaust in each fuselage half as well. These fit quite well and I was able to get that seam filled by having plastic ooze out of it when glued in. This was then simply scraped of with a hobby knife.
The nose inlets were not so lucky. They really needed a lot of filler and, due to their shape, were difficult to sand, though eventually a reasonable job was managed. Then the aft screens were glued on and it was time to cement the fuselage halves together. There is what appears to be beaching gear of some sort that fits in the lower center section. This was glued in place. Then the rear prop assembly was glued together and installed in the tail. Finally the gun turret was set in place and the halves glued together. Immediately, the attachment post for the gun turret snapped off. Wonderful! Now it will have to be glued in place. The mounting posts are a bit too longhand need to be trimmed down a bit or they will prevent a good join. Too late for me, but learn, grasshopper!
 While the glue was drying on
the fuselage, I cleaned up the wings, horizontal stabilizers and the wing tip 'sponsons'. Again, you need to be careful not to overdo it with this soft plastic. When
the fuselage was dry, the cover section over the nose inlets was installed. The
fit is not good as the part is too thick, but thanks to the soft plastic, it will
be easy to correct. The usual slather of filler was applied and the kit set
aside to dry.
While the glue was drying on
the fuselage, I cleaned up the wings, horizontal stabilizers and the wing tip 'sponsons'. Again, you need to be careful not to overdo it with this soft plastic. When
the fuselage was dry, the cover section over the nose inlets was installed. The
fit is not good as the part is too thick, but thanks to the soft plastic, it will
be easy to correct. The usual slather of filler was applied and the kit set
aside to dry.
This nose section took a couple of putty applications. During all of this, the tail planes were glued in place. Fit here was so-so as well and it took quite a bit of filler to get a smooth join. Once all this puttying had been done, the radar set was glued in place. I then went to glue down the gun turret, but when I tried to put the guns in the turret, the barrels snapped off!! I glued the turret down anyway and will stretch some sprue to replace the barrels. Final little bit was the 'stinger' radio antenna at the rear of the A-90. Then it was off to the paint shop.
| PAINT & DECALS |
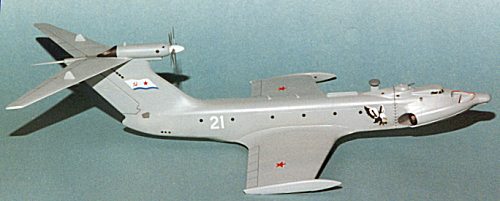
Other than some red trim around the nose intakes and some metallizer near the exhaust areas, this is basically a one color kit. Rather than mix up some paint, I went to see what I had that would be close. I settled on some Testors, Light Ghost Grey. It is pretty close to the color of the plastic itself, but is dark enough to match what is on the box art. A couple of coats and that was it! After drying, the whole thing was given a coat of Future clear gloss acrylic. Not only is this a good base for the decals, but it will also allow me to easily remove any overspray that will happen when I paint the other colors with enamels.
 Then it was time to do some detail painting. The prop
was painted white and when dry was masked off and the grey surround repainted.
Burnt Iron Metallizer was painted on the engine exhausts. The background of the
front engine exhaust area as well as two smaller areas in the rear were painted
with Titanium Metallizer. The radar dome was painted a dark grey, I think RLM 75,
but don't remember. The prop blades were painted USAAF Neutral Grey and the prop
tips with Japanese ID Yellow. Undoubtedly the most difficult part to paint were
the nose engine intakes. These had to have thin red edges and frankly, are not
my best work. No choice really but to use a brush and hope for the best!!Finally, the cockpit glass was snapped in place and brush painted.
Then it was time to do some detail painting. The prop
was painted white and when dry was masked off and the grey surround repainted.
Burnt Iron Metallizer was painted on the engine exhausts. The background of the
front engine exhaust area as well as two smaller areas in the rear were painted
with Titanium Metallizer. The radar dome was painted a dark grey, I think RLM 75,
but don't remember. The prop blades were painted USAAF Neutral Grey and the prop
tips with Japanese ID Yellow. Undoubtedly the most difficult part to paint were
the nose engine intakes. These had to have thin red edges and frankly, are not
my best work. No choice really but to use a brush and hope for the best!!Finally, the cockpit glass was snapped in place and brush painted.
Next were the decals. There really is no choice here. The Soviet markings with the big eagle on the front are much more colorful than the later Russian ones. First though, there are a myriad of other markings to put on. All but the cockpit windows are represented with decals. The decals are rather flat and are impervious to Microscale/Superscale setting solutions. However, Champ definitely makes them sit up and take notice, causing them to crawl into every crevice there is!! I had the most trouble with the prop blade de-icer boots (at least, that is what I think they are). They didn't like the Champ and a few of them dried rather oddly, being a bit shriveled.
The final steps were gluing replacement barrels into the gun turret, as well as the intake vanes (which don't fit worth a hoot), and that was it!!
| CONCLUSIONS |
 What can I say? It fits many of my criteria. It is fun to
build, it is easy to paint, and it is a very unusual subject!! If I were to pick
one thing I didn't like about the kit, it would be the surface texture of the
parts. It seems like the inside of the mold wasn't smooth at all. Parts have an
odd crosshatched design over the entire surface. The design is quite light, but
would call for some rather intense sanding to get rid of it. Frankly
sanding down all the parts to get rid of it wasn't one of my choices.
What can I say? It fits many of my criteria. It is fun to
build, it is easy to paint, and it is a very unusual subject!! If I were to pick
one thing I didn't like about the kit, it would be the surface texture of the
parts. It seems like the inside of the mold wasn't smooth at all. Parts have an
odd crosshatched design over the entire surface. The design is quite light, but
would call for some rather intense sanding to get rid of it. Frankly
sanding down all the parts to get rid of it wasn't one of my choices.
It is a kit I can recommend to nearly everyone. It does require some filler, yet it is a kit that can also be slapped together in just a few hours if playing with it is a high priority! This will be an interesting kit to see in contests. Is it a plane or a boat??
June 2000 Review copy courtesy of me and my wallet! If you would like your product reviewed fairly and quickly by
a site that has over 900 visits a day, please
contact the editor or see other details in the