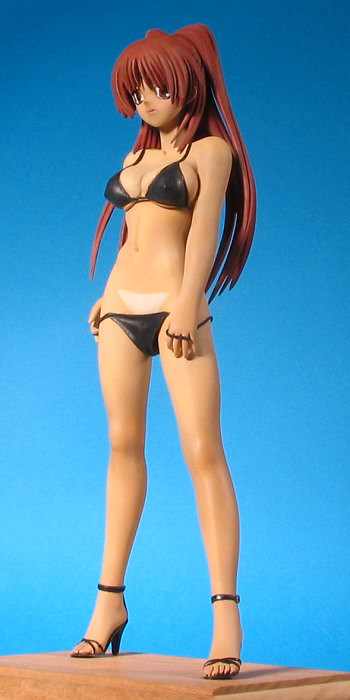
| KIT: | 1/8 Tamaki Kousaka in Bikini |
| KIT #: | FG 3316 |
| PRICE: | Approximately $35.00 plus s&h |
| DECALS: | None |
| REVIEWER: | Scott Van Aken |
| NOTES: | Resin anime figure from the series 'To Heart 2' |
| KIT: | 1/8 Tamaki Kousaka in Bikini |
| KIT #: | FG 3316 |
| PRICE: | Approximately $35.00 plus s&h |
| DECALS: | None |
| REVIEWER: | Scott Van Aken |
| NOTES: | Resin anime figure from the series 'To Heart 2' |
| THE KIT |
For those of us who like anime figures, there are a number of places that sell them and the quality of the casting can range from very good to very poor. Generally, those that originate in Hong Kong or Japan have the best quality, while those cast in Thailand are quite poor. Unfortunately, those cast in the US are often not as good as one would like. The result is that most of the figures that I buy originate in Honk Kong where the price is considerably less than what one would find in Japan. Several reputable companies in Honk Kong and the US sell these figures and the range is considerable.
 I tend to get those figures that show more skin than others so many of those are bikini clad as is this one. Several traits of anime figures are longer than normal legs, shorter torsos and larger, eh, uh, boobies that are bigger than the norm. In other words, they are very unlike most Japanese. Since this is a bikini figure, there are not a ton of parts. The pose is also quite simple and so doesn't run into some of the fit problems I've had with other, more complex figures. Some of these fit situations are so extreme that the kits have been shelved when over half built, though I have been slowly working on a few of them over the last few weeks. The vast majority of these come with most of the resin pour stubs trimmed off and most of the mold seams sanded down, a real help when it comes to building. They are also cast in a nice, whitish resin that is normally completely free of air pockets and surface trash.
| CONSTRUCTION |
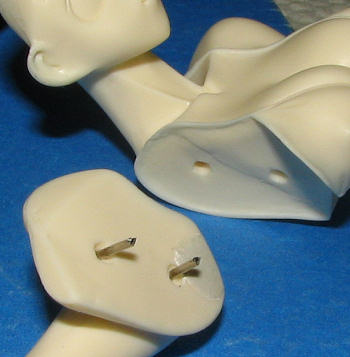
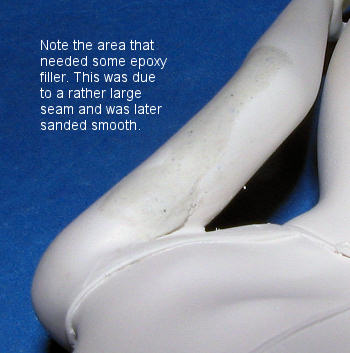
The initial step is to remove those pesky pour stub remnants and sand off the mold seams. Generally these seams are more a result of slight mold misalignment than the sort of seams one gets with a plastic kit. Occasionally one will find that the pour stubs have been removed too close to the part and a small chunk is taken out. I found this in a couple of parts and a quick application of epoxy putty took care of it. I generally put on the putty then join the two parts. Letting it sit a few minutes will then allow me to remove the part with the chunk and the filler still on it. Then I let it dry and sand it down as needed where it oozed out.
Many of these figures come with the various bits keyed, but this one did not. Instead, it has depressions on each part for the builder to drill out and put in mounting stubs. I generally use paper clips for this and use at least one of the two holes. It doesn't help that much during assembly, but does make the parts less likely to come adrift in the future. It does happen from time to time and there is nothing worse than arriving at an event to show your figure and find a piece has fallen off. It is a problem when one uses super glue to hold these things together.
 Anyway, a lot of time will be spent smoothing the resin and making sure the parts fit well. On this kit, I started with three main sub assemblies with an eye on gluing like parts when it comes to painting. The lower torso is mostly one part with just the feet to glue on and that was done. Then the upper portion has the arms to attach. This was the most difficult part as it was imperative to get things on right. Fortunately the straps of the top mark out most of the mating
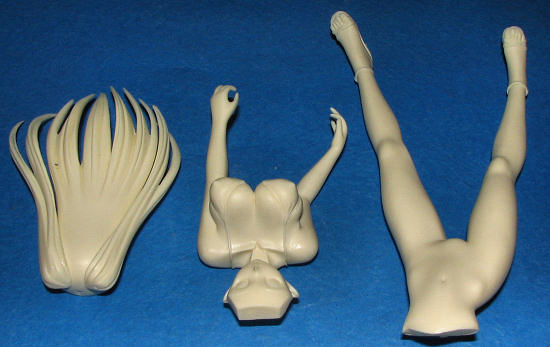 surface. Then I moved on to the hair and added the two larger side portions. It is important to test fit everything multiple times to be sure of no glitches. A set of instructions is included, but it is poorly photo-copied and in Japanese so no real help. The next step was to glue the upper and lower torso together. Again, fit wasn't perfect, but it wasn't bad. Some sanding and adjusting was done to get as good a fit as I could.
Now it was ready for some painting as I had the two major bits; the body and the hair. The bikini bottom was separate and the bikini will be painted black to match the bikini string provided with the kit.
| PAINTING |
 First step to painting figures for me is to giv
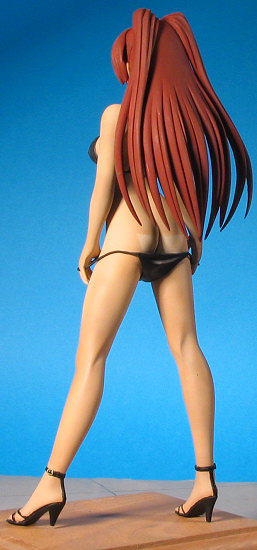 e the skin area a coat of matte white. This provides a good undercoat for the flesh tones and so I chose Floquil's reefer white thinned with lacquer thinner for this task. This showed a few more glitches which were filled using epoxy filler. Then more white to cover up and an overall coat of Badger Accu-flex tanned skin. Then some standard skin tones to lighten things up a bit with a bit darker shade used in a few spots as well. I also sprayed the lower torso in light flesh and then put one of the resin bikini bottoms over it and sprayed the rest of the area with tanned flesh. It seems to have turned out well. Unlike many figure painters, I don't like the heavy washes that are often applied to bring out details. To me, that is just as unnatural as accenting panel lines in an airplane kit. I'd rather add a bit of lighter color on the 'upper' surfaces and darken a few areas normally in shadow, but quite lightly. I'll let the room lighting take care of the rest. Just like on you and I.
The hair was done with an auburn brown color from Vallejo. Vallejo paints work very well, but don't seem to stick well to resin, even when primed first. One does need to take some care with it until it is finally sealed in place. Back at the 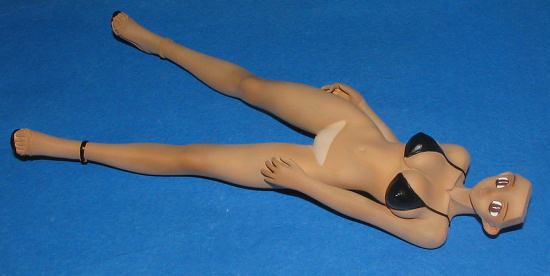 main part of the kit, I started painting the eyes and the rest of the figure's suit and shoes. The eye areas were first painted gloss white with Vallejo acrylics. When dry, the upper and lower section were highlighted in black and the main eye color then painted in. While that was drying, I used Vallejo gloss black to start brush painting the clothing and shoes. This takes quite a bit of time as I wanted to make sure I didn't slop it about. A bit of pink for the lipstick and nail polish was added as well. I went over several of the strap areas with a black technical pen.
| FINAL BITS |
I then attached the back and side hair pieces. All the while, bits of paint were rubbed off the hair. A bit more work on the face and then the forward section of the figure's hair was glued on. I then repainted the bits that needed it. About this time I realized that it might be a good idea to put it on its base. This was a relatively simple matter of drilling holes in the bottom of the feet to 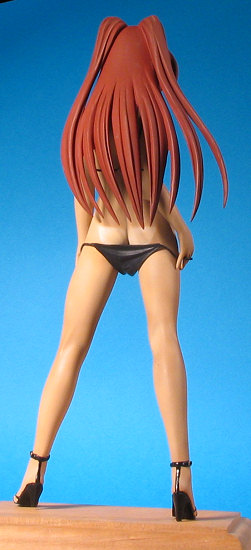 accept sections of paper clip. I left a considerable amount sticking out and used those to poke starter holes in a wood stand I'd bought several years back. The difficult part of this whole build was getting the bikini bottom in place. Every time I tried to position it, I rubbed black paint off on the skin surfaces. After considerable thought and a repaint, I placed a section of waxed paper on the inside of the bikini and that seemed to cure the problem of paint rub. Then I carefully removed the wax paper and added a few drops of superglue to hold it in place.
The next to last thing was to attach the lower bikini straps. One is given a section of black twine and a section of black wire. Not sure just what the wire is for. The twine does unravel if cut so the thing to do is to first put a drop of super glue on a straight section near the end. Then use a sharp knife to cut it. That end will be attached to one corner, the other part strung as needed and then, when matched with the other end, more 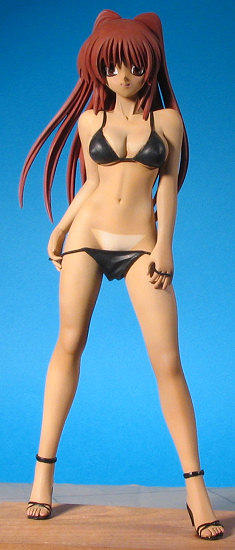 superglue used to keep it from unraveling and then cut. While it sounds complex, it really is quite simple and worked well. More touch up painting was done (such as brushing on a flat coat to the bikini itself) and that was it.
| CONCLUSIONS |
This figure kit and several others have been sitting around in boxes, half complete for quite some time, and after realizing that other projects wouldn't reach fruition in time, I decided it was best to take a few days to finish one of these off. It also helped to reduce the pile of forgotten projects.
I realize that these figures are not for everybody. After all, most over 30 haven't a clue as to what anime is as we grew up with Bugs and/or Scoobie. But for those who like large scale resin figures of scantily clad females that aren't all Red Sonja types, then these do fill the bill quite nicely. To quote one of my favorite cartoon characters, Weevil: "Eheh..eheh..eheh!"
January 2007
#14 in a series
Thanks to me and my wallet for providing this kit.
If you would like your product reviewed fairly and quickly by asite that has nearly 350,000 visitors a month, please contactme or see other details in the