| HISTORY |
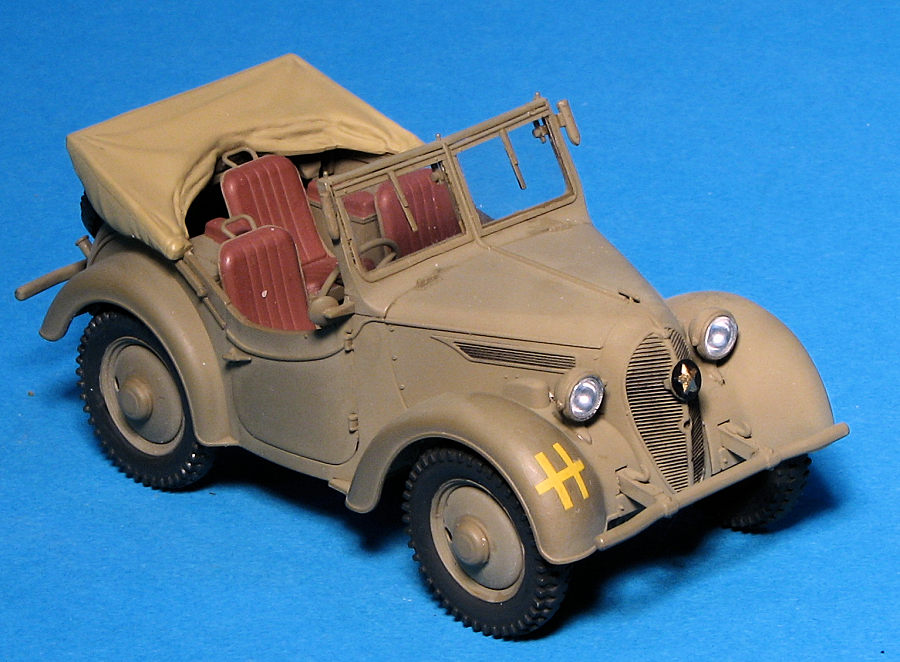
Fine Molds 1/35 Kurogane Type 95 Scout Car
| KIT #: | FM 50 |
| PRICE: | 3000 yen SRP |
| DECALS: | Four vehicles |
| REVIEWER: | Scott Van Aken |
| NOTES: | New tool kit (2017) |
| HISTORY |
The Type 95 was a Japanese scout car built by Tokyu Kurogane
Industries (東急くろがね工業
Tōkyū Kurogane Kōgyō?),
and was used during the war with China and World War II in the East. Between
 1936 and 1944 approximately 4,700 were built. It was the only completely
Japanese designed reconnaissance car ever used by the Imperial Japanese Army,
which tended to use civilian cars.
1936 and 1944 approximately 4,700 were built. It was the only completely
Japanese designed reconnaissance car ever used by the Imperial Japanese Army,
which tended to use civilian cars.
It is the world's first four-wheel-drive passenger vehicle placed into mass production before the Willys MB (Jeep), which was introduced in 1941, the Daimler Dingo in 1940, the Volkswagen Schwimmwagen introduced in 1942, and the GAZ-61 in 1938. Its nickname is the "Yonki" (よんき) which in Japanese means "woodpecker". In the field, soldiers often called it the "daruma".
An interesting tidbit is that it was powered by a V-twin engine displacing 1.3 or 1.4 liters. Of the 4, 775 built, only four are still extant in museums.
| THE KIT |
Some of you know that I have a fondness for wheeled military vehicles, so when I saw this for sale on a Japanese web site, I knew I had to get it. Besides, it was relatively inexpensive, and I know that Fine Molds kits are pricey in the US.
The olive brown plastic is superbly molded as one has come to expect from Fine Molds. The kit is not a curbside and does come with the air-cooled engine. Unlike Dragon and other kits, this one relies on quality molding not just parts count to provide detail. The kit provides a frame/interior floor/front wheel well piece on which all the various suspension parts are attached. There is a pretty complete exhaust system as well. Differentials and shocks are also nicely done.
Much of the smaller detail is limited to the interior pieces with
separate controls and three one-piece seats. The windscreen has separate clear
pieces that could be installed after painting the vehicle. Decals are used for
instruments. The car body has separate si des, each containing a rear fender.
Despite having a full engine, the bonnet is shown attached closed and no option
to have it open is provided. The rear section fits between the two rear fender
pieces. The top is molded down and there are separate doors provided. Wheels are
a full outer wheel with most of the tire as one piece with a partial tire/inner
wheel piece. The kit comes with a standing figure to provide scale.
des, each containing a rear fender.
Despite having a full engine, the bonnet is shown attached closed and no option
to have it open is provided. The rear section fits between the two rear fender
pieces. The top is molded down and there are separate doors provided. Wheels are
a full outer wheel with most of the tire as one piece with a partial tire/inner
wheel piece. The kit comes with a standing figure to provide scale.
Instructions are excellent with a nice color reference chart offering several paint options. Of course, everything is pretty much in Japanese so any interesting notes are illegible to most of us. There are four options, all in overall Japanese Army Khaki with red-brown seats and a tan top. All the vehicles are based in China or east Asia as apparently none of these were sent to the various Pacific islands. The nicely printed decal sheet offers pretty much just license plates and a couple of them have fender or door markings.
| CONSTRUCTION |
First steps for me was to assemble the front suspension pieces and
the rear suspension. I also attached the fuel tank and batter box to the
underside of the chasses. I then did a mass painting. For this, I used Tamiya
XF-59 Khaki which looks a bit darker than the artwork on the box, but at the
time is all th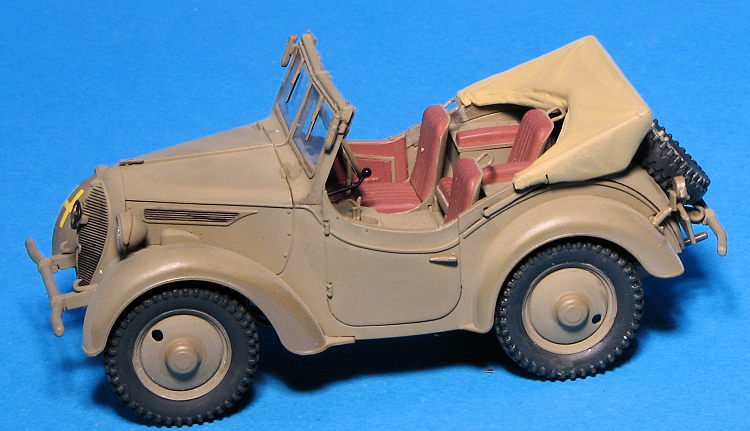 at I had available that was close. Pretty much all the parts on
the sprues got this color. The engine, which I realized when I cut it from the
sprue is not complete as I'd thought, was painted aluminum with black cylinders.
at I had available that was close. Pretty much all the parts on
the sprues got this color. The engine, which I realized when I cut it from the
sprue is not complete as I'd thought, was painted aluminum with black cylinders.
I then painted the exhaust pipes with Alclad II exhaust manifold. The engine was installed in the chassis once dry and the exhaust was also attached along with the rear axle. After I attached the shocks, I used the paint out of a 'liquid chrome' pen to do the oleos. The torsion bars were attached and then I moved to the front.
Here the front fender assembly was attached. It is held in place by two posts and there is a lot of wiggle in it. To cover the gaps under the bumper brace, there are a pair of small cover plates. The bumper and forward tow hooks were then glued in place.
The steering arm is placed through the firewall and that assembly is
glued in. Then the transmission hump along with the shifter, brake and 4wd
engagement lever. In the back, a frame was glued behind the rear seat. On the
upper cowl/windscreen piece, the grab handle and four very small window op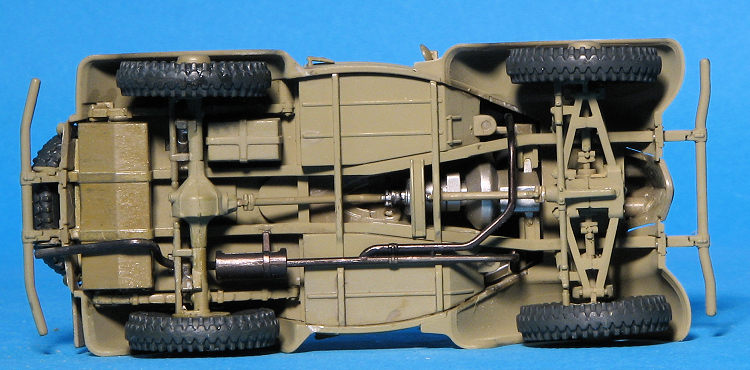 ening
levers are glued on. These latter items are quite small and one has to take
great care installing them. At this point, I sprayed many of these areas again
as I'd sanded off sections where the sprues attached or where there were mold
seams.
ening
levers are glued on. These latter items are quite small and one has to take
great care installing them. At this point, I sprayed many of these areas again
as I'd sanded off sections where the sprues attached or where there were mold
seams.
All the seats had been pre painted so I removed them from the sprues and painted the cushions with Vallejo's saddle brown as the instructions wanted a red-brown. These were then glued in place. I used the same color for the inside of the doors and the padded bits that fit inside the rear fenders.
Wheels were prepainted then assembled. The kit provides hub caps if you wish to use them. These fit over the bolt pattern. I simply pressed the wheels on after the tires were hand painted as the fit is quite good. I should mention that the demarcation between the wheel and tire is excellent on the outside with a raised rim to help. This is not the case on the inside. I'm not sure why this helpful feature cannot be done on both sides. This kit is not alone in not providing a raised rim on the inside of wheels as I run across it all the time with aircraft kits as well.
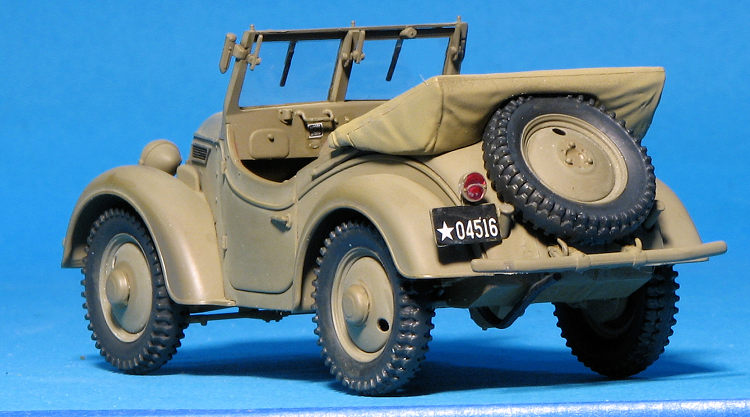
I then attached the bits in the back. There are teeny areas under the
rear bumper supports to install just like on the front. In the back, there are
twin fuel tank fillers, a mount for the spare and license plate as well as a
pair of tow hooks. A large, two piece folded top is provided. This was painted
Tamiya dark yellow. Note that you must attach the spare before putting this on
or you will have trouble getting t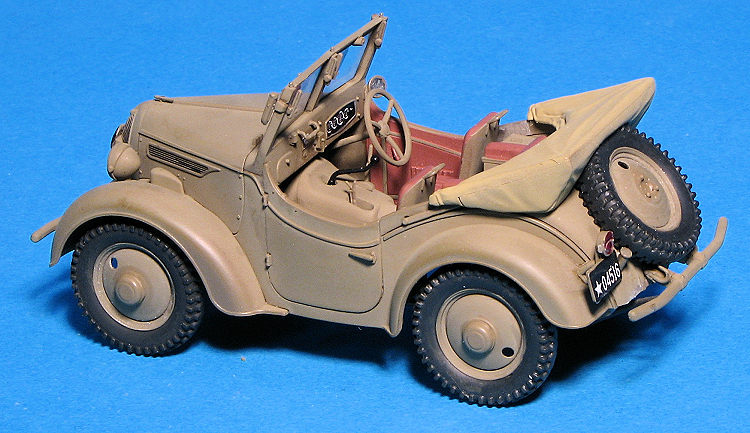 he
spare to properly fit. I used Liquid Chrome, which comes in a pen, for the area
behind the red on the brake light, the side view mirror and inside the headlight
housings.
he
spare to properly fit. I used Liquid Chrome, which comes in a pen, for the area
behind the red on the brake light, the side view mirror and inside the headlight
housings.
More small bits to attach are the door handles and the hood latch handle. There are two items that fit on the outside of the windshield frame which I am guessing are 'trafficators' or turn signal flags. Before attaching the separate windscreens, these need to be masked and the edges painted. Once installed, the windscreen wipers are added and the position you see is how the instructions said to install them. I would find their position to be an obstruction to good vision. Headlight lenses are a very good fit and took just a tiny bit of cement to ensure they won't fall out.
I did no weathering or even any dry brushing on this one, though I did do a black wash on the grill and the hood vents.
| CONCLUSIONS |
This is a very nice kit that made into a super little model. It was about as hassle-free as you can get. Not that it is a throw-together kit as the small bits will require some steady hands to install. However, it is one that I can very easily recommend to those who are interested in things like this. Fine Molds has a real winner in this one.
| REFERENCES |
https://en.wikipedia.org/wiki/Kurogane_Type_95
7 April 2016
Copyright ModelingMadness.com. All rights reserved.
Thanks to me for ordering this one.
If you would like your product reviewed fairly and fairly quickly, please contact the editor or see other details in the Note to Contributors.
Back to the Main Page Back to the Previews Index Page Back to the Review Index Page