Maquette 1/35 BA-64 Light Armored Car
| KIT: | Maquette 1/35 BA-64 Light Armored Car |
| KIT #: | MQ-3513 |
| PRICE: | $10.98 (9.96 at Squadron) |
| DECALS: | Two options |
| REVIEWER: | Scott Van Aken |
| NOTES: | It isn't officially short run, but treat it as such. |
| BACKGROUND |
For a look at what comes in the box, please visit the preview.
| CONSTRUCTION |
First thing I did was to look to see what sort of trouble I could get into with this thing. Looks like plenty so I got down to it. After scoping out the somewhat flashy kit, I cut off the wheels, body sections, turret parts, and the chassis. These were then cleaned up. There are ejector pin marks on the lower body and wheels that need to be filled in. Those on the chassis can be sanded off or cut and filed to shape (those that had the last treatment are those tubular bits on the chassis).
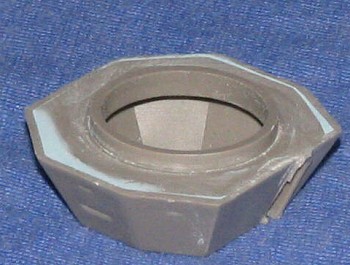
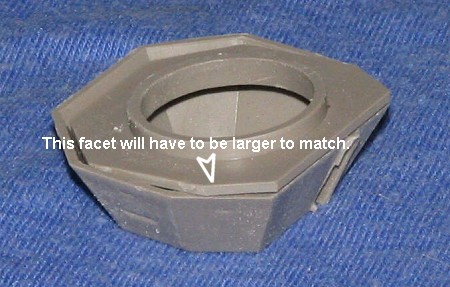 I then figured that I'd do the easiest part and glue the base onto the turret. Well, we can mark this down as problem area #1 as the base is not the same shape as the underside of the turret and is too large to properly fit inside it. The base section will need to have the facet that is facing you in the image sanded back. It also seems as if the flange for the gun opening is short shot.
OK, so that was set aside while I did a bit more construction. I went to the chassis and decided to add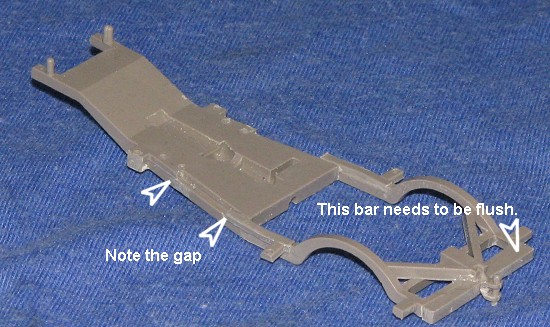 some bits there. First parts were #35 and #36, which are the forward rear spring mounting points. Looking at the instructions and the kit parts, there was a decided difference in length. The slot on the chassis is about twice as long as the actual piece. Taking one of the rear springs, I did a dry run and saw that these parts would have to fit as far aft as possible. I'll deal with the open slot that is left later. I also put on the rear bar with pintle. This needed to have the rear chassis part filed down a bit to get the bar to fit. The pintle had the biggest ejector tower on it I've ever seen on a part this small and that had to be cut off.
 I then applied filler to the rear bar and side pieces, which was sanded down once dry. The next step was to construct the rear axle and to glue on the rear springs. The springs went on without a problem. The axle assembly was pretty straight-forward as well. When you glue the differential parts, you'll find that they will need filler on the seam. Normally, I'd have left off the filler as the differential was normally bolted together, but I had some large 'chunks' that needed filled. Be sure to sand the mating surfaces as well to get rid of any lumps and bumps. You'll also find that the axles themselves have ejector pin holes that will need work. This was true of the front axle as well.
The front axle has the differential offset. When building this I realized that I screwed up the rear axle assembly, thinking that the differential 'bumps' on the axle were actually wheel end plates. Well, too late to fix it on the back, but I did get the front properly done. The wheel end plates on the front axle are rather sloppy fits and getting them properly aligned was a chore. After cleaning up (and breaking) the tie rod, I glued it on the end plates. You really need to make sure these end plates are properly positioned. The instructions are a touch vague on the proper alignment of these.
 Turning to the turret, I sanded down the facet as needed and glued in the bottom section. The fit is actually not good and though it probably won't be seen once installed, I felt I had to use filler to take care of the gaps. Turning to the rest of the body, I glued the upper and lower halves together after filling and sanding the ejector pin marks on the bottom of it (as they would be visible). Fit is fair, but it seems as if there was a mold problem near the front and on both sides, the upper half seems to have sunk in a bit. Filler will fix it.
Next, I decided to add on the doors and forward view plate. The doors are too small vertically and a bit too big horizontally. Filing them down took care of the horizontal part, though the hinges don't align. The vertical problem leaves a wedge shaped gap at the top that I had no choice but to fill in. The forward view plate needs careful cleanup before attaching and is too short in the vertical. You'll have a small gap either at the top or the bottom so make your choice. The plate that goes above it had one of the mounting holes not only filled, but there was a short 'pin' in its place. I removed the pin from the body and the corresponding one from the part before assembly.
With those bits in place, I did the usual filler trick on the seams and for the door. Then I installed the rear fenders. The fenders have an odd 'step' where they attach to the sprue gate. This entire step must be sanded off as the fenders were flat on the outside. There is a notch to help you get the fenders in place. Fit is fair and I used the glue's softening ability to get a really good, tight fit. Of course, this means that you have to remove the oozed plastic, but it really is a good solution. Once 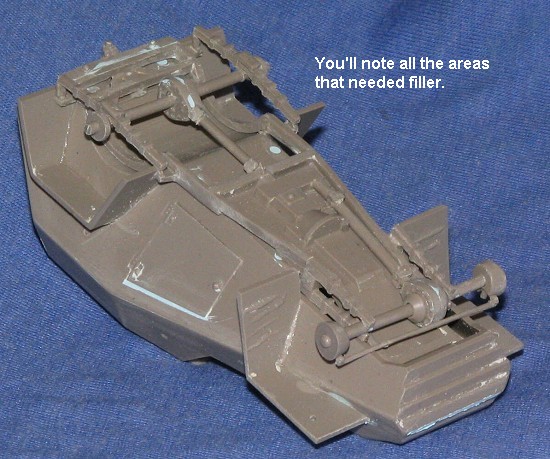 the edges were sanded I moved to the front fenders. These have to be treated the same as the rears, but there is only a tiny notch to help you align them. This makes getting them on straight, a much bigger hassle. I had to do quite a bit of fiddling around and even when dry, I also had to use filler to take care of some of the seams. As a help, when I put these on, I beveled the inner surface of the upper portion so that the fit would be a bit better.
With those in place, I then went to work on the chassis. I had no problem installing the rear axle/differential section. It fit well, though I did have to trim the drive shaft a bit to get things to seat properly. There is no positive locator for the axle so some fudge work is needed to get things aligned. For the front axle, I first glued on the upper and lower half springs. These parts had more flash than Prince and so needed to be cleaned up. There is also no indication as to which end is 'up' so the key is to have the longer springs facing the differential/axle assembly. Glueing the axle assembly on to the springs is also tricky and the axle needs to be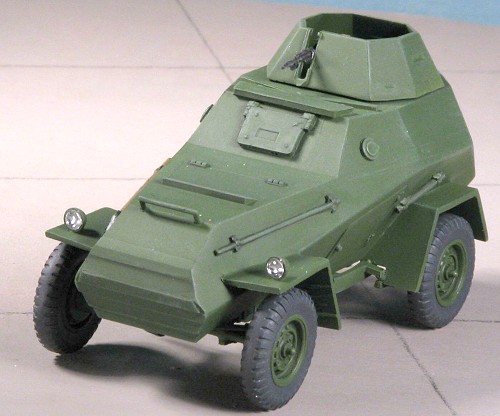 clamped onto them to get them to fit. Unfortunately for me, while drying, the axle slipped a bit and is now off center. I'm hesitant to break it free as it may make things worse. I'll see about it later. Getting the drive shaft to fit also required clamping and even then the fit is not great.
With a somewhat complete chassis, I then fit it to the body. In the rear, I had to cut away a bit at the fenders to get the chassis to fit. I also had to sand down the rear mounting area as it sat way too high. The front was not bad. I should mention that one has to slide the front part into the body first and then get the rear section in place. When you think you have things properly aligned, the chassis and body are clamped and then glue applied. After all that dried. I decided to go ahead and cut of the misaligned front axle and reposition it.
Now that the chassis and body were mated (and I have to say it probably isn't perfect as there is a gap between the chassis and the lower body), I went to work on some of the upper body bits. First there are several tools that need to be glued onto the side of the body. All of them have alignment pins on them, but there are no holes in the body for them to fit into. I ended up removing all these pins and butt joining them. I then glued on what I thought were fender braces, but it seems they are cables running from the lights. Regardless, one is a bit too short and you do need to fit these as close to the underside of the fender as you can or the wheels will rub.
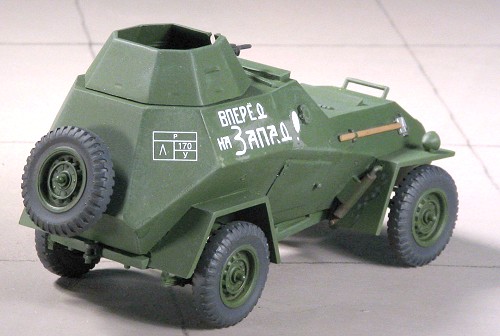
Then the headlights were glued in place over the holes in the front fenders. They really need some sort of lenses in there so 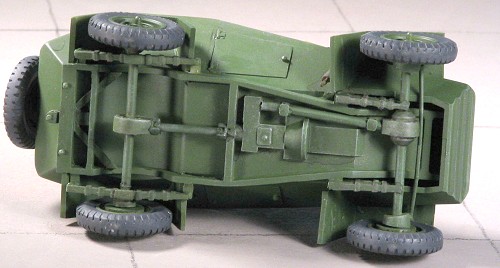 you can cover up the sink areas. There are 'thingies' that go on the side of the upper body. I wasn't really sure what they were as they seemed to stick out like lights. Looking at the box image, I came to the conclusion that they were pistol ports for the folks inside. However, unlike on the real thing, they are not flush but stick out. If you haven't figured it out already, there are a lot of discrepancies between the instructions, the kit parts and how the real vehicle looks. After gluing those in place, I then glued on the handle looking thing on the nose. There are mounting holes for this, but, as I found out after the part had dried, this piece should be more horizontal than vertical. I glued the spare tire mount in the middle on the back and then the exhaust to the right side behind the fender. It seems there should be a long exhaust pipe, but none is provided. I'll probably use a piece of tubing to represent that. I also cut off the gun (there are 7 sprue attachments on this small piece), cleaned it up and set it aside. The kit was now ready for paint.
| COLORS & MARKINGS |
I queried the forum as to what would be a pretty good color to paint this, especially seeing as how the common consent is that the Soviets used anything that was basically close. I'd originally intended to use FS 34102 as I already had it and didn't want to spend the bucks on a new bottle of paint (the stuff is $3 a bottle nowadays). I got all sorts of answers and none of them really seemed to be the same. I thanked them all for their inputs and since one fellow suggested that I go with the 34102, I did. Being an overall color makes things really easy. The only thing I had to be careful of was to not miss any spots as the light grey plastic would stick out. My already mixed Testors ModelMaster 34102 enamel had been mixed up for several  months and had turned the consistency of cold honey. A splash of Floquil thinner took care of that situation and it sprayed perfectly.
I then took the kit back to the workshop to do a bit of detail painting. This was mostly the handle for the spade and the muffler, which got a bit of Rust-All. The tires were all brush painted using Floquil Weathered black. Fortunately the rims are pronounced, a problem with some airplane kits, and painting was a breeze. I then gave the model a good dry brushing with some Vallejo light green acrylic to highlight the edges of things. The various hinges and bits got a black acrylic wash to add some depth to things. I then sprayed the area for the decals with Future to gloss it up in prep for application.
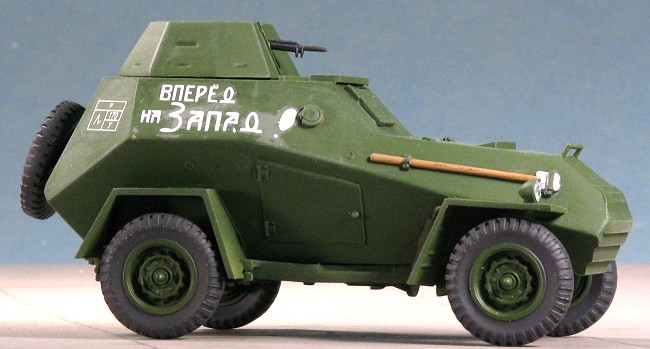
The kit decals have two options. One with a patriotic slogan and the other with what look like a white dog markings. The decals came free from the backing paper quickly, slide on to the model with no problem, were totally impervious to any setting solutions and silvered like a big dog. In short, they suck. Fortunately for modelers, aftermarket decals with slogans and generic markings for Soviet stuff are easy to fine. Add to it that often these vehicles carried no markings, and the decal problem can be overcome. However, this is a review kit and I build it OOB and at times, that includes using the kit decals. I suffer so you don't have to.
| FINAL CONSTRUCTION |
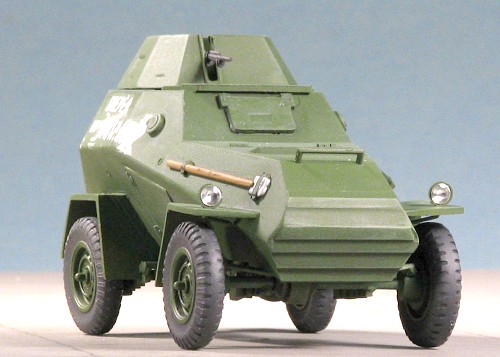 The last bits were to attach the wheels, the gun, and figure how to handle the sunk in headlights. Well, the gun was easy. Its attachment point is too wide for the gun slot so I simply sanded that down until it was able to fit. The wheels fit fairly well, but if you tried to butt them up against the plates, they'd be all cockeyed. I tried to get them as straight as I could, but they aren't totally aligned. I also had the 'one wheel in the air' syndrome, but fixing it was easy. I broke loose the offending wheel, set the model on a hard, flat surface, grabbed the super glue, and attached the wheel back to the axle. All on the ground and it is very hard to determine which wheel was the culprit. Looking at the pictures, I see that I didn't get the right rear wheel properly aligned. It wasn't the one I broke off and reglued! The headlight deal required expenditure of funds. MV Products lens # L136 is a perfect size. I used my calipers to get the inside diameter of the light (which was a bit over .13 inches or a bit less than 3.5 mm). A drop of super glue in each opening and the lens fit right in. These are a buck a piece so I spent the equivalent of 20% of the cost of the kit on two headlights. However, they are well worth it. I didn't do anything about the exhaust pipe or other areas that may have needed work (like not having an interior). No bother with radio antennas as I doubt if many carried a radio.
| CONCLUSIONS |
So here is how I see things with this kit. You can build it fairly rapidly. I took a bit over a week, but that is because I waited for filler to dry and so on. It is not a 'shake and bake' kit as, in addition to the clean up of parts, you really have to test fit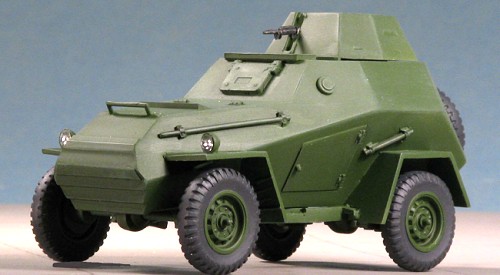 everything and even think a bit ahead when building it. A couple of things that I just have to comment on. One is that the instructions really are not fully adequate to build the kit. There is too much guesswork in what goes where and how things are to line up. Secondly, there are kit parts that do not look like what is shown in the instructions and there are bits that don't look like what is on the real thing shown on the box top. Finally, the decal are horrid.
This is not to condemn the kit, but to point out that you really cannot treat it like a Tamiya or Dragon kit when it comes time to building it. You are able to get a nice model out of it, but you have to put a bit of work into it to do so. It is a kit that the vast majority of modelers can complete to a standard equal to or better than I. What's more, it is an interesting vehicle, fits in well with my 'no tracks' military vehicle collection, and is, by today's standards, dirt cheap! What more could you want?!
November 2004
# 1336 in a series
You can find this kit and many others at
If you would like your product reviewed fairly and fairly quickly, please contact the editor or see other details in the Note to Contributors.