| KIT #: | 32515 |
| PRICE: | $28.00 MSRP |
| DECALS: | Four options |
| REVIEWER: | Scott Van Aken |
| NOTES: |
| HISTORY |
"German Field Marshal Von Kleist said, "Their T-34 was the best in the world." The T-34 tank is legendary as the armored fighting vehicle that won The Great Patriotic War for the Soviet Union.
In 1931, the Soviet Union purchased two American Christie tanks, which were at the time the most innovative in the world and too advanced for the U.S. Army to get involved with. The main technological advance of the Christie design was the suspension system, which allowed the vehicle to operate at higher speeds over more difficult terrain than the various AFV suspension systems then in use. This Christie suspension system was incorporated in what became the T-34, and was the most important item in creating the superior fighting vehicle the T-34 was.
 The T-34 was developed in the Kharkiv Tractor Factory in the Ukraine during 1936-37, as a technologically innovative design that addressed the short-comings of the earlier BT series of wheel/track tanks. These were light tanks designed for very high speed - 53 mph with tracks, and over 60mph in good roads without tracks! - and long range. While these features made a formidable weapon for fast advances deep in enemy territory, the BTs lacked firepower and armor and were not suitable as main battle tanks.
The prototype - now designated the T-34, was built in early 1939, was tested by successfully driving it 1,000 miles from Kharkiv to Moscow and back. It was put into production in September 1940. The Model 1940 carried the L-11 76.2mm gun, which was shorter than the subsequent 76.2mm main gun of the 1941 and later models. 1,225 T-34s had been produced at the Kharkov Steam-Engine Factory by the time of the German invasion on June 22,
Besides the suspension, the T-34's main advantage was its simple design, which made it easy to mass produce and repair. By the middle of the war, with mass production in the Urals factories, a T-34 could be produced in just 40 man hours. Compared to contemporary medium tanks, the T-34 was smaller and comparably lighter at only 26 tons, while the water-cooled diesel engine minimized the danger of fire and increased the radius of action to 115 miles.
The design evolved throughout the war: the T-34/76B was equipped with a rolled-plate turret, while the T-34/76C had twin roof hatches instead of the one large hatch, and the T-34/76D introduced a hexagonal turret, with a wider gun mantlet and jettisonable exterior fuel tanks. The T-34/76E had a cupola on the turret for the commander and all-welded construction, and the T-34/76F was equipped with a cast-steel rather than welded-steel turret.
The T-34 first saw action in a series of border battles between Russian and Japanese forces on the Manchurian border in March 1941. The Japanese reported the outstanding performance of the T-34, but these reports were ignored by the Wehrmacht.
 When the German panzers first met the T-34 in combat, it proved to be a nasty surprise, since it had a more powerful high velocity cannon that placed more emphasis on tank killing ability than did the German Pzkw IV which was the heaviest German AFV at the time, and a higher top speed - 32 mph versus 25 mph. Additionally, its sloped armor and welded construction was superior to its opponent, while its extra-wide tracks improved cross-country mobility in the great battles on the Russian steppes. The T-34 was so superior to what the Germans had that an emergency program was put in place to create a tank that could counter it, which resulted in the Pzkw V, known as the Panther and the Pzkw VI, the Tiger. During the design competition that resulted in the Panther, one other suggestion was the production of a direct German copy of the T-34.
The T-34, equipped with hand bars welded to the hull, was the first tank designed to carry infantry into battle, which was a tactic that brought real changes to the battlefield, since the infantry could ambush enemy tanks that didn’t expect their presence.
Following the Second World War, the T-34 was widely exported and saw action in nearly every war fought between 1945 and 1995, when it was used during the Bosnian civil war. T-34s can still be found in some armies in Africa, making it likely the most widely-used and longest-serving tank in history."
Few do a background history like Tom Cleaver and so I boldly swiped the above from his review!
| THE KIT |
Molded in olive brown plastic, there are four sprues (two of them identical which contain the running gear bits and only one is shown). A cast metal hull is also included and really, I'm not quite sure why this is the case, aside from giving the kit a bit more heft.
 Detailing is excellent as one would expect from Tamiya. All but a few parts are used in construction. Will other versions of the T-34 be produced? Is the Pope German? This is the earliest production version so others are sure to follow. As with the StuG and Sherman I built, the chassis components are first glued onto the hull, then the upper body is built and screwed into place. Most of us will alter this so that we can paint the suspension and wheel bits. There are screws and two sizes of poly caps so many moveable bits are to be envisioned.
The tracks are in bits and sections. The bits to go around the drive sprockets and idler, while the larger sections will connect them. The upper tracks are formed to fit and have a bit of sag to them. One nice thing is that the number of road wheels is much less than on similar tanks so less scraping and painting. A nice load of 'stuff' is provided to put on the outer body, including some spare tracks. The casting of the turret is first rate, though I can see that back seam will probably result in the loss of the casting marks. No interior in this one as these Tamiya kits are generally curbsides.
The instructions are quite good, but again, only provide Tamiya color references. Not really a problem as you can have your T-34/76 in any shade you want as long as it is Russian Armor Green (of any one of several dozen shades). The sheet also does not provide a parts layout or tell you which bits are not used in this version. The small decal sheet provides markings for four different tanks. My experiences with Tamiya decals are quite positive so you can use these with abandon.
| CONSTRUCTION |
The instructions suggest starting by gluing on the various plastic bits to the cast hull so that is what I did. The two idler wheels have their mount held in place with little plastic doo-dads. Undoubtedly to allow you to stiffen up the tracks when they are glued in place. The next step was to do the road wheels.
 But before this, I thought I'd be clever and paint all the pieces on the sprue. This seemed like a good idea, but in reality, it wasn't the best I've ever had. This is because the paint tended to wick away the liquid cement I was using, making assembling bits more difficult. Don't do it. Do paint the road wheels while on the sprue, as it makes things so much easier. I brush paint rubber so after dousing everything with Humbrol Khaki Green, I started painting each side of the road wheels using Gunze tire black. Still quite tedious a job as it seems to take an age, but eventually, all 20 road wheels were painted on the outside. I then snipped them off, sanded off the seam (again, a tedious job), glued the two wheels together and then painted the remaining parts. Fortunately, Tamiya has nice rims that stick up and make all this brush painting go well, even though it probably took me a couple of hours to do all this. I then glued on the idler and drive sprocket and then painted the lower hull. That was set aside.
Moving to the upper portion of the tank, I first glued on what few large bits there were. For the upper hull, this was the back plate, exhaust, and engine intake grilles. Fit is very good on all these parts. I then started to remove the myriad of grab bars. Cleaning up the sprue attachment points is quite difficult and I broke two of the longer ones. Even gluing them back together resulted in some 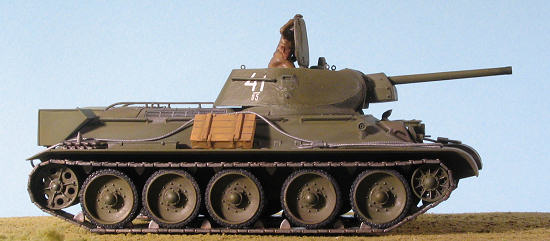 rather poor looking handles so I left off two of them that go on the turret. It would have been nice to have a few spares of these. With the glue wicking away, attaching them became a bit more difficult as not only did I have to scrape away paint, but some of the attachment location markings are very light and disappeared under the coat of paint.
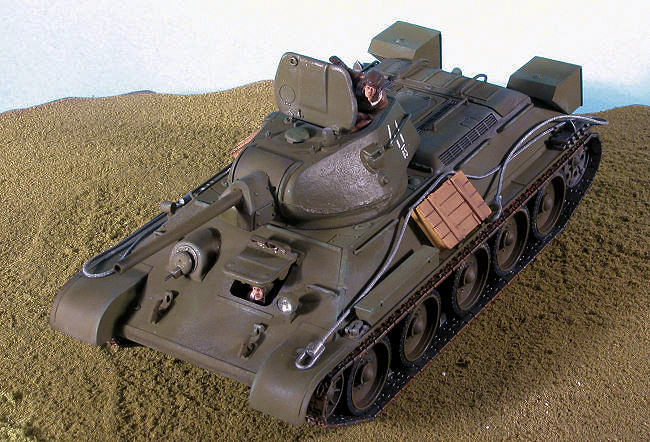
I assembled the driver's hatch in the open position as I want to put in some figures. Then the lights, tool boxes and extra bits were attached. The turret is well designed and the parts there went on quickly. Pay close attention to the piece that holds on the gun mantlet. I didn't and put it in reverse. The result is that I had to drill the attachment holes in an oval shape to get the gun to fit. I also needed some filler on the underside of the gun mount and the rear turret bustle. I know few will see it, but it just looks much nicer and I know it is done! The little hoist eyelets and the periscope fit on with no problems and the barrel just slid into place.
| COLORS & MARKINGS |
With all the various bits on the hull and lower section, both were given a complete coat of Khaki Green and set aside to dry. There was little left off either as thankfully, tanks generally seem to be the same overall color(s) on everything. Makes for easy painting. 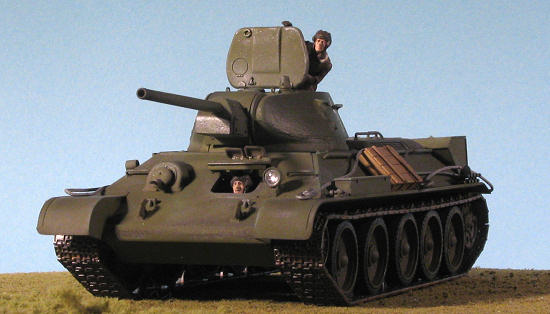
I did take the time to paint the tracks as well. First they were painted matte black then a coat of Alclad II steel. When that had dried, an overall wash of dark grey matte acrylic followed by another wash of a rust shade, both using Vallejo acrylics. Probably no where near grungy enough, but I'm not good at doing tank weathering and I've seen too many overdone ones to want to go that route. These things had to get caught in a rainstorm or washed down occasionally!
| MORE BITS |
Now that the main paint had been applied, I got to assembling the suspension bits. The road wheels were glued in place and the hub caps glued on. Then I started assembling the tracks. These are well designed, but I'm still not the best at this as I could be and had to struggle a bit to get everything in place. It would be a huge help if Tamiya molded an arrow on the inside of the upper track section so we could tell what way this is supposed to go. I think I got one of them on backwards......
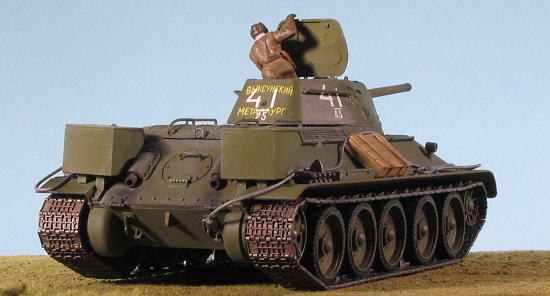
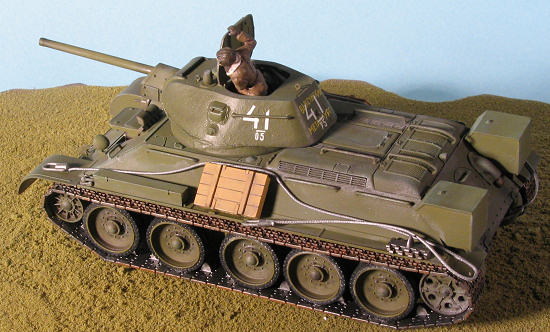
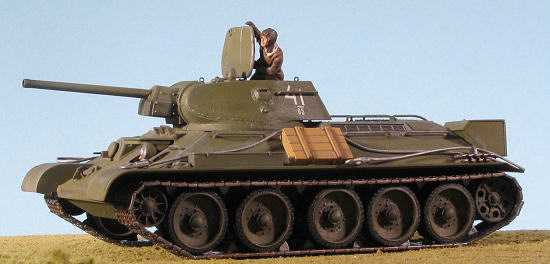
Anyway, with the tracks finally in place, I started working on the crew. Tamiya does a set of Russian Soldiers that includes two tankers. Many of the figures are in the sitting or squatting position so would be applicable to the tank as well. I chose the driver, tank commander and one other figure for my tank. The figures are nicely molded, but have rather thick mold seams. Removing them took more time and effort than I'd like, but once the figures were together, I got out the Vallejo acrylics and started painting. Naturally, Tamiya has you mix colors to get some of the shades, but I think I did OK.
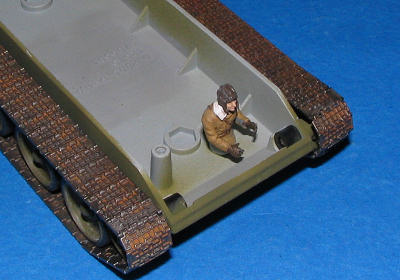 One thing for sure, these figures are not specifically designed for the T-34. The driver needed to have a chunk removed from the lower right and the back so that it would properly fit into the right place. Thanks to the thick rear section of the driver's hatch, the figure has to sit rather far forward. After much positioning (using tiny dabs of superglue to check position), I got it where it looked good and flooded the lower section of the torso with superglue and hope it will stay put. I did the required touch up and dry brushing before attaching the upper hull.
I ran into a similar fitting problem with the tank commander. The lower leg section that will fit on the stand in the turret had to be sanded a lot to put the figure at an angle so he can peer over the side of the driver's hatch.
Meanwhile the upper hull and turret were given a couple of washes using Rustall's wash. This is really quite thin and generally requires several applications. Some of the Rustall rust was used on the tracks and exhaust as well. With the driver in place, the upper hull was screwed in place and the covers put over the screw holes. Various washes and dry brushing was done to tone down the single color aspect of things. Not bad, but not a contest winner. The upper turret was then gloss coated for the decals. I picked the first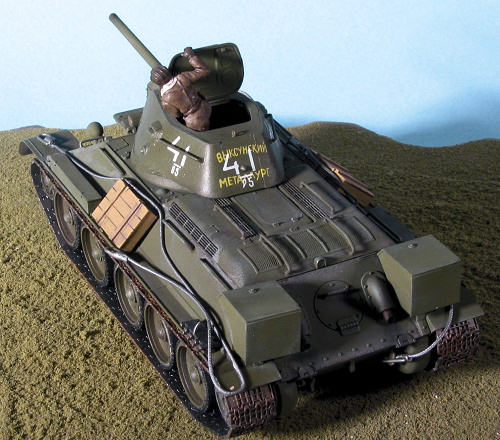 option on the sheet as this was a presentation tank and I thought that would be a nice touch. The Tamiya decals went down well with Solvaset and I then put several coats of clear matte on it, though not all the shine went away, despite the multiple coats.
There were a few more things to do. One was to attach the tow cables. I cut the string provided in half and dipped the tips in superglue to keep them from unraveling. Then I attached the ends and painted the whole deal with Steel Metallizer. Apparently Tamiya gives one more cable than needed as mine are quite long. Oh well, nothing a bit of wrapping about won't fix. I then replaced the clear lens of the driving light with an MV Lens. # L128, a .128"/3.3mm one fit perfectly and is held in place with white glue. No radio antenna was installed as most Russian tanks of the time didn't have them. Last step was a bit of black pastel for the tip of the gun barrel and the exhaust.
| CONCLUSIONS |
This is yet another super Tamiya 1/48 Tank. Though not the weekend special that some may think (at least not for me), it does make into a very nice model and has enough detail to please most. If this kit has one fault, it is the lack of turret interior detail, something that is quite obvious when looking at the huge chasm next to my tank commander!
August 2006
#1426 in a series.
Copyright ModelingMadness.com. All rights reserved.
If you would like your product reviewed fairly and fairly quickly, please contact the editor or see other details in the