Trumpeter 1/35 Soviet Armored Aerosan NKL-26
| KIT #: | 02321 |
| PRICE: | $22.99 SRP |
| DECALS: | Two options |
| REVIEWER: | Scott Van Aken |
| NOTES: | New tool kit |
| HISTORY |
 The NKL-26 was an armoured aerosan introduced by the Soviet Union during the Second World War, based on the earlier NKL-6 (OSGA-6). It was made of plywood and had a ten-millimetre armour plate on the front only, and was armed with a 7.62mm DT machine gun in a ring mount. It was powered by an M-11G aircraft engine.
Each NKL-26 was operated by two crewmen. NKL-26s were organized into battalions of 30 NKL-16s with a transport company of NKL-16s - each with three companies of 10. Each company was organized as three platoons of three vehicles, and a commanders vehicle.
Combat Aerosans often worked with ski infantry battalions, and could carry four ski troops riding outside the vehicle on its skis or towed behind.
| THE KIT |
This is the first kit I have seen of these vehicles in 1/35 and it is a most welcome deviation from the usual armor fare. Trumpeter has done a find job molding this one with all the parts being crisply done and with good detail. As is typical of some Chinese kit makers, some fragile parts are wrapped in bubble wrap or foam sheeting. Of course, we cannot have a kit without its photo etch, 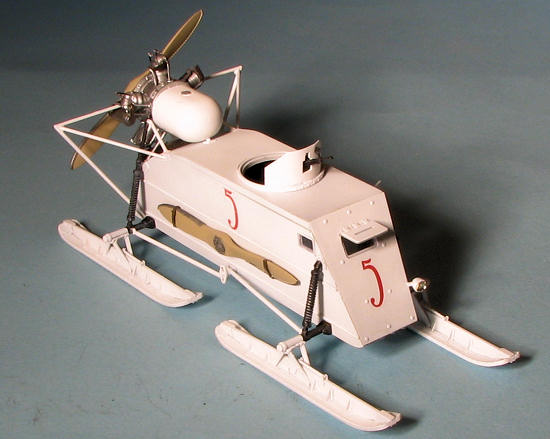 and Trumpeter provides two frets. These parts are used in most part for the ski assemblies. The hull attachment points are photo etch as are the braces for the skis. Since each of these braces has two folds and they are rather small, I would highly recommend a folding tool.
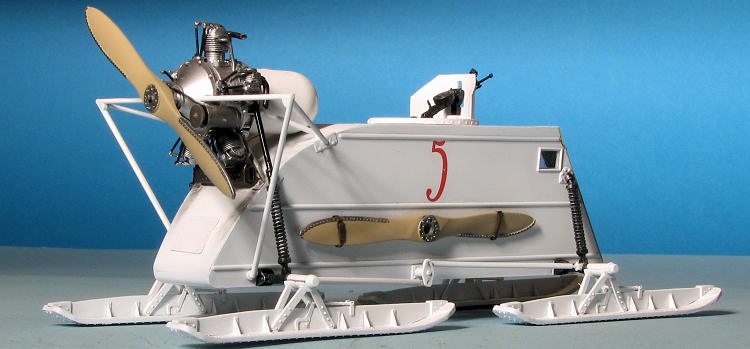
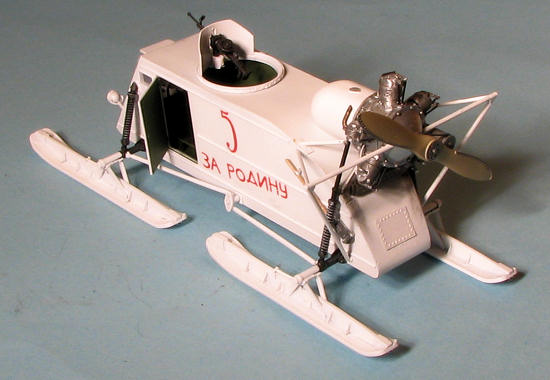
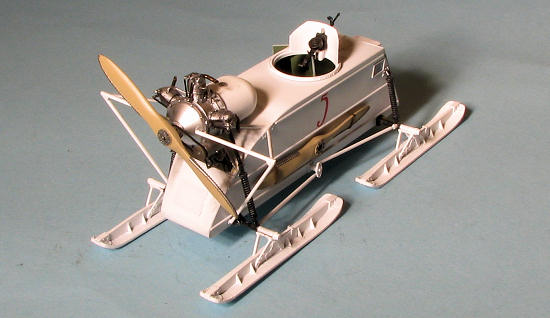
There is not much to the interior aside from a seat, instrument panel, steering gear, and a fuel tank. The engine is quite complex as you are going to not only build up the housing, but also the engine itself with the block consisting of several parts onto which separate cylinders will be attached. Each cylinder has a pair of exhaust pipes and the cam actuating rods. A generator is attached using photo etch belts. One has a pair of props; one to attach to the engine while the other is carried as a spare Both the driver's window and the door can be posed open if one wishes. A nicely molded turret with machine gun is also included. The figure that comes with the kit is manning this gun. Clear bits for the windows are available as pre-cut acetate sections.
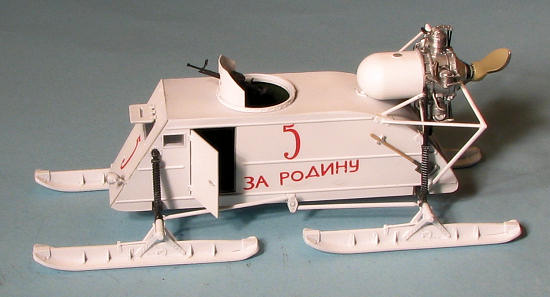
Instructions are well done providing a few options (such as a alternate aerodynamic forms to place in front of the engine), and these are clearly shown. It would be a good idea to read through these instructions prior to the build for that reason. Gunze paints are provided for the color references. Markings are for two all white vehicles, differing only in numbers and slogans. The small sheet (not shown) looks to be well printed. No unit information is provided.
| CONSTRUCTION |
 First thing I did was to look over the instructions and see if this was something I really wanted to build. I like the subject, but often, photo etch is my downfall and this one has a goodly amount of it in important places. Tossing caution (and an earlier experience) to the wind. I slowly started off by installing some of the interior pieces. Now I do not know how much you will be able to see through the open door, but like Monogram, Trumpeter has embossed the kit info on the interior floor, an area that will be quite difficult to reach when removing the offending stuff. I left it alone and glued in the cable runs and the rear bulkhead (of sorts). The gunner's chair was next assembled before I decided to paint the interior bits. Doing so later would have been folly.
The instructions call for khaki. There is green khaki and there is brown khaki and so I chose green as it was all I had in the paint racks. Probably wrong, but who is to say. The driver's seat was painted next as what looks to be a tank of some sort that perhaps holds fuel. This tank was painted aluminum as were the hold down straps. These were then glued into place. One needs to be quite handy with tweezers for this kit.
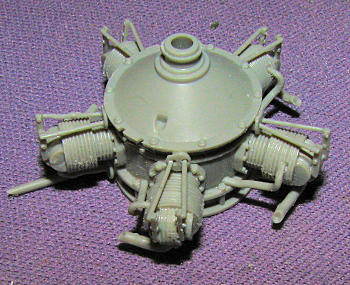 While that was drying, I started work on the engine. I have to say that Trumpeter went all out to make this about as many pieces as they could. The case is three parts, then there are five parts each of cylinders, cylinder mounts and small plates for the pushrods. Three cylinders get exhaust stubs while there is a collector of sorts for the bottom two. Next, each cylinder gets two small spark plug cables and each cylinder gets two push rod assemblies. It all makes for a lot of small work so break out the Optivisor. There is a back plate that one needs to carefully install else you will get it on backwards. Ask me how I know!
I did run into some problems with the engine build as the fine parts are VERY fine and some were broken. This was particularly true of the spark plug cables as the same location on both sprues was broken in an identical manner.
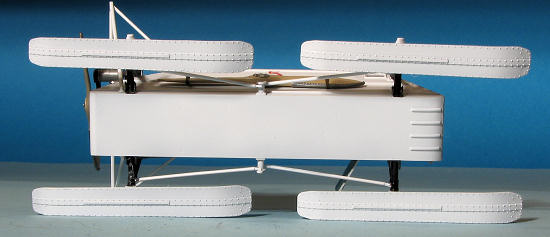
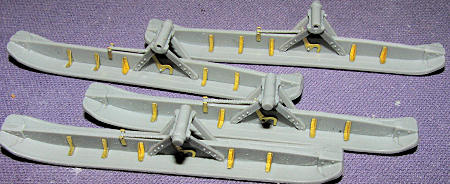 Once that was done, it was on to the skis. Each ski has photo etch braces. Each brace needs to have two bends in it to become the proper triangle with flanges. This is
 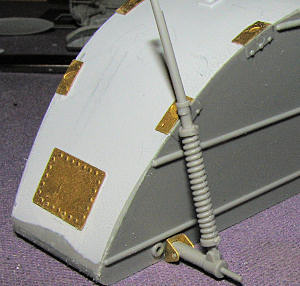 extremely time consuming and just bending and attaching these braces took the better part of a week. A bending tool is an absolute requirement as are flat nose pliers so one can hold each small p.e. part to sand off the nub from removing it from the fret. More photo etch is used on each ski for a small spring assembly. Two bits for the rear hinge and two for the front. The larger front ones were the only place in the build where I lost a piece of photo etch.
Back at the body, I painted the upper piece white and then glued it onto the lower hull. I then attached all the photo etch bits to the back. Each of the main suspension pieces has a photo etch bracket that will hold it to the body. Those were bent and the suspension piece installed. These were test fit and then set aside until later.
| COLORS & MARKINGS |
 This seemed like as good a time as any to do some painting. I used Floquil's Racing White lacquer for this after carefully masking the window and gun openings to limit overspray issues. There was considerable difference in what was to be painted black between the box art and the painting guide with the guide limiting the black to the suspension pieces. I chose that option as it meant less detail painting once the kit was assembled.
The engine was painted aluminum with some detail painting done in black and Vallejo's 'Tinny Tin'. A dark grey wash helped to accentuate the cylinders a lot more. I also painted all the various struts and rods that are part of the kit. I find cleaning these things up to be tedious, but it is part of the build process. The props were painted a wood shade with steel hub and blade leading edges.
| FINAL CONSTRUCTION |
Now that most of the painting was done, I returned to some assembly. In this case it was the front armored piece that got my attention. This has the steering wheel and instrument panel on the inner part. The instrument panel was painted white with the instruments in black and then dry-brushed. The steering wheel was attached and the assembly set aside while I attached the 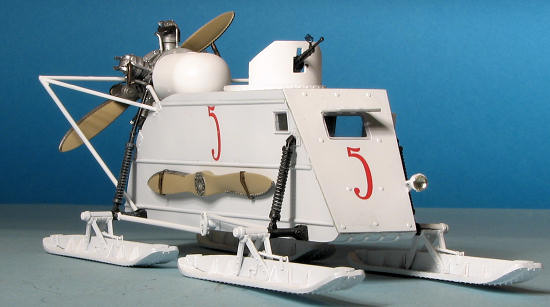 acetate windows. These all needed a bit of trimming to fit, but fit they did. I used clear gloss paint to install them. Then the forward piece was glued in place and the driver's armored shade was glued on.
Back at the engine, I glued on the long tank as shown on the box art. I did not like the smaller one. Then the generator was attached and when dry, the photo etch generator belt was bent into shape. It needed to be trimmed a tad. The turret mount also has a photo etch piece that goes around it. It was also a teeny bit too long. This was cemented in stages to keep it from buckling too much. The shield was attached and it was painted white.
Next, the suspension was cemented in place along with the steering gear. This is not as simple as one would think and it took several tries to get it all together. The upper brackets were also glued in at this time. I will attach the skis at the very last. These are a loose fit so I should be able to get things properly aligned. I hope.
Moving to the front, the bracket for the light was cemented in place and later the light housing joined it. I then glued the engine in place. Fit was fairly good, though not as great as I had hoped it would be. Engine guards were then attached and left to dry.
 Meanwhile, I had painted the shovel and the spare prop. The photo etch bands were folded around the prop and both items were cemented into place. The door was then glued on in the open position. After painting the gun and mount, this was attached to the upper turret. I started building the figure holding the gun, but it soon became apparent that I not only did not have the skill to do the figure, but that it would not fit properly anyway so gave up on it. Decals were applied and an MV lens, # LS21 was installed at the front of the light housing. A bit of matte clear was sprayed on, being careful not to fog the windows, but enough to help the decals blend in.
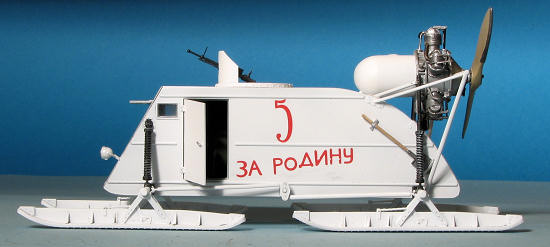
Last step was to attach the skis. I used a flat surface and glued them all on at once. I used Bill Koppos' suggestion about using a ruler to line them all up and that worked just great. My weathering sucks so I simply added some exhaust stains and left it go at that.
| CONCLUSIONS |
 Despite all the tiny etched parts, I generally had a good time putting this one together. One does have to go slowly with it to keep from making any major screw ups, but with care, it can easily be put together. Since the photo etch is fairly minimal compared to some kits, it would be a good exercise for those learning the craft. One thing for sure, this one sure does not look like anything else you will have on your shelves!
| REFERENCES |
http://en.wikipedia.org/wiki/NKL-26
November 2011
Thanks to Squadron Products for the review kit. Get yours today at your local shop or on-line retailer.
If you would like your product reviewed fairly and fairly quickly, please contact the editor or see other details in the