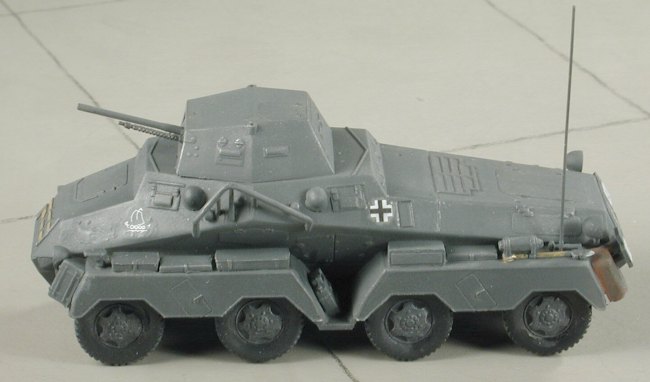
Roden 1/72 SdKfz 231 (8-rad)
| KIT # | 702 |
| PRICE: | $8.98 ($7.96 at Squadron) |
| DECALS: | three vehicles |
| REVIEWER: | |
| NOTES: |
| HISTORY |
Please visit the preview for more information on the 231 and a look in the box.
| CONSTRUCTION |
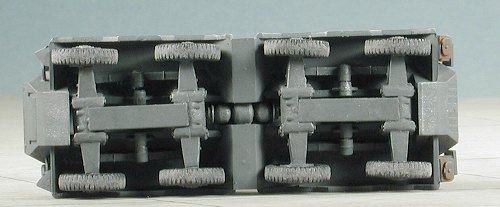
I haven't built much small scale armor in the last couple of decades. I've started several, but they've languished in the box unfinished for various reasons (mostly having to do with poor fit and a lack of motivation). It was with a touch of trepidation that I began on this one. As you may or may not know, I prefer soft skin vehicles when it comes to 'armor' subjects. You know, armored cars, trucks and field pieces. The last actual tank that I built was an Italeri 1/35 Patton back in August of 1988. When I looked into the box at all those teeny pieces, I thought that perhaps I'd started another kit that wouldn't be finished. Much to my delight, I found that I didn't have to spend most of my time sanding, filling and fixing things. The bits seemed to go together without a lot of unnecessary fussing. But I'm getting ahead of myself. There was a huge seam on the transaxles that needed to be sanded down and smoothed out. Much of this will be hidden once built, but not all of it. It was quite time consuming as the area to be done was rather small. While that dried, I moved on to the turret. This is a very simple construct. The gun goes through a flat mantlet. When that was dry, I fit it into the turret (a bit of trimming is needed to get rid of a touch of flash) and then the bottom glued in place. This lower section holds the mantlet and gun in place. The turret slots into the upper deck but you first much cut away the flash on the small tabs on the turret. Returning to the suspension, the differentials are paired and hooked together by a pair of leaf springs and a pair of attachment bars. There is also a short drive shaft that goes between them. It is a good idea to cut this shaft a touch longer than you think it should be as I found that I cut mine a teeny bit too short. This is a bit of a fussy construct, but I used the lower body to ensure proper alignment of the parts. I figured that if they fit where they will eventually be glued, all will be OK. There are two guide rails on the lower body. The attachment rails have to be OUTSIDE of those body guide rails. I did one set inside them before I realized my goof. There is a back section that MUST fit outside these guide rails so best to get them both the same. Once dry, There is a stiffening plate that goes between the two differentials. Mine were both a bit long, but a short session with a sanding stick fixed things right up. I did not attach the wheels at this time as I wanted to paint them before gluing them on. After all of that had been removed and replaced, the bits on the body itself were glued in place. Roden gives no spare bits so make sure that you don't lose any of them or it issayonara. Test fitting showed that they fit this time! It was now the time to take the various subassemblies and start gluing things together. Up to this time, the total construction has taken bits and pieces of two days. Really a quick build. Much of this is because there isn't any preliminary painting of parts. No filler, either. Armor kits with no interior that fit decently well eliminate a lot of steps that take time for things to dry (like paint and filler). I glued on the suspension pieces first. Had to do a bit of fiddling with the front one as it wasn't level (fiddling means that I broke apart some glue joins and redid them). The fenders fit just perfectly with no fuss. The turret was then snicked into place. I then figured where the lights would go and drilled some holes for them. Once drilled the lights were installed. They weren't exactly where the instructions would have them go, but they looked proper once done. Then it was time for some paint. CAMOUFLAGE & MARKINGS I had several choices for this one, but decided to stick with good old Panzer Grey. Though I had most of the bits glued on before painting, I'd suggest painting each of the subassemblies prior to gluing them together. It will make painting easier as having them all in one piece made it difficult to get paint to certain areas of the underside. I The first step is to build up four differentials. The half-shafts are designed in such a way that a really good modeler can have the wheels turn. This isn't me as I usually get glue into things somewhere along the build process. Holding the case halves in order to put in the half shafts and then glue on the other case half wasn't the easiest. I ended up holding the case half in two fingers with two others supporting the shafts. Then gluing the other case half. There are some wheel backing plates that were then glued in place. No positive locator for them, but positioning them wasn't difficult. I should mention that I broke several of the half shafts when removing them from the sprue with cutters. Use a very sharp and thin blade or saw with these fragile bits. The kit has a lot of them.
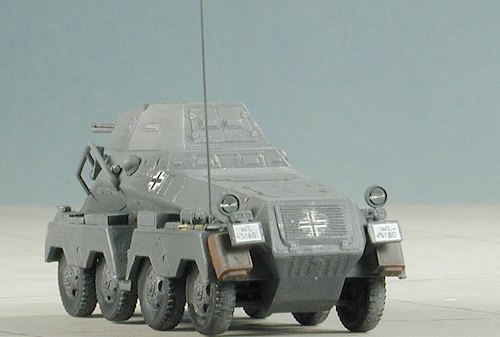 Next I started on the fenders. These have a bunch of very small bits glued on to them. Again, it is a time consuming task to remove all the various boxes and bits to glue them in place. Be very careful about which bits go on which side as they are not the same. Several times I caught myself gluing right side bits on the left fender and vice versa. The fenders are also where I had my biggest screw-up, but more on that a bit later. Tacking bits on was done in between working on other parts of the vehicle.
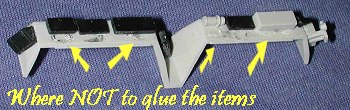 Back at the body, the upper and lower halves were glued. When dry, the join needed a touch of sanding to get rid of nipper marks and to smooth the join. At this time, I test fit the two fenders in place. They didn't fit!!!! YIKES!!! Apparently, I'd placed all the various boxes and bits too close to the inside of the fenders. As a result, the overhang of the body interfered. Why this wasn't pointed out in the instructions is beyond me as I can see lots of other people really screwing this up (except for you folks who are reading this review). I ended up having to cut off all the stuff atop the fenders and glue them close to the outside edge. Not a fun job and one that left really ugly marks on the inner fenders. Fortunately, much of that will be unseen when the fenders are in place. Still, I know it is there and I know the Penlight Police will zoom in on it at contests ("Gawd, Charlie. Come here and see what this idiot did. Bring the rest of the gang too..").
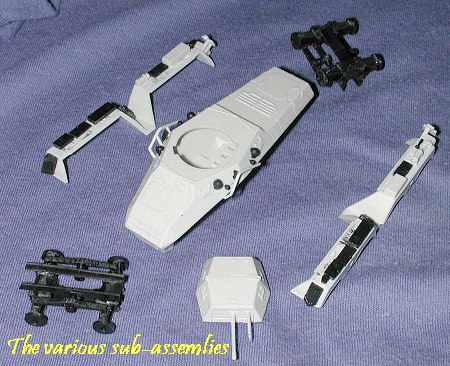 Moving on, I went to the body itself There are not a lot of bits for this, but you need to exercise caution. For one thing, the side guards are shown on the wrong side. Swap them or you'll never get them to fit. The helmets (pt A17) are shown fitting on the lower side, but I chose to put them on the upper portion as shown on the box art for fear they'd interfere with the fenders. Finally, the front and rear lights have no locator holes or any indication of just exactly where they fit. Instead of taking a guess and having problems with them regarding the fenders, I left them off until the fenders had been installed.
| FINAL CONSTRUCTION |
 The last bits to be added was the radio antenna made from a piece of piano wire and to have the wheels glued in place. Then I added a black wash to deepen some of the details and when dry, I drybrushed the entire vehicle with a lighter grey and a bit of aluminum. Then the wheels were painted panzer grey with tire black tires. I noticed that all of them had rather deep sink marks on the tire area. I could be filled and sanded, but would take some work. I put the decals on at this time, choosing ones from Norway in 1940. The decals are impervious to setting solutions. I tried Solvaset and they just sorta looked at me ("Is that the best ya got??").
I'd run out of Champ, so procured a new bottle just for these beasties. Imagine my surprise when I got my bottle home, opened the package and found a little slip of paper in there explaining that they'd reduced the potency of the product as too many people were complaining about how strong it was. It is now even weaker than Solvaset and for me, quite useless. Needless to say, I was in a bind. I tried an old trick of dabbing the decal with glue (the water-consistency type) and that helped quite a bit. I then applied the rest of them by making a 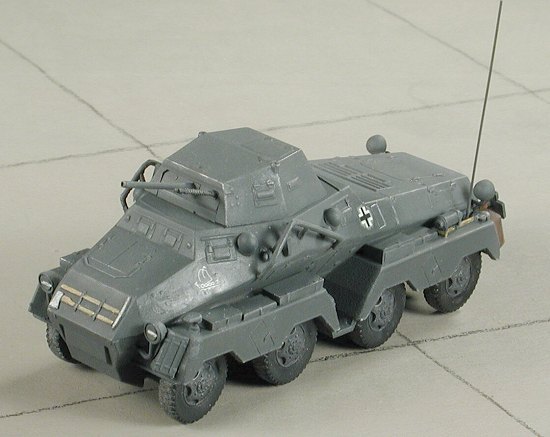 small puddle of clear acrylic paint (such as Future), placing the decal in it, and then applying more clear over the top of it. That worked fairly well, but wasn't ideal.
A coating of matte clear, a bit of more paint touch-up the addition of a radio antenna made from piano wire into a hole drilled in the rear fender and I was done. Imagine my delight when I found that most of the 8 wheels actually touched the ground! Needless to say, when displaying it in public, I'll have a base of ground cover to hide the one wheel up!
| CONCLUSIONS |
This really was a very nice kit. I found it generally easy to build and whole lot nicer than most of the new 1/72 armor kits from Eastern Europe. The quality of the molding is quite good and though there were a few spots where my inexperience with the genre got me into trouble, I found it a pleasant and relaxing experience, especially after building a number of short run kits! It is a kit I can really recommend to all but the bare beginner.
Thanks to the fine folks at  for the review kit. Visit them by clicking on the logo.
April 2003
If you would like your product reviewed fairly and fairly quickly, please contact the editor or see other details in the Note to Contributors.