PJ Production 1/72 Chevrolet Utility
| KIT #: | 72205 |
| PRICE: | €11.90 from www.pjproduction.net |
| DECALS: | No options |
| REVIEWER: | Scott Van Aken |
| NOTES: | Resin with vacuformed windows |
| HISTORY |
Over the years, it has not been uncommon for the military to buy what is basically off the shelf equipment. While this rarely extends to materials used in direct combat, often times what is produced for the civilian market can easily be adapted for military use.
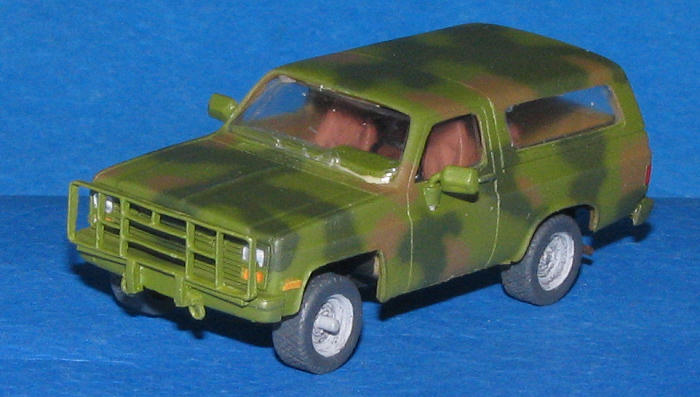
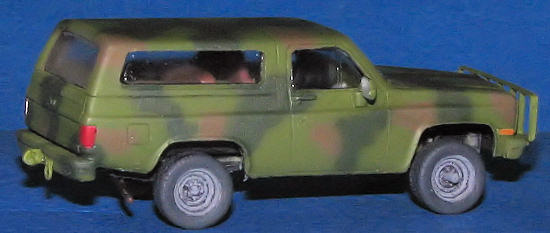 The use of what we now call SUVs is one that has gone back for many decades and so it is with the Cheverolet Blazer two door. This kit is a four wheel drive version with a large grille guard and the addition of tow hooks. Aside from that, it looks very much like a civilian Chevy Blazer of the late 70s/early 1980s. I'm sure a reader can pin-point things a bit better than I.
These vehicles were found just about anywhere that the US military was operating at the time. Though the Army (both active and reserves) was probably the greatest operator of the type, I've seen these painted Insignia Blue and used by the USAF as well as in battleship grey and used by the NAVY/Marines.
| THE KIT |
The PJ Production kit is very nicely molded in a tan resin. Aside from one 'open' tow attachment, I saw no problems with air bubbles and the detail is excellent. There is the usual resin flash, but it should be a breeze to remove. You get a full body and the interior is mated with the main chassis components. This makes final assembly easy as you can paint the body separately from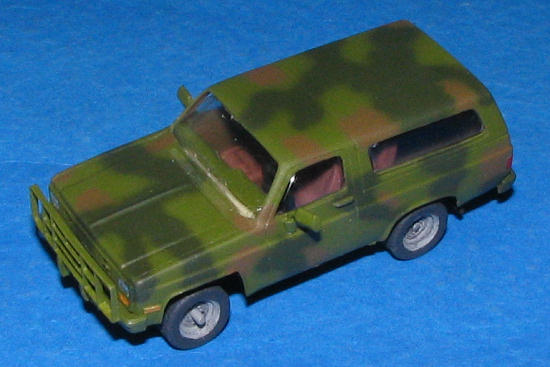 the rest of the kit. The interior includes a nicely done dash, steering wheel, high-back front seats and a nice rear bench seat.
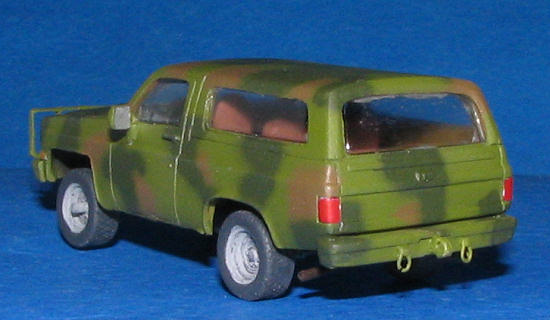
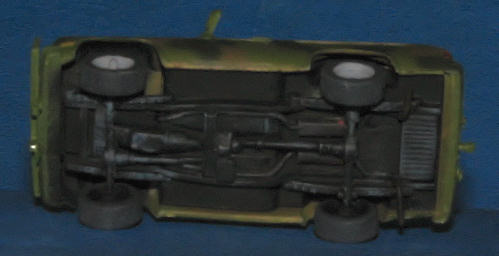
The suspension includes both transaxles and drive shafts along with tailpipes. A tow pintle and four smaller hooks are included as well as a nicely done grille guard and the two large side mirrors. As this vehicle has those rectangular headlights, it won't be possible to use aftermarket lenses in this one unless someone has recently developed some. The vacuformed windows are nicely done and some rough test fitting showed no problems with fit.
Instructions are on a small sheet with four basic construction steps and any interior colors specifically mentioned. On the other side is a full-color paint chart which is basically two greens and a brown. I'm sure that most will either brush paint this scheme or do some rather intensive masking! The sheet also includes Humbrol, Gunze, Tamiya and FS 595 color information.
| CONSTRUCTION |
Step one with any resin kit is to remove bits from the sprues and clean them up. In this case, both are quite easy and I used a sharp hobby knife and sandpaper as my only tools. The seats took quite a few swipes with the knife as the attachment is a bit 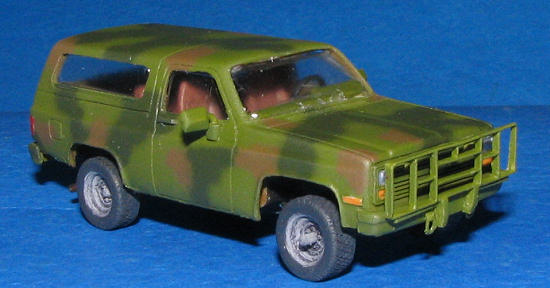 thicker on those. I wet sanded the grille guard until the resin flash fell out of the guard. Much easier than trying to cut them out. Some of the wheels hade some holes where the resin pour stubs were attached so I'll have to be sure those are either up in the wheel wells or on the bottom.
Test fitting the lower chassis to the body showed that the match wasn't perfect so there will probably be some grinding and sanding needed for a good match. The front seats will need the back hinges trimmed at the bottom to fit into the slots provided for them. At this time, I glued in the front and back seats as well as the instrument panel. The panel needed to be trimmed at the back to fit properly into the slot in the interior section. Though early in the build, now is a good time to paint the body. Yes, there are some bits to be added, but those can be done later and the paint touched up. This is a light truck so won't have a perfect paint scheme anyway.
| COLORS & MARKINGS |
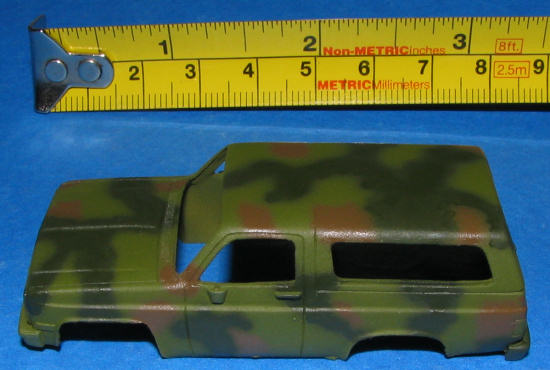 The body consists of three main colors. According to the instructions, most of it is FS 34151, which happens to be the same shade as Testors US Interior Green, so that was sprayed on first. Then the other colors, FS 30118 brown and FS 34079, were mixed water thin to be sprayed on by mySkybow AB-100 detail airbrush. This airbrush is a gem and I can say that I'd not be able to do this with just any airbrush.
As I mentioned, the paint is water thin and the air pressure at about 5-7 psi. Both the Green and Brown are not easy shades to paint in any case, but after about 15 minutes with each shade, I was done. Since I use lacquer thinner with my enamels, I only had to wait about 2 hours between colors so was able to do this in one day. The kit instructions provide an excellent guide.
 Back at the bench, I removed the transaxle pieces and glued the wheels to the end of the axles. Test fitting showed that the drive shaft for the rear drive was a touch too short. However, it wasn't impossibly short. When I did glue the transaxle assemblies in place, I was able to fill the gap with superglue. The front axle fit perfectly and there is an indentation for the drive shaft in the transfer case. No gluing of the forward shaft was needed. I did make darn sure all four wheels hit the ground when cementing the transaxle assemblies in place.
 While that dried, I added the additional bits to the body. This included the rear tow hitch, four tow cables and the rear view mirrors. I used a #68 drill bit to drill a shallow indentation in the mirror mounts on the door before gluing the mirrors in place. On the underside, the two exhaust were drilled out using a #75 bit and then cemented in place.
Then the interior was painted a medium brown and the underside was painted flat black. The medium brown was also painted on the inside of the body. Though there is no door panel detail, you'll see the insides through the vac windows.
| FINAL CONSTRUCTION |
 Next step was to do the required touch up painting on the body. First the side mirrors were painted with the light green of the rest of most of the body. Then tail lights, side lights and head light areas were painted gloss white. The headlights got some Humbrol shiny Aluminum while the side lights and tail lights got Vallejo transparent orange or red. The tires were painted Weathered Black from Floquil and the wheels got a generic medium grey.
Back to the interior, the vac windows were cut out and installed using standard white glue. When that had dried, I started test fitting the chassis. I found that the fit was not square and so I sanded a bit of the rear quarter until I could get things to fit better. The steering wheel was installed, the dash dry brushed and a dark wash was applied to the seats. The last thing I glued on was the grille guard. Then the chassis was glued in place. Not an easy job as alignment was still not great. I had to sort of hold things in place while the super glue set. I also sadly noticed that I'd not painted enough of the back of the dash as I saw raw resin. With the chassis firmly super glued in place, it was too late to do anything about it now. I dry brushed the chassis with some medium grey and that was it.
| CONCLUSIONS |
 This really is a neat little kit. Though I did make a few goofs, now you know what they are, you should be able to avoid them. I'd recommend doing any sanding and scraping on the chassis/body at the very beginning to ensure a good fit. It also may have been that I didn't trim enough plastic from the windows and those could have interfered. Anyway, it looks great and will make not only a super diorama accessory, but a fine little kit on its own. What's more these are still being used in the US. I passed one on the road just yesterday!
My thanks to PJ Production ![]() for supplying the review kit. You can order direct from the hyperlink.
for supplying the review kit. You can order direct from the hyperlink.
If you would like your product reviewed fairly and fairly quicklyh, please contactthe editor or see other details in the