SpaceMonkey Models 1/24 V-2/A-4 rocket
| KIT #: | 1 |
| PRICE: | $59.98 from www.spacemonkeymodels.com |
| DECALS: | Four options |
| REVIEWER: | Scott Van Aken |
| NOTES: | New tool kit |
| HISTORY |
The V-2 rocket (German: Vergeltungswaffe 2, i.e. reprisal weapon 2), technical name Aggregat-4 (A4), was a ballistic missile that was developed at the beginning of the Second World War in Germany, specifically targeted at London and later Antwerp. The rocket was the world's first long-range combat-ballistic missile and first known human artifact to achieve sub-orbital spaceflight. It was the progenitor of all modern rockets, including those used by the United States and Soviet Union space programs, which gained access to the scientists and designs through Operation Paperclip and Operation Osoaviakhim.
The weapon was presented by Nazi propaganda as a retaliation for the bombers that succeeded in attacking ever more German cities from 1942 until the end of the war.
Over 3,000 V-2s were launched as military rockets by the German Wehrmacht against Allied targets during the war, mostly London and later Antwerp. The attacks resulted in the death of an estimated 7,250 military personnel and civilians, while 12,000 forced laborers died during the production of the weapons.
Postwar:
Operation Paperclip recruited German engineers and Special Mission V-2 transported the captured V-2 parts to the United States. At the close of the Second World War, over 300 rail cars filled with V-2 engines, fuselages, propellant tanks, gyroscopes and associated equipment were brought to the railyards in Las Cruces, New Mexico, so they could be placed on trucks and driven to the White Sands Proving Grounds, also in New Mexico.
In addition to V-2 hardware, the U.S. Government delivered German mechanization equations for the V-2 guidance, navigation, and control system, as well as for advanced development concept vehicles, to U.S. defense contractors for analysis. In the 1950s some of these documents were useful to U.S. contractors in developing direction cosine matrix transformations and other inertial navigation architecture concepts that were applied to early U.S. programs such as the Atlas and Minuteman guidance systems as well as the Navy's Subs Inertial Navigation System.
 A committee was formed with both military and civilian scientists to review payload proposals for the reassembled V-2 rockets. This led to an eclectic array of experiments that flew on the V-2s and paved the way for American manned space exploration. Devices were sent aloft to sample the air at all levels to determine atmospheric pressures and to see what gases were present. Other instruments measured the level of cosmic radiation.
Only 68 percent of the V-2 flights were considered successful. A supposed V-2 launched on 29 May 1947 landed near Juarez, Mexico and was actually a Hermes B-1 vehicle.
The U.S. Navy attempted to launch a reassembled German V-2 rocket at sea—one test launch from the aircraft carrier USS Midway was performed on 6 September 1947 as part of the Navy's Operation Sandy. The test launch was a partial success; the V-2 went off the pad, but splashed down in the ocean only some 10 km (6.2 mi) from the carrier. The launch setup on the Midway's deck is notable in that it used foldaway arms to prevent the missile from falling over. The arms pulled away just after the engine ignited, releasing the missile. The setup may look similar to the R-7 launch procedure, but in the case of the R-7 the trusses hold the full weight of the rocket, rather than just reacting to side forces.
The PGM-11 Redstone rocket is a direct descendant of the V-2.
| THE KIT |
When I was contacted by Space Monkey Models about this my interest was immediately piqued. I've built V-2s in several scales and have always been fascinated by it, despite its nefarious history. Probably about as aerodynamic a shape as one can get, the V-2 kits produced have had rockets that were quite easy to assemble and this one is no exception from the look of things.
Ok, it isn't a snap kit by any means, but the parts are superbly molded and the assembly is very well thought out. The main body of the rocket is made of blown styrene with all the external detail one could hope for. One simply saws off the upper and lower globes to start construction. There are five additional sprues of translucent white plastic to take care of the nose cone, fins and various vents and vanes. These parts are also superbly molded and test fitting a pair of fin halves shows that they fit very well.
The detail on this kit is mostly raised detail because that is the way the real V-2 was. In addition to the fins, there are steering vanes, nose tips and various vents. There is also a piece of styrene rod. This is to be used to cut small discs for the upper/lower rocket body attachment area, which was held with fasteners. The set includes a guide strip that one wraps around the rocket body with the placement of each fastener shown on the strip. Sounds complex, but really, it is super simple and quite easy. Just as an idea of the size, the main body, minus the upper and lower globes, measures 18 inches. Adding the fins and nose cone will take this pretty close to 2 feet.
 Instructions are superbly done and include a bunch of photos of each step of the construction. The folks at Space Monkey Models want to be sure you have no problems assembling this kit. There are markings for four rockets and the painting and markings guide for each of them is in full color. There are two museum vehicles; one from the USAF Museum in a splinter camouflage and the other from the Imperial War Museum in an overall olive green. Two others are of historical significance. One is the Operation Sandy missile that was launched from the USS Midway. The other is a 'billboard' missile that was used as a gate guard at White Sands for many years and has since been restored for the White Sands Missile Range museum. The decals are superbly printed by Cartograf.
Of course, one is not limited to the decal sheet for this kit. If you can find a photo of one, then you can paint it in that scheme.
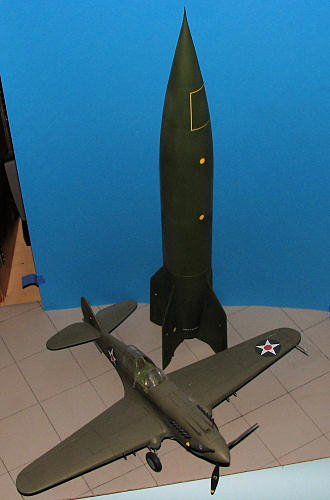
Also included in the kit for inspiration and reference is Rocket Aero's new DVD on the V-2/A-4 in America that will be reviewed separately. As you can see from the image to the right, along with the Vintage 1/24 P-40B, it is not a small model.
| CONSTRUCTION |
SpaceMonkey Models does have a superb instruction sheet, but like most who think they know more than the designers, I started off on my own. First step was to collect all the bits that had fallen off the sprues and put them into a zip bag. I then cut off the fins and put those remaining bits that were still sprue-bound into the same zip bag along with the decals.
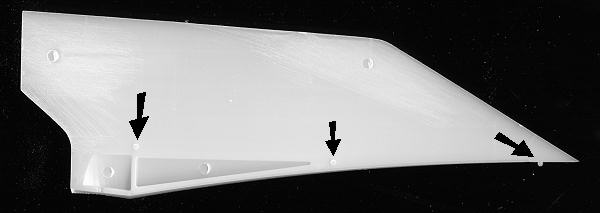
Then I removed the ejector towers and sanded down the inside of the fins. Here is the first warning to you. Don't sand off everything. There are two shallow pins that fit into shallow holes on the fin halves. Leave these. Also do not remove the small tab that is on the upper portion of each fin. These will fit into holes you'll drill in the body of the rocket. The image below shows the three things to leave alone. you can see where the ejector towers were. Those inside the indentations will not be an issue.
Once all the fins were prepped, the halves were cemented together and the fins set aside to allow the glue to cure. In the meantime, I sawed off the two globes from the end of the body. Then the openings were sanded with coarse paper until the nose and the tail section fit inside with ease. The instructions stated that the tail section will need to be somewhat loose so that it can be rotated. I also made the nose cone opening a bit loose as well. Then the nose cone was glued in place. There is a small step between the nose and the rest of the body with the nose being a tad smaller than the join line. Nothing major and once I sand on it, the step should disappear. This was also set aside to dry.
Back at the fins, the edges were sanded and I used some thick super glue on the bottom of the fin as the fit there is good, but the ends don't match completely. After some accelerator, that was sanded down. Back at the main body, the nose section had some sanding done and some filler put around the cone.
Now, to attach the fins, the instructions suggest blackening some small alignment dots, then using those to help properly line up the fins once the lower insert is placed. This insert will be turned to properly align the fins. There are lines on the fuselage to help this. So, looking at it, I was wondering if there might not be a better way to do this as my alignment skills are not good.
If you recall, on the fin, I suggested not removing the little tab on the front inside of the fin. These tabs, I thought, might fit into holes drilled through the alignment dots. So I drilled out the alignment dots using a #41 drill b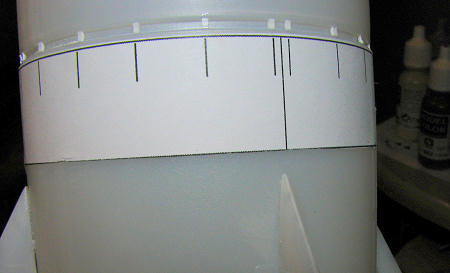 it (actually started much smaller and worked up to that size). Then I inserted the lower insert and it seems that things fit rather well. The fins may well need to be down a bit lower as they don't fill the slots in the lower insert, but all the rest of the parts seem to fit well and I'll go with that on this one. I also noticed that the lower insert doesn't totally align with the four alignment stripes on the rocket body. I can get two sides to line up but the other two are off. Since they are covered by the fins, this may not be an issue. Just be advised that you do have to take care in this part of assembly.
Next was the installation of the 24 small fasteners. These are to be cut from a half round rod into approximately 1mm sections. There is a guide that is supplied which one tapes just under the large circumferal seam and lines up with the fins. This shows the place where these small pieces go. I installed mine flat side up. They did not fit all the way down into the seam. Attaching them was a bit of a challenge as they are so small. I probably lost as many as I glued, but you are given a lot of rod so no worries there.
 Finishing that task, I glued two of the small radio antenna halves together. These are quite small and since the slot is angled, be sure only to remove them from the sprue as needed. I also cleaned up the vents that would be attached to the lower section. These were then glued in place using both the kit instructions and the reference as well as the DVD to determine which went where.
| COLORS & MARKINGS |
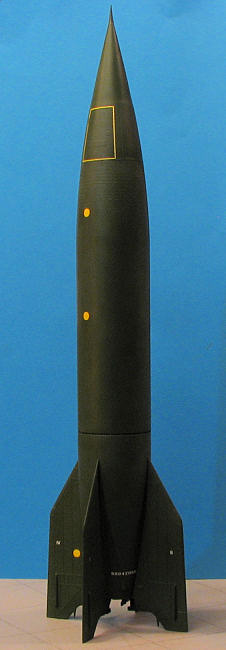
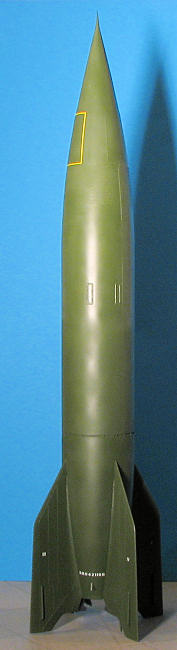
With all of that finished, it was time for paint. Decision time in regards to camouflage scheme and being the weasel I can be, I decided on the later war version all in one color. First, I painted the nozzle vanes with Weathered Black from the Floquil range. These items were pressed carbon and probably black, but very dark grey works well too. Now for the outer color. I wanted to do the late war V-2. The instructions called for Tamiya X-5 or equivalent. Well that is a green that matches Humbrol #3 and FS 14062 and to be honest, I don't think that was the proper shade. In SMM's defense, the color they recommend matches the one on display in England. I just chose the one in the V-Missiles reference book which, using period documentation, calls for RAL 6003 for the final camouflage color and that matches over to Humbrol #117, which is FS 34102. Those with more enthusiasm will want to give one of the other schemes a go.
Painting the rocket took most of a tinlet of Humbrol paint and several days, as much because of the size of the beast and the fact that only a portion of it would fit into my paint booth at any one time. Had to let the previous stuff dry enough to handle before moving on. Then the usual back and forth to fix things. I also painted the nozzle area with Burnt Iron from the Alclad II line. I also tried masking off the upper nose panels and painting them light yellow as suggested in the instructions, but was not pleased with several attempts so just painted over it. I eventually used yellow decal stripes to accentuate a couple of these and while not really pale enough, adds some interest to what is basically a single-color project.
| FINAL CONSTRUCTION |
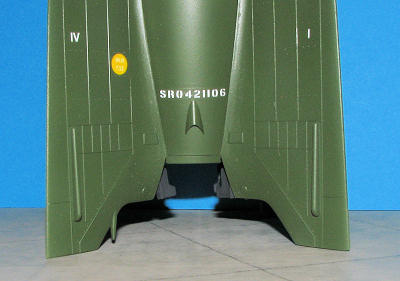 With the rocket finally painted, I tested an unused decal to see how well it would work with Solvaset when applied to a matte surface. It was a mess so I used Future to gloss up the areas where the markings would fit. With the spots slicked up, I started applying the decals as shown in the instructions. Something I noticed is that the serial number decals tend to look like they are curving up on both sides. You see, the area they are placed is conical and the decals are not so shaped, hence the tendency to curve upward on the ends. A couple of additional dabs of setting solution to take care of silvering, and the rocket was given a coat or two of semi-matte clear. The final step was to glue on the control vanes. The canopy was unmasked and that was it....no...wait....It was not weathered as it was the unit commander's plane....ummm..and that was it.
| CONCLUSIONS |
I have to say that I'm pretty pleased with the finished results. The kit is not really difficult to build, just big, and the DVD is a real bonus as it provides a great reference and is fascinating to watch as well.
| REFERENCES |
April 2011
Thanks to www.spacemonkeymodels.com for the review kit. Get yours direct from the link.
If you would like your product reviewed fairly and fairly quickly, please contact the editor or see other details in the Note to Contributors.